
Removing Red-Eye with The GIMP
With the abundance of low-cost digital cameras and scanners available these days, more and more Linux users are looking to the popular, open-source GNU Image Manipulation Program (The GIMP) when editing their digital images. This article describes a simple technique for eliminating the dreaded “red-eye” from your candid flash photos using The GIMP.
First, a little background on red-eye—what causes it and what you can or can't do to avoid it. You can see a good example of red-eye in Figure 1. The little girl's red eyes are not the product of staying up late and reading LJ; it's a result of an ordinary flash from a digicam. It's important to note that red-eye occurs only under a particular combination of circumstances: the camera is within a particular range of the subject, the subject is looking toward the camera and the flash is close to the taking angle of the lens. The problem is caused by the intense directed light of the flash reflecting off the retina in the back of the eye, straight back into the camera lens. The color is red because the light is filtered through the blood capillaries in the eyes. For a more detailed explanation, see the one offered in the “How Stuff Works” series (www.howstuffworks.com/question51.htm).
If you must take a flash photo because of dim lighting, you can do several things at picture time to reduce or eliminate red-eye and avoid having to edit the image later.
Move the flash farther off axis from the picture-taking angle, so the reflected angle is changed (e.g., using a flash bracket or remote trigger).
Bounce the flash (e.g., off of a white ceiling).
Move closer or farther away from the subject.
While all of these are effective at reducing or eliminating the red-eye effect, they are, unfortunately, not viable options for the casual shooter. For one thing, the flash on most consumer cameras is not designed to allow bounce flash and is fixed very close to the lens because the camera is designed to be compact. Furthermore, changing distance is not always an option because of the low power of the built-in flash unit, the constraints of the photographer's position, the lens' zoom limitations or other issues.
Most cameras sold in the last several years have a “red-eye reduction” flash mode. Why not just use that? The red-eye flash mode works in most cases by firing the flash repeatedly at one or more low-power settings before opening the shutter and firing the final full-power flash. The preflashes cause the subject's pupils to close down, thus providing a narrow exit channel for the reflected light, thus “reducing” red-eye. Unfortunately, it often also causes the subjects to grimace as their eyes, adjusted to a darkened setting, respond to the sudden intrusion of intense light. As a result, in many shots taken with red-eye reduction mode flash, the subjects have a “deer caught in the headlights” look, have their eyes closed or are squinting. So it seems impossible in many situations to avoid red-eye if you want a decent candid flash photograph. Here is where The GIMP comes to the rescue.
The technique I describe allows you to retain as much of the all-important tonality (shades of lightness and darkness) of the different areas of the pupil. Also, it preserves the catchlight (the reflection of light off of the cornea over the pupil that gives the impression of life and vitality in the subject).
Most of the menus in The GIMP are accessed by clicking the rightmost mouse button in an image window. In the description that follows, a right-click is abbreviated RC. If I describe a GIMP action that needs to be invoked, I mention the series of menus or a keyboard shortcut in parentheses. For example, open the image (RC-->File-->Open), means right-click in the image window and choose File and then from that menu choose Open. If a keyboard shortcut makes more sense, I'll list the combination of keys to press. For instance, copy the image (Ctrl-C) means press and hold the Control key and press C.
Here's the technique. Start The GIMP and load your red-eye image (RC-->File-->Open), as shown in Figure 1. Once you've got your image loaded, zoom in close on the eyes (by pressing + a couple of times and scrolling as necessary) so you can get a good, large view of the red pupils, as shown in Figure 2.

Figure 1. Sweet Little Girl—Or Devil Child?
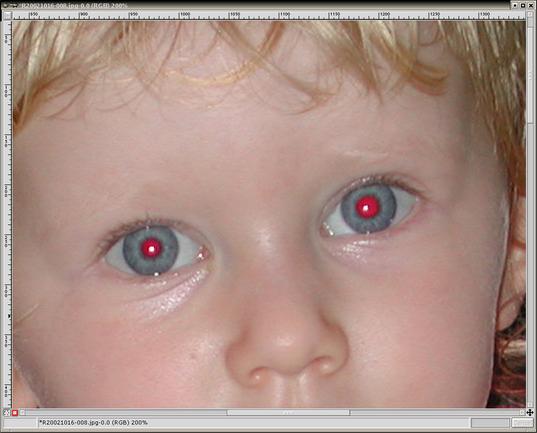
Figure 2. Close-up of the Pupils to Be Fixed
Next, we want to select only the pixels that constitute the pupils of the subject's eyes. There are a number of ways to go about this, but one I've found that seems to work fairly well is the fuzzy select tool, also known as the “magic wand”. The fuzzy select tool works by selecting contiguous areas of color/tone. By this we mean areas that differ by no more than a certain threshold in actual pixel values (that's where the “fuzzy” part comes in; we can control the threshold).
The fuzzy selection tool works best in areas of the image where contrast can be maximized between the desired selection and the rest of the image (in this case the pupil and the iris). All images in RGB mode (the normal mode for most color images) are made of three channels: red, green and blue, each containing pixel values for the entire image. If you examine these channels individually, you will usually find that the green channel has the most contrast for fuzzy selection of the pupils.
Bring up the Layers dialog (Ctrl-L) and click on the Channels tab. Then deselect the Red and Blue channels. The Layers dialog should look like Figure 3, with only the Green channel highlighted. We haven't turned off the visibility of these two channels, so the image window won't look any different. But by selecting only the green channel, our fuzzy select examines only the green channel pixel values in deciding which adjacent pixels to select.

Figure 3. Color Channels in the Layer Display
Now double-click on the fuzzy select (magic wand) tool in The GIMP toolbox window to see the tool options. You'll need to experiment with the Threshold setting, but generally you'll want to increase it from the default. Try the value I used here, shown in Figure 4. You also should check the Feather option and give it a small amount, as shown.

Figure 4. Increasing the Threshold
Now click on the red part of one pupil in the image. You should see it select most of the pupil with a “marching ants” outline. If it doesn't, clear the selection (Shift-Ctrl-A), increase the Threshold value slightly and try again. Conversely, if areas outside the pupil are selected, clear the selection, reduce the Threshold and try again. Another possibility is to use the Grow Selection (RC-->Select-->Grow) and Shrink Selection (RC-->Select-->Shrink) dialogs to slightly enlarge or decrease the selection if it looks mostly right, but you are a few pixels off either way.
Once you've got a decent selection on one pupil, hold down the Shift key and click on the red part of the other pupil (holding Shift during a selection adds to the current selection). At this point you should have both pupils selected, as shown in Figure 5.
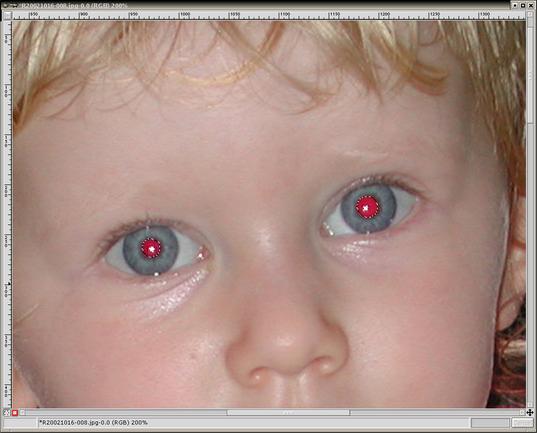
Figure 5. Both Pupils Selected
Tip for advanced GIMP users: if you know about quick masks, you can fix up an imperfect selection here. Click on the quick mask button, apply a few appropriate paint strokes with a small, fuzzy brush, and then go back to selection mode.
Now go back to the Layers dialog, select the Red channel and deselect the Green. Once you've verified that only the Red channel is selected, desaturate the selection (RC-->Image-->Colors-->Desaturate).
Now it's time to evaluate your results. Press Ctrl-T to toggle the visibility of the selection off; the “marching ants” around the pupils should disappear so you can get a better look. It is important to realize that the selection is still active, just invisible. If you forget to toggle it back on, you can easily forget that you have a selection on the canvas, which can make further edits rather confusing.
When you are satisfied with the results, toggle the selection visibility back on (Ctrl-T), deselect everything (Ctrl-Shift-A) and zoom out (-) to see your handiwork in the unzoomed view and to make further edits. If you are unsatisfied with the result, toggle the selection visibility back on (Ctrl-T) and undo (Ctrl-Z) back to the point where you can make changes in the selection or rectify the problem with some other approach.
I have to mention one variation on this technique that I think gives slightly better results. It requires that you have the Channel Mixer plugin activated in your version of The GIMP.
The Channel Mixer is a great plugin for converting color selections or entire photos to black and white, as it gives you a lot more control over the process than the Desaturate or RGB-->Grayscale conversions. The Channel Mixer wasn't part of my stock Red Hat-based GIMP 1.2.3, but I found it at The Gimp Plugin Registry (registry.gimp.org). Simply compile it and drop it in the .gimp-1.2/plug-ins folder in your home directory.
In this variation you do everything as I mentioned above, but instead of the final step of desaturating the red channel, you (re)select all of the channels and bring up the Channel Mixer (RC-->Filters-->Colors-->Channel Mixer). The Channel Mixer allows you to mix the RGB values in different percentages. Check the “Monochrome” box and mix down the Red channel significantly and boost Green. I use settings of Red 10%, Green 60% and Blue 30%, as shown in Figure 6. You may need to experiment to see what gives you the most realistic pupils for your photo subjects, but this is a good starting point.

Figure 6. Customized Channel Mixer RGB Values
When you have the mixer settings to your liking, click OK. If you're not sure you like the result and want to try another mix, Undo (Ctrl-Z), toggle the selection visibility back (Ctrl-T) and run the same filter again (Shift-Alt-F). You can see the result of running the Channel Mixer in Figure 7: the pupils look good and dark, with gentle changes in tonality around the edges and a good-looking catchlight in each eye. As before, once you're satisfied with the result, toggle the selection visibility back on (Ctrl-T), deselect everything (Ctrl-Shift-A) and zoom out (-) to see your handiwork in the unzoomed view. Figure 8 shows the final result using the Channel Mixer variation.
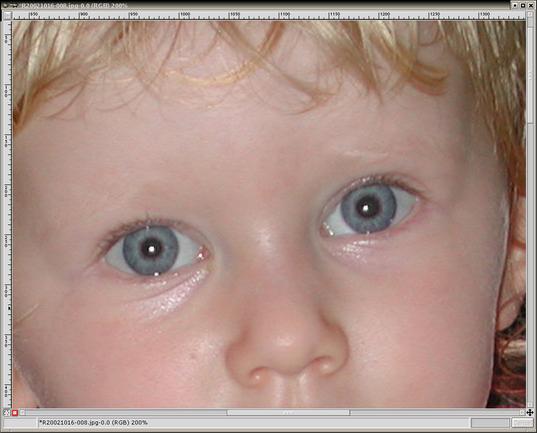
Figure 7. Pupils That Look Human, Thanks to Channel Mixed
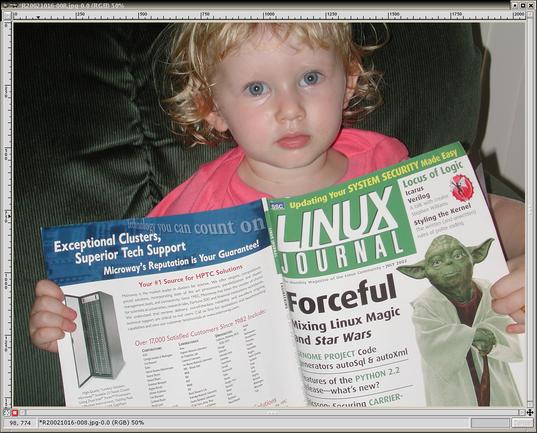
Figure 8. The Final Channel Mixed Photo
This technique may seem slightly involved at first, but it takes only a couple of minutes once you have the hang of it. Best of all, the results are excellent, especially when printed on a high-resolution photo inkjet printer. Throw this technique into your bag of GIMP tricks, and you'll never again have to worry about red-eye ruining your candid flash photos.
email: jeschke@mano.uhh.hawaii.edu
Eric Jeschke (eric@redskiesatnight.com) holds a PhD in Computer Science from Indiana University and has worked as a software engineer, university professor and freelance consultant. He lives in Hawaii with his wife, kids and an overweight cat. Eric enjoys his family, outdoor adventures, taking photographs and running Linux.
