
Installing Red Hat 7.3 on a Compaq Presario 711CL Laptop
The Compaq Presario 711 is a nice upgrade from my 475MHz AMD desktop system. The configuration I recently bought from Costco.com includes too many features to list here, but it has more than two times the power that my desktop system has and includes a FireWire port and an 8x DVD drive. The pre-installed version of Windows XP wasn't a big selling point for me, though; I wanted to use Linux on my new laptop.
Linux has made great progress on desktop systems. Installing a modern operating system like RH 7.3 on a desktop is almost easy enough for Aunt Minnie, as Jerry Pournelle likes to call the everyday computer user. But laptop installs are a different matter. The hardware on laptops is less generic than what's on the desktop, but with the move to ATX-style motherboards with integrated peripherals, this has become less of a problem.

The Presario Laptop
The first step toward Linux freedom on my new Presario was a basic install of Red Hat 7.3. For me this consists of selecting a laptop install from the friendly GUI installation manager, and then going through the package list to remove everything but the bare essentials needed to get X and the development tools up and running. The only real issue with the installer is that it doesn't auto-detect the video chipset the Presario has, which is a variation of the Savage chipset called Savage Twister K. So you have to manually select “Savage” from the list of video drivers presented during the install.
Once I have the basic setup installed and running startx from a shell prompt, giving me a nice plain X screen, I copy over all the Red Hat CDs to a new directory named /RPMS/. I find this makes life much easier when I discover something missing from the system. I can install it in a few seconds, and I don't have a lot of the extra baggage that modern distributions bring to clutter up the hard drive. With a 20GB drive available, there is no reason not to install 2GBs of RPM packages so that you will always have them available.
I use Window Maker as my window manager, and I don't install GNOME or KDE and their associated load of cruft. This has become somewhat of a crusade for me lately; when I upgrade my hardware I actually like to see my applications run faster instead of running bigger applications at the same speed as before (or, in some cases, slower). I see a strong trend in the GNOME and KDE communities toward feature bloat, which ends up negating the increases in processor speed and available RAM.
But that doesn't mean you have to follow my heretical habits. One of the greatest benefits of using a liberating operating system such as Linux, and all of the associated programs, is you can mix and match the packages to suit your tastes. The changes I am going to describe will work equally well on a stock GNOME- or KDE-based Red Hat install, if that's what you use. So, on to the tweaks we need to make to get your Linux laptop up to snuff.
One of the first things I'll cover is the fact that the basic Red Hat 7.3 will install and run on the Presario, but the correct power management system isn't enabled. The Presario, as well as an increasing number of newer laptops, uses the ACPI power management interface instead of the older APM system. Because of this, you will notice the processor and fan run at full blast, trying to do their own version of the Chernobyl disaster while sitting on your lap.
As I write this on my Presario, it is running X, OpenOffice.org, the xine DVD player and a number of Window Maker docking apps. The CPU usage is hovering around 30%, the fan is on low and the laptop is a comfortable temperature. Without ACPI working it can get very hot, to the point where it's uncomfortable to hold it on your lap.
In addition to power management, the sound card has to be dealt with, as does one of those wonderful LinModems and the lack of RS-232 serial ports. As an added bonus, I'll tell you how to play your favorite DVD movies while still getting work done.
One subject that I won't cover is software suspend. Patches are available that are reported to work for some people. I didn't have any success when I tried applying them to my kernel, and there were too many differences for me to attempt to hand-patch. Because of the nature of software suspend, I am reluctant to try and shoe-horn it into my kernel myself; I'd rather wait until a well tested version makes its way into the kernel tree.
The most important of the modifications outlined above is power management. Modern laptops depend on the operating system to correctly interface with the hardware power management system. Older laptops used a system called APM, while newer laptops are starting to use the ACPI system instead. As I mentioned before, the default Red Hat 7.3 install has APM power management enabled instead of the ACPI power management system that the Presario uses. There is an ACPI system included in the 2.4.18-4 kernel, but it is somewhat outdated and doesn't provide the /proc/acpi interface required by wmacpi. The latest ACPI patch as of this writing is acpi-20020726-2.4.18.diff. It provides a better /proc/ interface to the status of the machine and the state of the battery. This patch is available from acpi.sf.net, but read on before you run off and try to patch your kernel.
As luck would have it the new ACPI patch doesn't apply cleanly against the Red Hat kernel-source-2.4.18-4 RPM packaged source tree. A considerable amount of hand-tweaking is needed to get the kernel to compile correctly after applying the patch. You also need the kacpi patch, which fixes a problem the Presario has with losing track of ACPI interrupts. This patch is available from Juliusz Chroboczek's excellent web page (see Resources). If this patch isn't included, the kernel will miss interrupts and ACPI power management will be disabled. I modified the kapcid patch a bit so that it wouldn't report the missed interrupts—there were so many of them that it was filling up my logs.
Instead of talking you through all the tweaks I made to get the new version of ACPI working, I have provided a complete patch that handles all of the issues I cover in this article, which can be downloaded from my web site at www.brianlane.com. This patch will apply cleanly against a standard Red Hat 2.4.18-4 kernel tree, so here is how to patch your kernel (it isn't as hard as you may have been led to believe).
Let's get started by installing a clean RH 7.3 kernel with the following commands:
rpm -Uhv kernel-source-2.4.18-4.rpm
cd /usr/src/linux-2.4/
cp configs/kernel-2.4.18-athlon.config .config
Then apply my patch to the kernel tree:
patch -p1 < /tmp/2.4.18-4presario.patch
And configure the kernel for ACPI support with make xconfig.
Go to general setup, deselect APM support and select ACPI support and type y for all the ACPI options except “CPU Enumeration Only”. Save and exit the kernel configuration, and then build and install the kernel:
make dep; make clean; make bzImage
make modules
make modules_install
make install
This will create the new kernel, called 2.4.18-4acpi, install it into /boot, create an initrd and update the bootloader (Grub in my case).
If you are feeling adventurous, you can edit /etc/grub.conf (or LILO, if that's what you're using) and select the new kernel as the default. But always keep a spare around, just in case. Reboot your machine, and make sure that there is now a /proc/acpi directory tree. Look at /proc/acpi/battery/BAT0/state to see the current state of your battery. Mine, for example, looks like this when running from the battery:
present:                 yes
capacity state:          ok
charging state:          discharging
present rate:            12565 mW
remaining capacity:      47463 mWh
present voltage:         16145 mV
I use the Window Maker window manager, so my choice for battery monitoring is the excellent wmacpi utility from timecop (see Resources section). It shows the current state of the AC plug, the battery charge level and a timer that estimates the remaining time left on the battery. It also reports when the battery is charging and has a button that switches the display between time remaining and time on battery. Download it from timecop's web site and install it like so:
cd /usr/local/src
tar xvzf wmacpi-1.34
cd wmacpi-1.34
./configure
make
make install
cp wmacpi /usr/local/bin/
Launch wmacpi using the Run menu option and drag it over to the dock. Right click and select Settings... Start when Window Maker is started so that it will come up every time Window Maker runs.
For those of you not using Window Maker, you could use GkACPI or aKpi to monitor the status of the battery and its charging.
ACPI events, like AC power removal, power key presses and lid closure, can be caught by user-space programs. The acpid program, available from acpid.sf.net, can connect these events to the commands you specify, such as system shutdown. The acpid dæmon runs in the background, watching /proc/acpi/events for events that have been linked to actions specified in the /etc/acpid/events directory. Installations is a snap if you use the RPM from the acpid web site. After installation, make sure it is running at power-up with chkconfig acpid on; chkconfig --list acpid.
I now have my system configured to call shutdown -h when the power key is pressed, but be careful with this. It will immediately shut down your system, not leaving you any time to save files or logout. So if you think you are going to accidentally press power, it might be a good idea to add a timeout.
You can also catch lid closure, but there isn't a good way to differentiate between the open and close events. When I tried running xlock from the lid event, it ended up running twice because it catches two events, one when the lid closes and one when the lid opens.
To catch power events, add the following file to the /etc/acpi/events/ directory as a file named power:
event=button.power.*
action=/sbin/shutdown -h now "%e"
The event entry is a regex to match the event. You can see these events listed in /var/log/acpid when you do things such as press the power key or close the lid. You can also catch battery events. As with lid events, it is hard to tell what the event signifies without checking the /proc/acpi/ battery state. But a simple power-down when the battery gets low would look like this:
event=battery.BAT0.*
action=/sbin/shutdown -h +2 "%e"
This command will shut down the system two minutes after the first battery event. As the battery gets lower it will emit more events, so this really ought to call a Perl script that checks the contents of /proc/acpi/battery/BAT0/state. But I will leave that as an exercise for the reader.
The Presario comes with built-in stereo speakers, a headphone jack and microphone input. The audio system uses an AD1886 AC97, codec which is supported by the default kernel—except the driver included with the kernel doesn't initialize the codec properly, so there is no sound output. A small patch from Santiago Nullo solves this problem, and I have included it in the comprehensive Presario patch available on my web site.
Red Hat 7.3 correctly detects the sound system and modifies /etc/modules.conf accordingly, so there is nothing to modify after rebooting with your new ACPI kernel. You should confirm that sound is working, though, by running xmms and playing some of your favorite Ogg Vorbis or MP3 files. Make sure the xmms output plugin has the OSS driver selected; if it isn't you may end up with a bunch of .wav files in your home directory.
I use the wmix docking app that came with Red Hat 7.3 to control my audio settings from the Window Maker dock. After installing the supplied RPM it came up with all of the supported sound card volume settings, some of which I didn't even know it supported. The master volume level can be controlled by software or with the hardware +/- keys. Note that the volume settings are independent, so hitting the hardware keys may jump the volume to an unexpected level.
The modem included with the Presario is a software modem, requiring a driver in the OS to handle the modem functions instead of hardware. This used to mean that the modem was useless when running Linux, but thanks to Mark Boucher there now is a driver available for the modem. I downloaded the hsflinmodem-5.03.03.L3mbsibeta02072100-1.i386.rpm file from Mark's web site (listed in the Resource section at the end of this article) and installed it with rpm -Uhv. It didn't recognize the kernel version I had, so it recompiled itself after asking a few simple questions (accept the defaults) in a painless and user-friendly way. Kudos to the authors for putting together a clean installation module.
I installed my favorite terminal program, Minicom, which is included with the Red Hat distribution, and pointed it toward /dev/modem (is now a symlink to /dev/ttySHSF0). I then tested the connection by dialing into my home Linux box. The driver uses an unnoticeable amount of CPU time while active and worked fine for my experiments. One disappointment is that it responds to the +FCLASS=? command with a 0, indicating no fax support.
The driver install tries to autodetect your location based on the time zone setting and may get your country wrong, as it did in my case. (I picked Vancouver as the closest choice of cities in the Red Hat installer's time zone setup dialog). The country can be changed by running hsfconfig -country as root.
If you haven't been paying attention to recent laptop designs, you might be surprised to note that most new laptops don't come with the old DB9 serial ports anymore. All of the new laptops I looked at are using USB instead of RS-232, and the Presario is no exception. The Presario does include two USB ports next to the still-standard 25-pin parallel port. Support for USB works right out of the box; the kernel autodetects the type of USB hub is use and loads the correct drivers at power-up without any intervention.
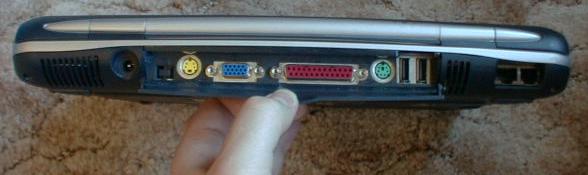
The Connectors
You will have to add any users with permission to access the USB devices to the uucp group by editing /etc/group. Add a comma-delimited list of the users to the uucp: line.
I have tested the USB port with an Handspring Visor, hotsyncing it with the USB cradle and pilot-xfer program. This required manually installing the Visor module using modprobe visor. Press the hotsync button on the Visor cradle and then run pilot-xfer /dev/ttyUSB1 -b ./backupdir to save the contents of the Visor to the back-up directory.
I have also tested the system with a serial port adapter from www.rabbitsemiconductor.com, I plugged it in, and it was detected by the kernel automagically, and all the correct modules were loaded. I then ran my DigiTemp program (after plugging in a DigiTemp temperature sensor kit to the serial port adapter) and, in under a minute, I was monitoring the temperature in my lunchbox. For those that are curios, the temperature reading was 39.7F.
The FireWire port is a higher speed serial interface for connecting multimedia devices like digital video cameras. I don't have anything with FireWire, so I was unable to test this port. Support for it is in the kernel, however, so it may work as easily as USB did.
The Presario 711CL includes a number of special keys that are used under Windows to directly launch programs. An Info button, Email button, Search Button, Music button and volume control +/- keys surround the power key. There is also a four-direction key that looks like it would be useful for scrolling. The volume control buttons work without any effort. I think they are hard-wired into the sound system; they seem to independently adjust the master volume level.
I have not been able to figure out how to use these additional keys. They aren't reported by the ACPI system like the power and lid switches are, and when I run showkey they don't emit any key codes. The special windows keys do show up as key code 125, 126 and 127 for the left window key, right window key and menu key respectively.
It seems to me that the laptop ought to have an accessible temperature sensor in it somewhere. The Presario uses the VIA686a ISA bridge chipset, which is supported in the lm-sensors package. But after patching the kernel (by hand yet again), it couldn't find any sensors attached to the VIA686a. I have left this patch out of my collection, because it doesn't add anything useful to this laptop.
And the last item on that list I mentioned at the beginning of this article is playing DVDs—even all of those encrypted DVDs on your bookshelf can be played. Oooh, I said it, didn't I; that taboo word—encrypted. Yes, it is possible, even easy, to play your DVDs under Linux, and there isn't a thing that any court in the world can do about it. Hopefully they don't come chasing after me for telling you which web sites have the CSS decoder software available.
Because of my simplified install, the RPM for xine wouldn't install without adding a whole load of things I really don't need on this system. So I first downloaded the RPMs from the Ogle web site and installed them. The Ogle web site includes links to all the packages you need to install to get DVD playback working on your system. The web site also has links to the source for all the packages they recommend, so you can recompile from source if the RPMs have too many dependencies.
Make a symlink from /dev/hdc to /dev/dvd, and then run ogle from the command line. You should see your movie begin playing, but it will probably look choppy. The default Red Hat install doesn't turn on DMA transfers for the DVD drive, so it isn't transferring data as quickly and efficiently as it could. Don't worry, there's a fix for this too. Copy the /etc/sysconfig/harddisks file to /etc/sysconfig/harddiskhdc and edit it. Change the line USE_DMA=1 to enable DMA transfers on this drive. You may want to do the same thing for hda, creating a file named harddiskhda. You can reboot to make sure this takes effect, or you can run the hdparm utility to turn on DMA access:
hdparm -d 1 /dev/dvd
Now try running Ogle again. Playback should look smooth, and the terminal window shouldn't be complaining about dropped frames—at least not very often.
The Ogle player also has some problems with audio synchronization. It sometimes looks as if the audio is lagging behind the video playback, and the terminal window will sometimes report that it is resynchronizing the audio.
The xine player works better, and the audio is synched correctly, but it was a bit of a chore for me to install it on my stripped down system. If you are running GNOME, it is an easy task to install the associated RPMs from xine.sf.net. If you want to play encrypted DVDs (why else would you have a DVD player?), then you also need the libdvdcss library and the dvdnav plugin for menu support. See the Resources section for the web sites.
In my case I downloaded the source for all of this and compiled and installed it. The only glitch I ran into was that the libdvdread was hard-coded to look for the libdvdcss.so.1 library, but I had version 2.0 installed. This is easily corrected by editing the libdvdread-0.9.2/dvdread/dvd_setup.c file, replacing the occurrences of libdvdcss.so.1 with libdvdcss.so.2. No other changes are needed, and this may be fixed in newer versions of libdvdread.
After installing libdvdread, libdvdcss, libdvdnav, xine-dvdnav,xine-lib and xine-ui, you should have a working DVD player. When you run xine for the first time, run it as xine -V XShm to ensure that it doesn't use the xv display calls. This will save the preferences to the ~/.xine/ directory so that you don't need to do this every time. If you forget to do this, it will attempt to use xv and will completely lock up the laptop. Then you'll have to pull the power plug and remove the battery in order to reboot. Yes, it is possible to hard-lock a Linux system; it usually only happens to me when dealing with X.
My experience with the Presario laptop has demonstrated how far Linux has advanced from the first time I downloaded the SLS distribution, and how far it still has to go before it can gain even as much desktop share as the Mac OS. The good news is that it is possible to successfully install it on the Presario and take advantage of all the features of that laptop. I'd like to thank the authors of all the programs that I have discussed for their efforts to advance the state of the art for Linux. Especially useful was Juliusz Chroboczek Presario 711 web page, where I learned about the kapcid patch and the sound card patch.
Juliusz Chroboczek's Linux on the Presario 711 EA and kapcid Patch
LinModem Driver at Mark Boucher's Page
Ogle DVD player Web Page, libdvdread
dvdnav Page for xine Menu and CSS Support
USB to DB9 RS-232 Serial Adapter
Brian Lane is a software developer from Seabeck, Washington, who writes software for embedded systems, TI DSPs and Linux. He maintains a variety of web pages from his www.brianlane.com domain. Former president of KPLUG (Kitsap Peninsula Linux User Group), he is now the webmaster for the KPLUG web site.
email: bcl@brianlane.com

