
Interoperate with Me
Yes, François? It does look like something from the 1980s. That's because it is. You are right, mon ami. It is true that I am still running on my Linux system, but the effect is wonderfully nostalgic, non? Oui, there are several examples on tonight's menu, and I think our friends will be delighted. What did you say, François? Ah, they are already here!
Bonjour, mes amis. Welcome to Chez Marcel, home of the Linux world's greatest wine cellar and the finest Linux cooking. Your tastebuds are tingling in anticipation, is it not true? Then allow my faithful waiter to show you to your chairs, and we will have a look at the menu immédiatement. François, please, to the wine cellar. Bring up the 1989 Pessac-Léognan—it will be a perfect match for what is to come.
By definiton, interoperability implies the ability of some technology to work easily with some other technology or some piece of software with another piece of software. I tell you now, mes amis, that this concern for the machine side of things makes me want to drown my sorrows in a rich crème caramel. Come to think of it, I may do that regardless of how things turn out, non?
What was I saying, mes amis? Ah, oui. What about the software working with the wetware as they say—the person working with the machine. What makes Linux so wonderful to work with is that it gives us choices that other environments do not provide. Those choices are so exceptional that we even can choose to run our Linux systems with the friendly face and flavor of an earlier operating system we knew and felt comfortable with. After all, it is what is inside that counts, non?
You probably are running a flashy new GNOME or KDE desktop environment, and yet you long for a foray into the desktops of your youth, whether it be Amiga, an old Macintosh or even that particular ubiquitous desktop from circa 1995. Under no circumstances do you wish to give up the power of your Linux desktop, but the appearance is another matter.
When you start your GNOME or KDE desktop, you are running a window manager on top of the X Window System graphical manager (or simply X). On most Linux systems, this is the XFree86 server. If your system starts out at a text login and you start X with startx, then you are ready to experiment. If your desktop starts at a graphical login, you may want to switch back to a text login for a taste of these recipes. Log out from your desktop, switch to one of your virtual consoles (with Ctrl-Alt-Fn, where Fn is a function key from 2 to 6) and log in as root. Now type init 3, and the graphical login manager will exit. There are numerous ways to do this. Your graphical login screen even may have an option to switch to console mode.
The master program that starts all desktops is xinit. The startx program is just a script that calls xinit (with a few flags and parameters). Still, you could restart your KDE window manager like this:
xinit /usr/bin/startkde
If you do it this way, make sure you always specify the full path to the window manager. Another thing you can do is create a .xinitrc file in your home directory with a single line in it:
exec startkdeDoing it this way, you can start your window manager with the classic startx command. And indeed, classics is what we were talking about, mes amis--this 1989 red is most certainly a classic. François, please pour for our guests. While you enjoy your drinks, let me show you the first of our desktop classics, Takashi Hasegawa's MLVWM, which stands for Macintosh-Like Virtual Window Manager. Start by visiting his site, pick up the latest source and build it:
tar -xzvf mlvwm091.tar.gz
cd mlvwm091
xmkmf -a
make
make install
While you are there, you also may want to download the mini-icon set (which actually comes from the FVWM desktop) and extract those:
cd /home/natika/pixmaps
tar -xzvf mini-icons.tar.gz
Before you start up your new (or old) Macintosh look-alike desktop, you must first create a .mlvwmrc file. In the distribution directory (where you built mlvwm), you'll see a sample_rc directory. Simply copy all these files over to the user directory, then rename the mlvwmrc file. Let's continue with our friendly user, natika:
cd /home/natika
cp /pathto/mlvwm091/sample_rc/* .
mv Mlvwmrc .mlvwmrc
We are almost there. The default configuration file is a good place to start, but you will want to edit the path to those pixmaps. Look for the following line and change it to reflect the path of your system icons (or the mini-icons you just installed):
IconPath /usr/local/include/X11/pixmaps:/home2/tak
/bin/pixmap
Now, fire it up with xinit /usr/bin/X11/mlvwm. Figure 1 shows MLVWM in action. It is all coming back to you now, eh, mes amis?
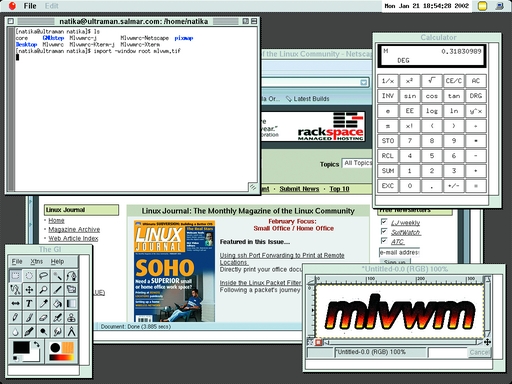
Figure 1. MLVWM in Action
For those who desperately need a dose of something friendlier, there was always the Amiga. Did I say “was”? Mais non, if not the Amiga itself, certainly the spirit lives in Marcus Comstedt's AMIWM. Start by visiting his web site and downloading the source. Then, as many times in the past, we build comme ça:
tar -xzvf amiwm0.20pl48.tar.gz
cd amiwm0.20pl48
./configure
make
make install
Check the included README for configuration file options. These runtime options come from either a local .amiwmrc file or the global system.amiwmrc. By default, you will find the global file in the /usr/local/lib/amiwm directory. Have a look at Figure 2 to see the AMIWM desktop.
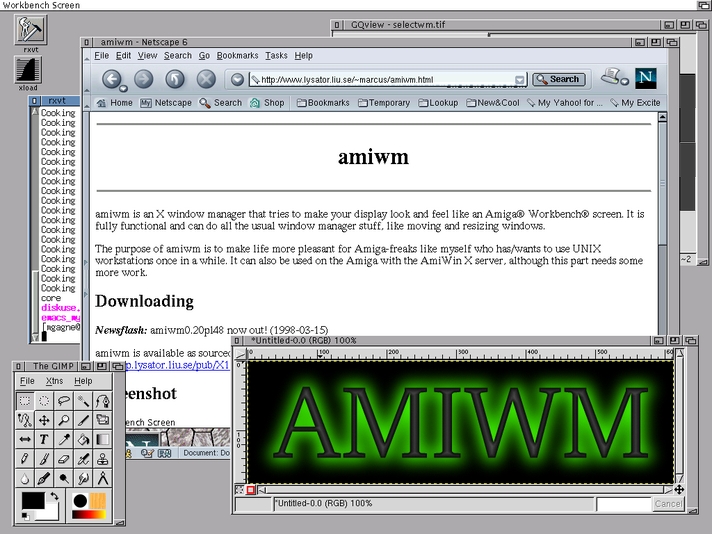
Figure 2. Who Says the Amiga Is Dead?
Those desktop alternatives provide a means to experience the tastes of the past. KDE and GNOME are the present. But what about the future-uture-uture? Do any of you hear an echo? Anyhow, Niklas Elmqvist, Robert Karlsson, Steve Houston, Antony Suter and others are working on providing us a glimpse of the future. Enter 3Dwm, a three-dimensional desktop that takes us out of window manager flatland and transports us into a world of depth. In fact, the 3Dwm team would like us to forget about the wm part of the name and think of 3Dwm as an environment for developing three-dimensional user interfaces rather than a window manager.
Have a look at Figure 3 for a sample of what is to come. Are you ready to step into the third dimension? Let's go then.

Figure 3. Desktops Enter the Third Dimension with 3Dwm
Since this is a 3-D application, you'll need your Mesa or OpenGL libraries. You'll need the expat libraries for the XML parts of the project, and the SDL libraries also are required. Pay attention to the release number of the SDL package (which you can get at www.libsdl.org). It must be version 1.2 or better for this to work properly. This seems like a lot just to get started, but luckily, most modern Linux distributions will have all these things already installed.
In order to build 3Dwm, you will need a few additional things. The biggest of these is the OmniORB package from AT&T's UK Labs, the same people who brought you VNC (an excellent remote control package). I will make a strange suggestion here. For the most part, I have little trouble recommending source packages for installs, but this is one place where it might make more sense to pick up one of the binary packages. Since dependencies are certainly a concern, those of you running an RPM-based system also might consider grabbing the source RPM and rebuilding it for your release and architecture. That is what I did. Then, I rebuilt a new binary RPM package in this way:
rpm --rebuild omniORB-3.0.4-0.src.rpm
This ticks along for quite some time. When it is complete, you should have both a complete omniORB and omniORB-devel package sitting in your build directory (which will vary from system to system). On my Red Hat test system, the finished RPMs were in /usr/src/redhat/RPMS/i386. Debian users will find prebuilt packages as well.
You could continue with the 3Dwm build now and do this process later, but let's start it now so that we don't forget. Modify your /etc/profile to include the following lines:
OMNIORB_CONFIG=/etc/onmiORB.cfg
OMNIORB_LOGDIR=/var/omninames
The omniORB.cfg file doesn't exist yet, so you must now create it. Here's what you need there:
ORBInitialHost localhost
ORBInitialPort 8088
Note that the “localhost” designation may not work depending on your hostname configuration. Because I start my desktop as a host within my domain, I had to use the fully qualified domain name here. You may have to do the same. Now, start the omniNames server like this:
omniNames --start 8088 &On the dowload page for 3Dwm, you'll also find the source for meshio, a library for loading the 3-D model files. Yes, there are several pieces involved in this recipe, but the result will be worth it, I assure you. It is time now to compile meshio. You'll be happy to know that this is a quick process:
tar -xzvf meshio-0.2.0.tar.gz
cd meshio-0.2.0
make
make install
Now, it's time to build 3Dwm itself. At the time of this writing, the release level was 0.3.1, which technically still qualifies as alpha software, but we Linux-types, we love to live on the edge non? For the compile to go through properly, you will need to set the PYTHONPATH variable:
export PYTHONPATH=/usr/lib/python2-1/site-packagesAnd now, we build:
tar -xzvf 3dwm-0.3.1.tar.gz
cd 3dwm-0.3.1
./configure
make
When this is all complete, copy the configuration file tdwmrc (which you'll find under /etc in your build directory) to ~/.tdwmrc. Open it with your favorite text editor and make sure that the path to the default.zorn is correct. Remember that this will vary depending on the path to your install directory. Now, start the display server:
cd server
./tdwm-server
If everything went well, you should see a black display box appear on your screen. That is success. This may not sound interesting, but 3Dwm is a client-server application, and the 3-D client will run in this window. To jump into your 3-D world, you must now run a client. The 3Dwm site has a 3dwm-data.tar.gz file that you should download. It contains some sample 3-D models and textures. All you have to do is extract the file; there is no compiling to do here:
cd clients/geoclient
./geoclient office.3ds
A three-dimentional representation of an office (complete with desk, monitor, keyboard and mouse) will appear in the 3Dwm server window. If it looks a bit strange, try navigating through it like this.
Moving around includes some combination of the keyboard Ctrl key and mouse buttons. These combinations, by the way, are defined in that default.zorn file I mentioned earlier. If you hold the Ctrl key and click the left mouse button (while moving the mouse), you change the orbit around the focal point. Pressing Ctrl and the right mouse button zooms your focal point in or out. Ctrl and the center mouse button pans your focal point. Ctrl, Shift and the left button rotates left and right, while Ctrl, Shift and the right button changes your field of view.
There are other clients besides the geoclient, but I'm going to leave that exploration to you. Included with your 3Dwm package is a 3-D virtual clock, and as you can see from our 3Dwm virtual clock, the hour for closing time, she approaches once again, non? François, if you would be so kind as to refill our guests' glasses a final time. Merci, mon ami.
Whether you find your ideal work environment in the desktops of the past, the present or even the future, rest assured that when you cook with Linux, interoperability isn't a fancy technological catch phrase—it's the way we work each and every day.
A votre santé! Bon appétit!
Marcel Gagné (mggagne@salmar.com) is president of Salmar Consulting Inc., a systems integration and network consulting firm and the author of Linux System Administration: A User's Guide, published by Addison-Wesley.

