
You Can Get There from Here, Part 4
Hello, everyone, and welcome back to another installment of the SysAdmin's Corner, the place for Linux administrators who understand that the real answer to the "all work and no play" conundrum is to make at least part of your work fun. And what could be more fun than exploring the wonders of your Linux system? My thoughts exactly. Last time around, I talked about a system that is kind of like 411 for your network, our new old friend, LDAP. With it, you can get access to your corporate contact information from anywhere in this big old world. At the end of it, we had a simple LDAP server and the means to enter new information. Today, I'd like to explore the topic further. If you missed the first part, you can find it right here.
One of the things I did not cover in that article was the subject of "schema", and that may have left a few of you scratching your heads when it came to your slapd.conf files. Schema files define the data and how it is organized in your directories, including the format of attributes, syntax and so on. The Red Hat package installation (which I used in my initial tests) included a number of schema files by default, whereas the source install only included the core.schema file. For my example to work as demonstrated, you need to include at least three additional schema files. These are all part of the source distribution, and you will find them in /usr/local/etc/openldap/schema. Here's what the top part of my slapd.conf file looks like:
  include         /usr/local/etc/openldap/schema/core.schema
  include         /usr/local/etc/openldap/schema/cosine.schema
  include         /usr/local/etc/openldap/schema/inetorgperson.schema
  include         /usr/local/etc/openldap/schema/nis.schema
For the record, the Red Hat default slapd.conf file also contains the following:
   include         /etc/openldap/schema/redhat/rfc822-MailMember.schema
   include         /etc/openldap/schema/redhat/autofs.schema
   include         /etc/openldap/schema/redhat/kerberosobject.schema
Everything else should have been just fine. What you probably thought wasn't fine was this whole business of entering data by using LDIF files. If you have to enter every name currently in your address book, and you had 500 names, you would have to create 500 LDIF entries that looked something like this.
   dn: cn=Harry the Fish,ou=staff,o=salmar
   cn: Harry the Fish
   sn: the Fish
   objectclass: top
   objectclass: person
   objectClass: organizationalPerson
   objectClass: inetOrgPerson
   mail: harryfish@salmar.com
   telephoneNumber: 555-8708
   givenname: Harry
   surname: the Fish
Let's look at some alternatives, shall we? For starters, it's likely that you have this address book somewhere on your e-mail client. Let's pretend that you (or people in your office) is running Outlook and you (or rather, they) have a large collection of e-mail addresses, you could export that address book to a CSV file (a comma-delimited ASCII file) and, from that file, create a single LDIF file to import. The missing step of course is how you easily convert that CSV file to an LDIF file.
Here's a little Perl script I put together to tackle that very issue.
   #!/usr/bin/perl
   # importcsv.pl : Create LDIF file from CSV addressbook
   # Marcel Gagné, Oct 10, 2001
   open (LDIF_FILE,"+>/tmp/loadfile.ldif");
   ##  This is our temporary LDIF file.
   $csv_file = @ARGV[0];
   open (CSVFILE,"$csv_file");
   ##  Open the CSV file.
   while ($line = <CSVFILE>)
    {
       chomp $line;
        ($full_name, $email, $street, $city, $poscode)
            = split (",", $line, 5);
   ##  I only really care about the first two attributes for this example
       ($first_name, $last_name) = split (" ", $full_name, 2);
       printf LDIF_FILE ("%s","dn: cn=$full_name,ou=staff,o=salmar\n");
       printf LDIF_FILE ("%s","cn: $full_name\n");
       printf LDIF_FILE ("%s","sn: $last_name\n");
       printf LDIF_FILE ("%s","objectclass: top\n");
       printf LDIF_FILE ("%s","objectclass: person\n");
       printf LDIF_FILE ("%s","objectclass: organizationalPerson\n");
       printf LDIF_FILE ("%s","objectclass: inetOrgPerson\n");
       printf LDIF_FILE ("%s","mail: $email\n");
       printf LDIF_FILE ("%s","givenname: $first_name\n");
       printf LDIF_FILE ("%s","surname: $last_name\n\n");
    }
   close CSVFILE;
   exit (0);
Save the file as importcsv.pl, then make the script executable and run it.
   chmod +x importcsv.pl
   ./importcsv.pl myfile.csv
The script takes one argument and that is the pathname of your CSV file. You could modify this to take a second argument which would then be the LDIF file's pathname, but I chose to use a default name in /tmp (namely /tmp/loadfile.ldif).
That's great. We can now import all that data with the following command (which you'll remember from the last column).
ldapadd -c -f loadfile.ldif -xv -D "cn=SalmarAdmin,o=salmar" -W
Those of you who are paying particularly close attention will notice the use of an additional flag in this command . . . two actually. The -W tells the ldapadd command to ask for the password at the command line, but the really interesting flag is the -c option. Because of the sheer number of LDAP entries we might be generating with the Perl script, we don't want the LDAP command to choke every time it encounters an error. The -c tells the command to continue regardless of any errors it might encounter.
Suddenly, we have an LDAP database populated with all the data from our corporate address books (or, for the more popular among you, personal address books). This is a great approach for that initial load, but what do you do when you want to casually add data to this directory? This constant creation of LDIF files can get a little tedious. If you check your Linux distribution CD, you might just find a little Gtk-based package called GQ, a rather innocuous name for a wonderful tool that provides an LDAP directory browser, schema browser and import/export utility. Best of all, it lets you add, delete or modify single entries in your LDAP directory using a nice, friendly graphical interface. You can also pick up the latest version of GQ from the fine people at Biot.com. Their URL is http://biot.com/gq.
As per my description, building GQ requires that you have Gtk installed (version 1.2 or better). Beyond that, the install process follows standard methods.
   tar -xzvf gq-0.4.0.tar.gz
   cd gq-0.4.0
   ./configure
   make
   make install
Sure, I know that you all know this stuff, but nothing satisfies like seeing a program build from scratch on your own system. Am I right? I digress . . .
Start the program by simply typing the command name at a shell prompt.
gq &
If you have an LDAP server configured and running on that host, gq will automagically take note of it and offer it as a default. Notice that the program window has three tabs, search, browse and schema. From the search tab, you can enter all or part of a name in your LDAP directory and find it. There are three fields here. The first is your name search field, the second is your LDAP server, and the third lets you specify where in your directory the search takes place (i.e., o=salmar in my sample organization). If you leave the name field blank, gq will return all the names in your LDAP directory.
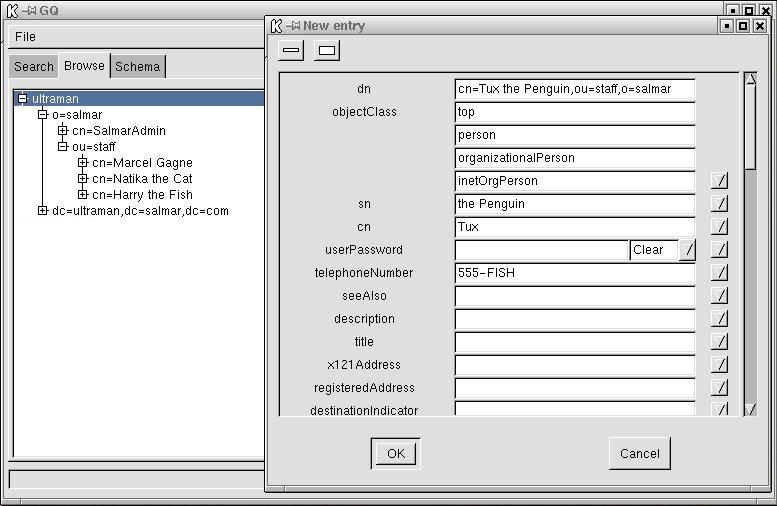
The other tab that I want to talk about is the browse tab. From here, you can add or modify an entry. In order to modify an existing name, click down through the directory tree until you find the entry you want. Click on that entry and a box will open on the right hand side from which you can modify or update any information. You can also right-click in the left hand list and specify delete (to remove an entry) or New to create a brand new entry. The following image represents just such a dialog on my test system.
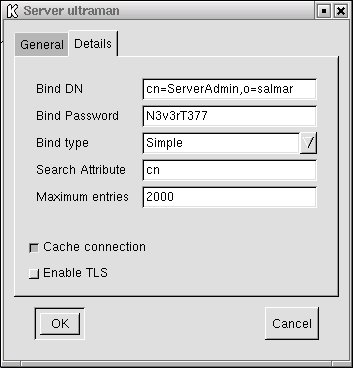
Once again, my quota of electrons is rapidly getting used up, but I do want to show you one last thing. Click on File and choose Preferences (Control-P works as well), and you'll see a number of configuration options I will mostly let you discover for yourself. I do want to point out the Server tab that lets you add other servers to administer (or query). Click on Server, then New and fill in the appropriate information. Have a look at the next image for an example of this in action.
Well everyone, I've gone on long enough. With the information provided here, you should be able to start updating and maintaining your LDAP directories with some amount of ease.
Warning! Gratuitous self-promotion follows...One last thing before I go. It's here!! My book has now been officially published. Linux System Administration: A User's Guide (ISBN 0-201-71934-7, Addison Wesley) is arriving in stores now (as well as your favorite on-line vendor). Hey, if you check out the above link, you can even download a free excerpt. Until next we meet here at the SysAdmin's Corner, remember that despite what you may have heard, you can get there from here.
Looking for past articles to this series? Click here for a list.
email: mggagne@salmar.com

