
You Can Get There from Here, Part 3
Welcome back, one and all, to the "SysAdmin's Corner". This series is about getting to that all important data on your system, even when you are far away. Part of the data we take for granted at home is our e-mail, hence the first part of this series. Closely related to that very topic are those ever growing lists of people with whom we communicate. Sure, you could carry your own list of contacts, but what about the corporate address book and its wealth of information? How can we get to that?
So glad you asked since it's a nice intro to today's discussion on LDAP. LDAP is an acronym for Lightweight Directory Access Protocol. I like to think of it as directory assistance for your network, a kind of net-enabled 411 service. With an LDAP server running on your, er, server, directory assistance will never be far away. Sound good? Strap in because this is a big topic. I'll get into some of the nittier and grittier stuff associated with LDAP later, but I know that you want to walk away from this with something that works, so this is the plan for today.
A directory is a collection of entries, as you might expect in any database. Each entry is made up of attributes--more importantly globally-unique distinguished names, and I do mean globally. Each attributes also has types with associated values. For instance, an e-mail address is defined as "mail", while a person's full name is referred to as cn for "common name". All this data is organized inside of a hierarchical structure. The database represents an organization. Inside that organization are organizational units. Inside organizational units are people. A person is described by attributes of different types and values. Trust me. This will all make sense when you see it in action.
While it may seem frighteningly obvious, I'll start by saying that in order to do something with LDAP, we need to get the LDAP software. The latest version can be downloaded directly from http://www.openldap.org.
In all likelihood, you already have a copy of OpenLDAP on any recent distribution CD. The big advantage of building LDAP from source is that you will have all the bits and pieces right there when you are done. On my Red Hat test system, for instance, I found that the whole OpenLDAP suite was broken up into several components, such as clients, servers, PHP extensions and so on. In particular, a default installation may have everything you need to access an LDAP server, but not the server itself. That package was openldap-servers. If you decide to go with source, you can build it with these basic steps.
     tar -xzvf openldap-stable-20010524.tgz
     cd openldap-2.0.11
     ./configure
     make depend
     make
     make install
By default, the source distribution installs in /usr/local. If you are going to run a server, then the configuration aspects aren't too scary (for the server anyhow) since everything you need to worry about is in one file, slapd.conf. Now, that install path is important because it will affect the location of the file. On my Red Hat system, the RPM package puts it in /etc/openldap. On another system (where I built OpenLDAP from scratch), the file is in /usr/local/etc/openldap. Let's have a look at that file. In order to simplify things, I'm going to accept all the defaults at the beginning of the file and concentrate on the database definition.
   database        ldbm
   suffix          "o=salmar"
   suffix          "dc=ultraman, dc=salmar, dc=com"
   rootdn          "cn=SalmarAdmin, o=salmar"
   # Cleartext passwords, especially for the rootdn, should
   # be avoided.  See slappasswd(8) and slapd.conf(5) for details.
   # Use of strong authentication encouraged.
   rootpw                itsasecret
   # rootpw                {crypt}ijFYNcSNctBYg
   # The database directory MUST exist prior to running slapd AND
   # should only be accessible by the slapd/tools. Mode 700 recommended.
   directory       /home/ldap
   # Indices to maintain
   #index  objectClass                             eq
   index   objectClass,uid,uidNumber,gidNumber     eq
   index   cn,mail,surname,givenname               eq,subinitial
I've already done a little editing here, and I'll go over a few of these changes. For starters, you should change the suffix information to reflect your organization (o) and domain name. As you can see, the domain is broken up into its constituent parts. Think of rootdn as the root user for administering LDAP--consequently the name can be something other than root. Following that hierarchical format, that person exists within an organization. (And yes, I did name my test server after a Japanese monster-fighting, super-hero.)
Next, take a look at the directory parameter. That directory can exist anywhere you want, but it does have to exist before you start adding information. Finally, I'm going to jump back a couple of lines and look at that password note. That little warning above about plain text passwords is important. In the simplest form, I could just enter my password (not really) of "itsasecret". To generate an encrypted password, use this little Perl script.
perl -e 'print("userPassword: {CRYPT}".crypt("secret","salt")."\n");'
The "secret" is your password while the "salt" is a two character key designed to provide a pseudo-random seed so that the crypt routine can generate a password. By doing this, you can generate an encrypted password rather than using the plain text version.
   perl -e 'print("userPassword: {CRYPT}".crypt("itsasecret","I5")."\n");'
   userPassword: {CRYPT}I5ToCN7ZovZmQ
So far, so good. It's time to start up our LDAP server. Obviously, this is going to vary depending on where you decided (or your distro decided) to install the software. The dæmon that does all the work is called slapd and that is pretty much all we need to know in order to start it.
/usr/sbin/slapd
In all likelihood, you'll find yourself back at the root prompt without any additional information. So how are you supposed to know if anything worked? Well, you can try this little command:
ldapsearch -x -b '' -s base "(objectclass=*)" namingContexts
The -b flag specifies the search base. I am going to use the default. If all has gone well up to this point, you should get something that looks like the following.
   #
   # filter: (objectclass=*)
   # requesting: namingContexts
   #
   #
   dn:
   namingContexts: o=salmar
   namingContexts: dc=ultraman,dc=salmar,dc=com
   # search result
   search: 2
   result: 0 Success
   # numResponses: 2
   # numEntries: 1
Specifically, you are looking for the line that says "namingContexts" which is, after all, what we asked for. Does it look like what we defined in slapd.conf? It should.
Good. Now we need to enter some real information into our database. This is done by creating a LDIF file (LDAP data interchange format). Warning, this gets a little wordy, but I will explain. Each stanza represents an entry into our data hierarchy. Each subsequent stanza builds on the one above it. Look at the description: attribute and you'll see what each represents.
   dn: dc=ultraman,dc=salmar,dc=com
   objectClass: top
   objectClass: dcObject
   objectClass: organization
   dc: salmar
   o: salmar
   description: Salmar Domain
   dn: o=salmar.com
   objectClass: top
   ObjectClass: organization
   o: salmar.com
   description: Salmar Organization
   dn: cn=SalmarAdmin,o=salmar
   objectClass: organizationalRole
   cn: SalmarAdmin
   description: Directory Admin Type
   dn: ou=staff,o=salmar
   ou: staff
   objectClass: top
   objectClass: organizationalUnit
   description: Salmar Address Book
   dn: cn=Marcel Gagne,ou=staff,o=salmar
   cn: Marcel Gagne
   sn: Gagne
   objectclass: top
   objectclass: person
   objectClass: organizationalPerson
   objectClass: inetOrgPerson
   mail: mggagne@salmar.com
   telephoneNumber: 555-0918
   givenname: Marcel
   surname: Gagne
Having created this definition file doesn't give you a database. To get this information, you need to use the ldapadd command. Pretend that I have saved this file as staff.ldif (I have). The command is as follows:
ldapadd -f staff.ldif -xv -D "cn=SalmarAdmin,o=salmar" -w secret
The -w lets you pass your simple authentication password. A (capital) -W tells the command to prompt you for the password. You could, if you wanted to, add as much information to this LDIF file as you needed. You could also add more later. The stanzas describing the root, domain and administrator do not need to be added each time. What's done is done. Since my database looked a little lonely with only one name, I decided to add another, my cat, Natika.
   dn: cn=Natika the Cat,ou=staff,o=salmar
   cn: Natika the Cat
   sn: the Cat
   objectclass: top
   objectclass: person
   objectClass: organizationalPerson
   objectClass: inetOrgPerson
   mail: natika@salmar.com
   telephoneNumber: 555-0930
   givenname: Natika
   surname: the Cat
Before we move on, I want you to take note of those attributes. These are part of this globally defined unique list of names I talked about at the beginning. How an inetOrgPerson can be defined is described in RFC 2798. Look there for details.
Okay, we are pretty much all done. The big question, of course, is what do we get for our troubles? Oh, and "Did it work?". In our search for an answer to these questions, let's start with Netscape. Since Netscape Communicator is LDAP-enabled, it will do what we want here. Using your own domain (of course) do a lookup by entering a URL like:
http://server_name/cn=some name,ou=org_unit,o=organization
Have a look at the results I get when I use my own LDAP configuration.
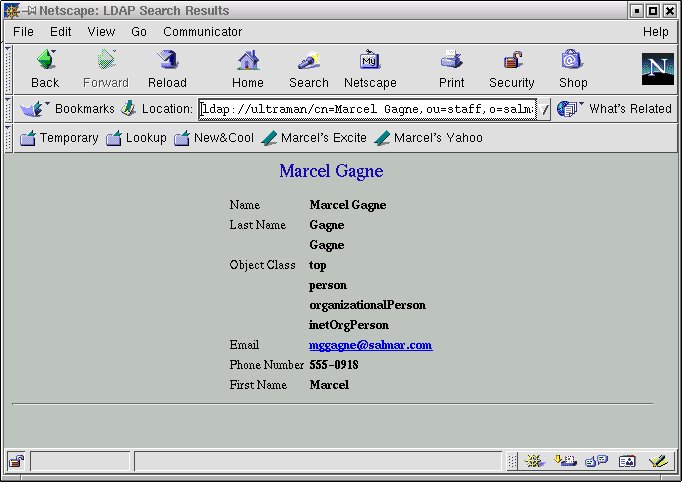
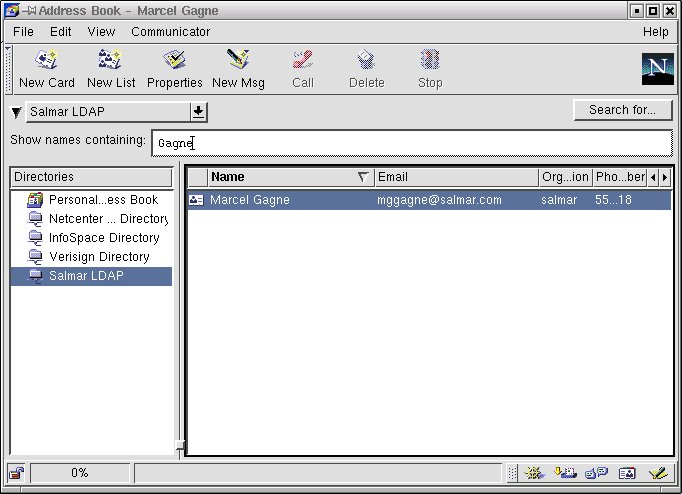
Wonderful! The information we so laboriously entered is now visible in our browser. That's nice, but it's not quite an address book either. That's the next step. Bring up your browser's address book (click on Communicator and select Address Book.) Now, right-click in the Directories listing and select New Directory. A box will appear asking you for a directory name (this can be anything that makes sense to you), an LDAP server (the host name or IP address of your server) and the server root. For my example that would be "ou=staff,o=salmar". The port number can stay as is, as can the number of hits. When you are happy with the information, click OK.
Alright, let's do a search. From the drop down list on the top left of your Netscape address book, select your new Directory (odds are pretty good it will already be selected). You can also just select it by clicking on the name in the list of directories. Finally, enter a name (or part of a name) in the Show names containing: box. Hit Enter and you should see something similar to the following image.
Wow! My allocation of electrons is definitely up for the week. It's time to wrap up, however...as you might have guessed, we will talk more on this subject of LDAP when next we meet on this very Corner.
Warning! Gratuitous self-promotion follows. One last thing before I go. It's here!! My book has officially been published. Linux System Administration; A User's Guide (ISBN 0-201-71934-7, Addison Wesley) is arriving in stores now (as well as your favorite on-line vendor). Hey, if you check out the above link, you can even download a free excerpt. I'm so excited! Until next we meet here at the "SysAdmin's Corner", remember that despite what you may have heard, you can get there from here.
Looking for past articles to this series? Click here for a list.
email: mggagne@salmar.com

