
You Can Get There from Here, Part 2
When last we met here at the SysAdmin's Corner, I talked about a web-based e-mail package called Squirrelmail. The amazing response to the article leads me to believe that getting to your e-mail (or any of your data for that matter) when you are away is a topic near and dear to your hearts. Well, getting there from here (or vice versa) is what this series is about and, today, we move on to another means of getting here from there...but first, a few notes about the last column.
A couple of readers rightfully pointed out that moving the data directory (as in the previous article) to a location outside of the web server's root is probably not a bad idea. Another item pointed out was that you can run Squirrelmail through your secure, SSL-enabled Apache server (building such a server was covered in this article) to provide even more security (but you already knew that).
Another type of protection you may want to consider when remotely accessing your mail (or any other type of web document/application) is Apache's own access controls. You all know about those nice little "you must enter your password" boxes that pop up when you visit certain web sites. Well, you can do the same for your Squirrelmail application. This is done with the .htaccess file, which lives in the directory for which limited access is desired. Here's the basic format.
   AuthName        "WebMail:  Restricted access"
   AuthType        Basic
   AuthUserFile    /usr/local/apache/.mailpass
   <Limit GET POST>
   require valid-user
   </Limit>
Okay, here's the scoop. The AuthUserFile parameter points to the location of the actual password file. Notice that I have mine sitting outside of my web server's document root. In that way, the file cannot be downloaded with a simple HTTP request. You add passwords to this file with the htpasswd command, like this:
htpasswd -c passwordfile username
Obviously, the path to the htpasswd command will vary depending on your installation. Red Hat users will probably find it in /usr/bin/htpasswd. If you built your Apache server from source, however, the program will likely be in the /usr/local/apache/bin directory. A note of caution here: the -c flag creates a new password file if none existed before. You do not want to use this unless you want to flush the whole file and start over. Another flag you may want to use (and probably should) is the -m flag, which forces MD5 encryption on the passwords.
htpasswd -m /usr/local/apache/.mailpass natika
As soon as I add "natika" to the list, I will be prompted for a password and then asked to confirm that password. Almost there...
If you've done everything I've told you up to this point, and you visit the appropriate web page, it won't work. That's because your Apache server does not honor .htaccess files by default; you need to turn this feature on. To do that, bring up the httpd.conf file (depending on your distro or install, this could be /etc/httpd/conf/httpd.conf or /usr/local/apache/conf/httpd.conf) in your favorite editor, and look for these lines:
AllowOverride None
This line appears in three different areas, at least. One covers the server root, one the document root (htdocs or html), one is for cgi-bin, and another for the icon directory. You need to change the "None" to "All".
AllowOverride All
I tend to set all but the icon directory, since I don't have a lot there that I feel needs protecting (just the default icons from the Apache install). That's it. Restart Apache, then relaunch your browser, and you should be rewarded with a nice password authentication prompt. This is all great information because you will almost certainly want to do this for the next thing we are going to talk about today.
Every once in a while, you need to get to your system. Specifically, you need to get shell access. If you happen to be on someone else's network or, if you are not carrying your handy-dandy notebook (computer), this can be a problem. The problem gets worse if, being the security-conscious type that you are, you deny Telnets in favor of an SSH connection. Just about every PC has some kind of Telnet terminal application (though the standard one that comes with that other OS tends to be pretty, ahem, crappy), but not everyone has a SSH terminal for you to use. If you've got a web server on your system, your problems are solved. Pretty much anybody who is connected has a web browser, and that's all you need with Matthias L. Jugel and Marcus Meißner's Java Terminal app.
To get your hands on the Java Terminal app, check out the following address.
www.mud.de/se/jta/index.html
While you are there, click on the Download link and pick up the jta20.jar file (yes, that's jar, not tar). Then, pick up the sample default.conf file. It will make your life easier when it comes to setup time.
Now, copy those files somewhere in your web server's hierarchy; you can call it anything you like. In order to actually use this from a web browser, you need only create the simplest of pages. I saved it as SSHTest.html; here's what it looked like:
     <html>
     <head>
        <title>Web-based SSH Access</title>
     </head>
     <body bgcolor="White">
     <center>
     <applet CODEBASE="./"
             ARCHIVE="jta20.jar"
             CODE="de.mud.jta.Applet"
             WIDTH=590 HEIGHT=360>
     <param NAME="config" VALUE="sshapp.conf">
     </applet>
     </center>
     </body>
     </html>
Pay special attention to the param NAME= line. In this case, I am passing a value of sshapp.conf, which defines all the parameters for my SSH-enabled terminal session. This is just a modified version of the default.conf file that you picked up earlier. These parameters are many, and a peek through the default.conf file is a good start--trust me, there is lots there. For my system, I still needed to make a few rather important changes. Have a look at some of those lines:
   plugins             =   ButtonBar,Status,Socket,SSH,Telnet,Terminal
   Socket.port         =   22
   Terminal.localecho  =   false
We'll start with the plugins line. Each plugin has its own set of configuration options. These are all covered in the Documentation section of the application web site. The applet works by loading various plugins (a number of which are included in that jar file you downloaded). Some of the things you may wish to specify include a button bar at the top of the terminal window, a status line at the bottom (indicating connection status), as well as SSH, terminal and Telnet capacity. Some of those pretty much need to be there, such as Socket and Terminal. One actually handles the socket communication while the other provides you with the terminal emulation (defaults to vt320). If you base your configuration file on the default.conf file you picked up, you'll need to add that SSH plugin if you wish to use encrypted communication.
The second line of interest here is the Socket.port, which I have set to 22, for SSH. If you wanted to run straight Telnet instead, this would be port 23. Finally, on my system I had to set the Terminal.localecho to "false" since everything I was typing would come up twice. Once again, I have to emphasize there are a lot of configuration options that you can play with. Check the default configuration file and adapt it as you see fit. It's time to test your installation:
http://yourserver/some_dir/SSHTest.html
If everything is working well, you should see something that looks like this:

This will then be followed by your login screen. In this image, I'm running the fortune program.
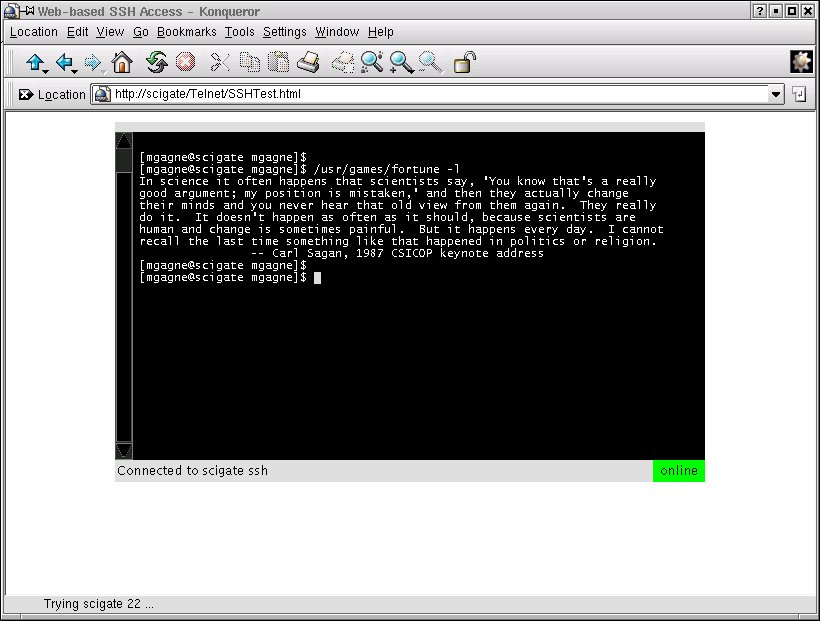
Good old Carl. He is missed.
That's it for today, everyone--my allocation of electrons has been greatly exceeded. You now have shell access into your system from anyplace a web browser is available. If, in addition to the SSH connection, you run this through your SSL-enabled Apache server, you should feel that much more comfortable about getting to your system and the almighty command line, no matter where you are.
Warning! Gratuitous self-promotion follows: as of this writing, it is only a couple of days until my new book is published. Linux System Administration: A User's Guide (ISBN 0-201-71934-7, Addison Wesley) will be released Friday, September 14, 2001. If you check out the above link, you can even download a free excerpt. I'm so excited! Until next we meet here at the SysAdmin's Corner, remember that despite what you may have heard, you can get there from here.
Looking for past articles to this series? Click here for a list.
email: mggagne@salmar.com

