
Setting up a Multitrack Audio Recording Studio
Ever since Elvis plopped down his nickel and crooned a song captured in glistening black vinyl, children everywhere have dreamed of making the next hit single. Unfortunately, doing so usually costs more than the paltry sum The King laid out for his tracks. Today, anyone with a PC can be the next George Martin or Trent Reznor, making the next big hit to be traded illegally, right in their own bedroom! Linux's capabilities make it perfect for multimedia production, and as distributions become easier to install and set up, more ordinary users will want to do more multimedia projects.
To begin, start with your favorite Linux distribution, it doesn't matter which one. I choose Slackware. For this article I will assume you have the sound working and X running on x86 architecture. I'll also assume you know how to navigate Linux and install programs, although you don't have to be a guru. Because this article is targeted toward users who want to make good recordings, there will be less emphasis on the technical aspects of using Linux and more on recording theory and practices, including program-specific HOWTOs.
The two programs I discuss are Gmurf and Broadcast 2000, the latter of which had a nice introductory article in the January 2001 issue of Linux Journal. Neither program requires root privileges to install or run, and both are easy to install and run (just follow the documentation), so I won't cover that here.
The only other things you'll need aren't computer-related at all and consist of noise-making items (such as your voice or a pan and spoon), studio gear (such as a 48-channel powered mixing board with DSP or a Wah-Wah pedal) and a mic or three.
Once you have everything you think you need (trust me, you'll want more stuff once you get going), the next step is to record. Multitrack recording is essential for getting the best possible sound out of more than one instrument, and it is necessary if you are the only one playing the instruments.
Multitrack recording, in its simplest form, is simply multiple single tracks recorded and played in synch, so that the resulting music sounds like one composition. An audio CD is a multitrack recording consisting of two tracks that are played through a machine that sends one track to the left speaker and one to the right.
Music studios traditionally have tape machines that can record up to 64 tracks, and multiple machines can be synched to make an unlimited amount of tracks available. Then each track can have effects added to it and be mixed down to a regular stereo recording for placement on a CD, cassette or web site. With Linux, you can have an all-digital studio, with the number of tracks limited only by the space on your hard drive.
The two basic formats that we'll be working with are .wav and Broadcast's hypertext audio language (HTAL). Gmurf and Broadcast 2000 both work with .wav files; while Gmurf will actually let you edit and manipulate the bits of data that make up a sound file, Broadcast 2000 works only with pointers to various parts of sound files. The result is a small project file, one that leaves no fear of accidentally chopping the middle out of that killer take, and one that makes it incredibly easy to add "just one more" track.
The two quickest and cleanest ways of getting audio onto your computer are to rip from a pre-existing CD or download samples from the Web. The first method has the advantage of offering an enormous selection of samples to choose from, acquired simply and easily with countless CD-ripping utilities for Linux. However, current law limits the duration of samples you are legally allowed to use, and you'll need to be creative in finding even small samples that would be appropriate to use in an original composition. The second method has the advantage of being an easy way to get usable instrument sounds presampled. This is a great thing if you are looking for a unique instrument or any instrument to which you do not have access. I use downloaded samples to create drum tracks for lack of a real drum machine or drum kit.
The major disadvantage to using prerecorded sounds is that you will need some kind of sequencer to get maximum benefit and flexibility from the samples. For example, it is easy to arrange drum samples in Broadcast 2000 to create a great-sounding beat, but there is no easy way to add swing to the track to make a really funky groove, aside from tweaking it by trial and error.
Making a live recording using a microphone through your sound card will give your opus the "you are there" energy that can make a good tune rock. Synthesized noises are okay for backgrounds, but if you want your creation to turn out sounding more like a person played it and less like a midi-enabled web site, you'll have to break out some real recording tools.
Some programs will allow you to make a stereo recording on your hard drive, using the input jacks on your sound card. Broadcast 2000 is no exception, and shortly I'll discuss exactly how to record that screaming guitar solo quicker than you can say "real recording studio".
What about those little flubs and outtakes, the musical equivalent of typos? There are two ways you can deal with them, destructively and non-destructively.
Gmurf is a good program to use for destructive editing. I primarily use it for taking out dead space at the beginning or end of a .wav file or converting samples from one sample rate to another.
Broadcast 2000 is an excellent program for working nondestructively under Linux. You can easily clip, copy, loop, move and blend audio tracks without losing a single 1 or 0 from your original audio files. The main disadvantage of working this way is that a large .wav file will remain large, even if you clip all but ten seconds of it for use in a production. The file size, though, is offset by the enormous advantage of knowing you didn't just accidentally rm a piece of a file you intended to use later in the song.
The best compromise I've devised so far is to use Gmurf to whittle down each sample or track to the smallest size possible, then use Broadcast 2000 to arrange them, or parts of them, into a complete tune. So how do we do this, you ask?
Let's begin by deciding where you want to keep your project and create the appropriate folders. Since Broadcast 2000's markup language uses absolute paths, you can't easily move the files around when you realize they're in the wrong place. It's best if you set up a good directory structure from the beginning.
When you're ready, open Broadcast 2000. It should give you two audio and two video channels, with the play and record buttons selected for all four channels. The selection of these buttons determines what happens on the individual channel when you do various tasks. The Play button is a green triangle, while the Record button is a red circle. When the Play button is selected, that channel will play when you hit the master Play button. When the Record button is selected, any changes you make to selections will affect that channel. Both Play and Record are completely independent of each other and themselves across all channels, so you'll need to keep your eye on what's selected as you work.
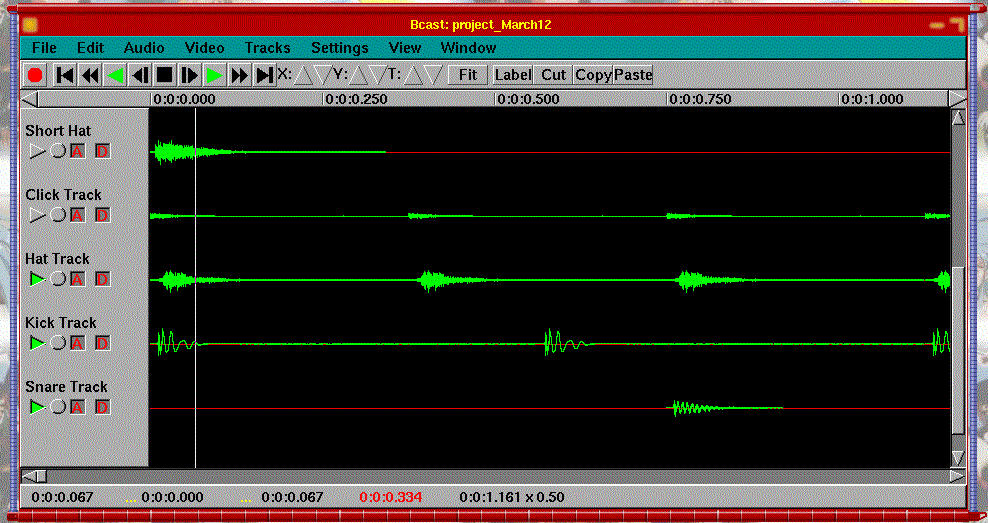
The first thing to do, since we won't be doing video editing, is deselect the Record buttons on the two audio channels and click Delete Tracks in the Tracks menu. Since the two video tracks have their Record buttons selected, they will be affected, thus deleted, leaving only the two audio tracks. You can rename these if you'd like by clicking on the name of the track and typing something else. In Figure 1, you can see my drum tracks, all labeled. I used downloaded samples, which is why I have my drums set up before I have done any recording.
Figure 1. Drum Tracks Labeled and Ready to Use
To import samples or existing .wav files make sure all your samples are in the project directory, then select Append from the File menu and choose the file to import. It will create a new track or tracks, if it is a stereo sample.
The Cut, Copy and Paste buttons work similarly to those on other programs but only on tracks that have their record buttons selected. For example, to cut a section of a track that you don't like, click that track's Record button, click and drag the mouse from left to right over the section (like selecting text in a word-processor) in the timeline window, then click the Cut button. To paste the cut section somewhere else, select the target track's Record button, click the mouse at the desired location in the timeline and click the Paste button. To add a new track to paste something into, select Add Track from the Audio menu on the main window. Keep in mind that if you have multiple tracks' Record buttons selected, it will cut, copy or paste onto all of those tracks.
When selecting part of a track to edit, you may notice that selections are made in blocks. The size of a block is determined by the video framerate, which can be changed from the Video menu. You can switch back and forth between framerates, so if you want to make a selection for cutting down to one one-hundredth of a second, set the framerate to 100, then reset the framerate to 16 for pasting a sample dead on the beat.
To save the project, select Save from the File menu and name it. If, for some bizarre reason, Broadcast 2000 crashes before you get to save the project, don't worry. Since Broadcast 2000 uses a markup language to edit the projects, all of the recorded .wav files are on the disk already. Simply restart the program and import the individual tracks into a new project. I've had it crash while creating a loop by copying and pasting a sample onto the same track several times, then clicking the Play button. Saving before clicking the Play button, in this case, lets it work without it crashing.
Okay, so you have a blank canvas in front of you, let's get started. To make sure you are able to hear the instrument you're about to record coming through your computer's speakers, follow along while we make a test track.
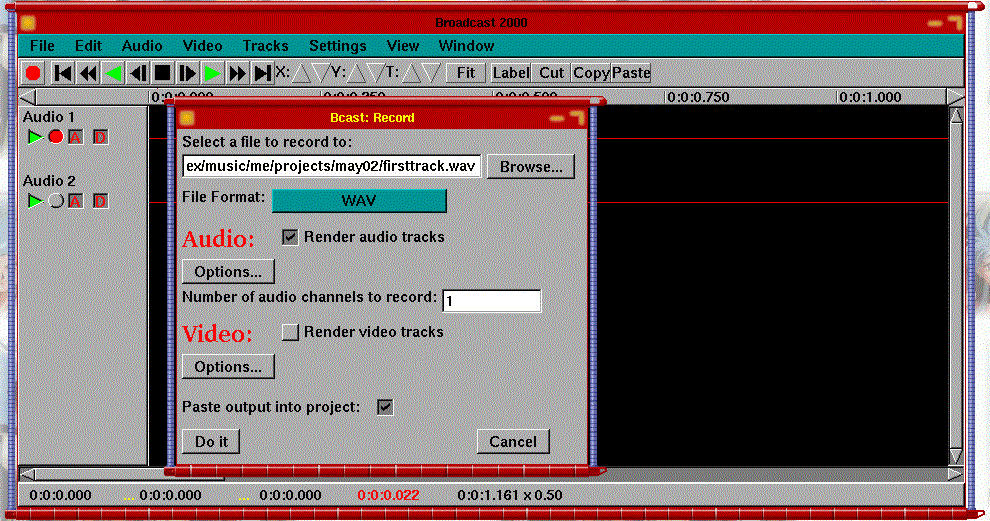
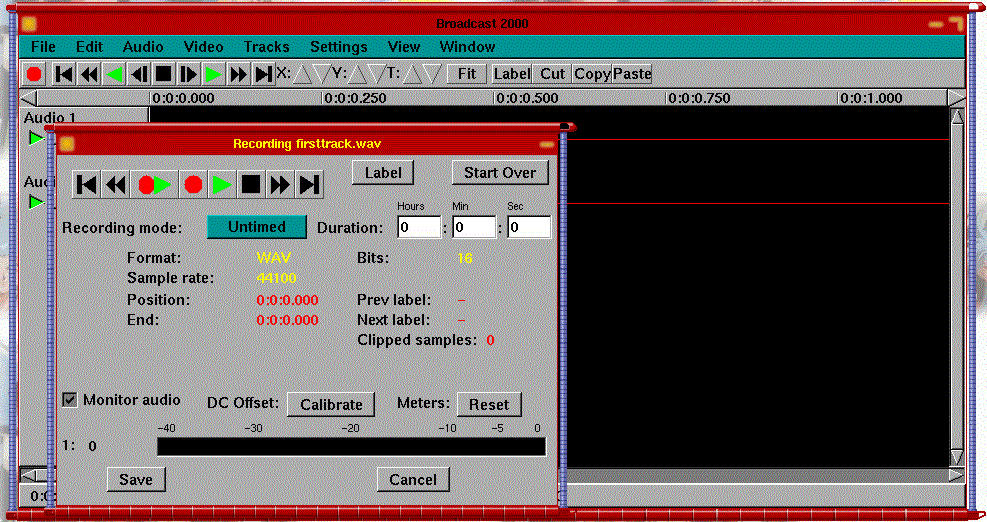
Make sure a blank track's record button is selected, then click the Master Record button to bring up the track record dialog box (see Figure 2). Click the Browse button and navigate to the directory you set up earlier. You'll want the file format to be .wav, your audio options set at 16 bits, and all other options set up as I have. Now click the Do it button, which will bring you to the real record panel (see Figure 3). If you're about to overwrite a file with the same name, it will tell you. If you're doing a retake, click Ok; otherwise, click Cancel and go back and give it another filename to save as. Set all of the options the same as what I have here, and click the Play/Record button (the one with both the red circle and the green triangle on the same button). This will play all of the tracks that have the play button selected and allow you to hear whatever comes through the sound card's input jacks.
Figure 2. Track Record Dialog Box
Figure 3. Broadcast 2000 Record Panel
You are now on the air, so start playing! If you can hear your instrument, make sure it's not too loud or too quiet, then click the Stop button, click the Full Rewind button (left-pointing triangle with the vertical line) and re-record a real track.
When you are done, click the Stop and Save buttons, and your track will show up in Broadcast. Do this for as many tracks as you need to until your entire song is recorded.
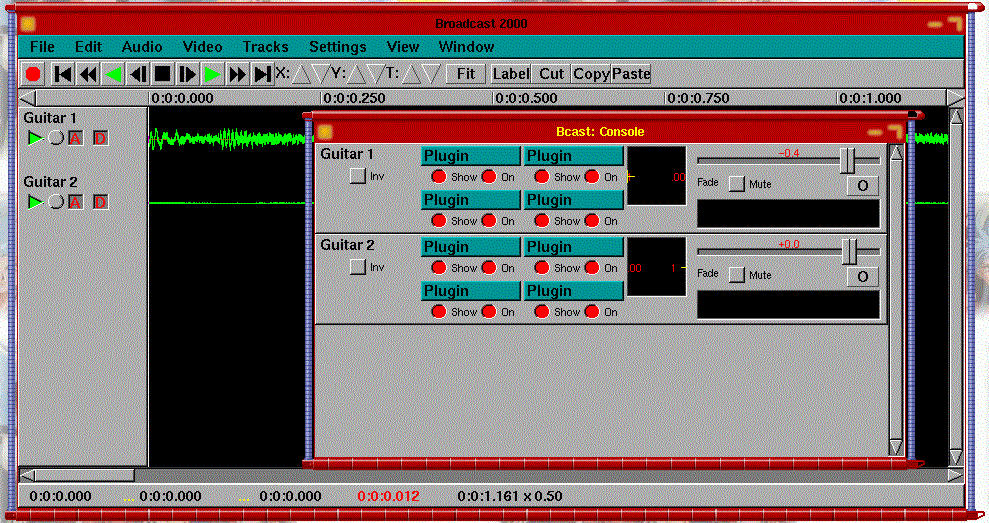
To do a quick mix of your tracks (nicer to listen and play along with), select Show Console from the Window menu on the main Broadcast window (see Figure 4). The options you'll use most on the console are panning and faders. The pan box is the black square to the immediate right of the plugins. The yellow sideways T along one edge is actually a half-hidden cross that can be moved to adjust the panning. The fader turns the volume down and up by dragging it to the left and right, respectively. Since this is digital recording, you'll most likely only need the plugins to enhance the vocals, especially if the instruments sound good before you record them.
Figure 4. Main Broadcast Window
The last thing you'll need to know before doing a final mix is how to do a fadeout. First, make sure each track that will appear at the fadeout has its record button selected. Then, highlight the fadeout area; for example, the last ten seconds of the song or so. Then from the Audio menu, select Feather Edits. For now, leave the default number of samples and click Ok.
There is no hard and fast rule as to how many samples you'll need for a fadeout, so just experiment. A higher number of samples gives you a longer fade, and you can use this technique to fade out or in of any track for any reason, such as bringing in a choir. To fade in, select the beginning part of a track.
Once you have all your tracks recorded, your fadeouts planned, and your levels and panning adjusted, it's time to make music history. Simply select Render from the File menu (see Figure 5), browse to a directory, give it a name, render your audio tracks, don't render video tracks, then make it so! Since this will be a finished product and not part of the Broadcast 2000 project, you can save it anywhere. Finally, open your favorite .wav-capable audio player, open your file and give it a listen.
Now you're done, and it is perfect. So why would you ever need Gmurf? You're ready to convert it for sharing, and you never once opened Gmurf throughout the whole process. The secret to your long-term success lies in running a clean shop behind the scenes.
As I said before, Broadcast 2000 edits your files nondestructively. Concretely, this means that using a two-second section of a five-minute track could waste perhaps 50MB of hard drive space because although Broadcast is only using two seconds, the whole track is stored. Imagine how much space you'd waste with ten such tracks.
Now, you probably won't be wasting 500MB with each project, but it's best to learn good practices from the start, and once you get into projects with 24, 32, 64 or more tracks, it's easy to eat up a 30GB hard drive.
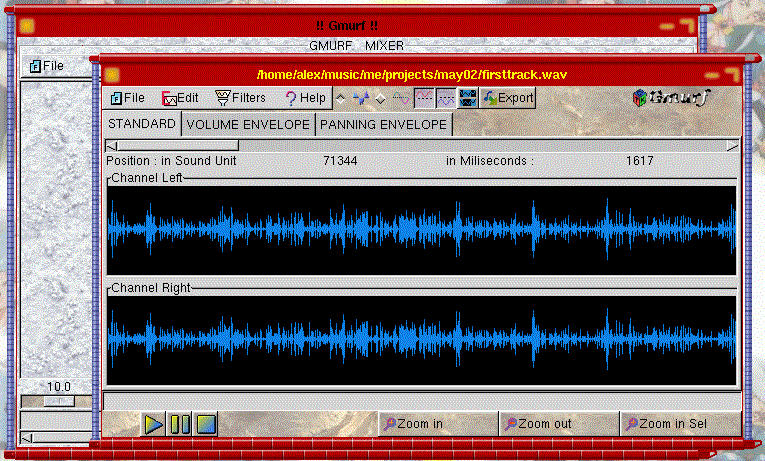
To alleviate wasted space, open Gmurf, then select Open in WE from the File menu. Navigate to your project directory and open the track you want to edit. This will open the track in Gmurf's WAV Editor (Figure 6). Using the Zoom in and Zoom out buttons will give you a finer or more coarse view of your .wav file, making it easier to edit smaller or larger sections of the file. Also, clicking the Play button will play as much of the song as is in the window, so zooming in will allow you to hear a shorter section, and you can edit small sections more quickly, especially when you're working with longer tracks.
Editing on Gmurf is a little different than most programs. The way you select a section is by clicking on the beginning of the selection area with the left mouse button, and the end of the selection area with the right mouse button, rather than clicking and dragging. Once you have a selection, Cut, Copy and Paste all work as usual from the Edit menu.
Because of the way Broadcast 2000 handles its tracks, it's best to do your Gmurf editing before making edits in Broadcast 2000. Broadcast's pointers point to specific places in a file, and if you shorten that file it will still have pointers to the same absolute place, now a new real place in the track.
In this article I've given a quick run-through of two powerful tools that you can use to create professional-quality audio on Linux. Using this article as a starting point, anyone proficient enough with both Linux and whatever instruments they wish to record can develop a good technique for making rich, professional sounding, layered musical compositions.
To progress further, you will need to practice using these programs, explore their capabilities and develop a comfortable method of working in the studio. Using the programs is the easy part. Making recordings that have a good sonic quality and are mixed properly takes hours of work experimenting, laying down tracks, making a mix, dumping it down to tape or CD, listening to it a zillion times in your car, re-recording tracks, remixing, listening to it a zillion more times in someone else's car--you get the idea.
For a more detailed walk-through, including more screen captures and expanded examples, check out my web site in the Resources section.
Alex Heizer (alexheizer@synchcorp.com) has been annoying people with his multitrack recordings for over 15 years and his love of Linux for over three years.
email: alexheizer@synchcorp.com

