
Setting up a VPN Gateway
A virtual private network (VPN) is a tool that enables the secure transmission of data over untrusted networks such as the Internet. VPNs commonly are used to connect local area networks (LANs) into wide area networks (WANs) using the Internet. Perhaps you need to build a VPN between two offices but are not sure if the large infrastructure costs associated with an enterprise-level VPN solution are justifiable. The performance of applications that are intended for use over LANs (for example those that use network file sharing) seriously can be degraded over WAN connections. Likewise, lower bandwidth and longer latency in WAN connections can affect adversely the reliability and performance of groupware and thin-client applications. Perhaps you have a home office and would like to use your high-speed internet access to connect seamlessly and securely to your office LAN through an IPSec-capable router. Or perhaps you are just curious about VPNs and IPSec in general and want to experiment.
The VPN firewall discussed in this article will run on just about any 486-or-better PC that has 16MB or more main memory and two Linux-compatible Ethernet network cards. The idea is to provide a starting point from a single, self-contained package that will allow you to create robust, secure, scalable and highly configurable VPNs that also are interoperable with many common commercial VPN implementations. If you wish to experiment on a low-maintenance firewall-VPN gateway, then the package discussed here might be ideal for you.
This article shows you how to set up, at minimal expense, a working VPN gateway that uses the IETF's (Internet Engineering Task Force) IPSec (internet protocol security) specification. IPSec is an open standard and is supported by virtually all major firewall software and hardware vendors, such as Lucent, Cisco, Nortel and Check Point. This package will give you a widely interoperable IPSec that uses the de facto standard 3DES encrypted, MD5-authenticated site-to-site or point-to-site VPN. You should be able to do this without resorting to a full Linux distribution or recompiling a standard Linux kernel with a kernel IPSec module.
The VPN system we examine here is based on FreeS/WAN (www.freeswan.org), a portable, open-source implementation of the IPSec specification. FreeS/WAN has been demonstrated to interoperate, to various degrees, with Cisco IOS 12.0 and later routers, Nortel Contivity Switches, OpenBSD, Raptor Firewall, Check Point FW-1, SSH Sentinel VPN 1.1, F-Secure VPN, Xedia Access Point, PGP 6.5/PGPnet and later, IRE SafeNet/SoftPK, Freegate 1.3, Borderware 6.0, TimeStep PERMIT/Gate 2520, Intel Shiva LanRover, Sun Solaris and Windows 2000. The official FreeS/WAN web site has a regularly updated compatibility list with the latest version of its on-line documentation. FreeS/WAN version 1.5 is included in this package.
I have created a single-diskette distribution that installs the base configuration of a VPN firewall based on the Linux Router Project (LRP, www.linuxrouter.org), a compact Linux distribution that can fit on a single, bootable floppy diskette. The distribution here is essentially Charles Steinkuehler's Eiger disk image with Steinkuehler's IPSec-enabled kernel and LRP IPSec package. Firewalling is carried out through Linux ipchains. This particular version is based on the 2.2.16 kernel of Linux. This distribution is called DUCLING (Diskette-based Ultra Compact Linux IPSec Network Gateway). Compact Linux distributions have a twisted history. LRP technically refers to Dave Cinege's compact distribution. There are many variants around, including Charles Steinkuehler's distribution (EigerStein) of Matthew Grant's defunct Eiger version (lrp1.steinkuehler.net). Another such distribution is David Douthitt's Oxygen (leaf.sourceforge.net/content.php?menu=900&page_id=1). Also, there is LEAF (Linux Embedded Appliance Firewall), a developer's umbrella that tries to coordinate releases and documentation, sort of like a one-stop shop for compact Linux distributions (leaf.sourceforge.net). I use the term LRP to refer to the compact Linux distribution presented here, even though some may consider this terminology incorrect.
If you are running MS Windows 9x, the distribution self-extracts and installs itself onto a standard 3.5", high-density floppy diskette. You also can write the image to a boot floppy if you have a system running Linux. Once the extraction is done, you will need to boot off the floppy disk you have created, copy the network drivers for your network cards over and edit the appropriate configuration files. That's it—no creating and formatting disk partitions or messing with boot managers on your hard drive. If you are not happy with the distribution, just pop the diskette out, throw it away (or reformat it) and reboot your PC. Check the links on leaf.sourceforge.net/devel/thc for more information on these options.
This distribution of LRP uses a standard ipchains-based firewall. ipchains (replaced by iptables in the 2.4 series kernels—see David A. Bandel's “Taming the Wild Netfilter”, LJ, September 2001) is a freely distributed packet filter for Linux. It is very instructive to look through the ipchains HOWTO if you are not familiar with this firewalling tool. This can be found at www.linuxdoc.org/HOWTO/IPCHAINS-HOWTO.html.
The VPN is provided by FreeS/WAN's implementation of IPSec. FreeS/WAN's IPSec implementation is compliant with the IETF's IPSec specification. IPSec is an extension to the Internet Protocol (IP) that provides for authentication and encryption. Three protocols are used to handle encryption and authentication, namely ESP (Encapsulating Security Payload), AH (Authentication Header) and IKE (the Internet Key Exchange). All these components are included in the FreeS/WAN implementation of IPSec and generally are transparent to end users. ESP and AH handle encryption and authentication, while IKE negotiates the connection parameters, including the initialization, handling and renewal of encryption keys. The only encryption scheme currently supported by FreeS/WAN is 3DES (the triple DES or Data Encryption Standard—the current de facto standard for IPSec encryption). Authentication is carried out using MD5 digests of a so-called shared secret (a shared key). The shared key could be a mutually agreed-to character string, RSA cryptographic key pairs or X.509 certificates. FreeS/WAN's KLIPS (kernel IPSec) component, which is compiled into the Linux kernel, implements AH, ESP and the handling of packets. IKE processes handle key negotiation, and renewals are implemented in FreeS/WAN's standalone pluto dæmon.
First, you will need a PC with a floppy disk drive (I have tested only 3.5" disk drives) and two network cards in it. The demands of LRP (the distribution) are minimal and do not require a powerful PC. Anything that is Intel 486-class or better with more than 8MB of RAM will do. You also will need two floppy disks. Reliable, high-density 3.5" floppy disks should do, such as promotional diskettes from AOL. I have never had any problems with generic floppy disk drives, but I have found some problems with writing the distribution to floppy disks with Imation USB U2 SuperDisk drives.
You will need to download the appropriate DUCLING.tgz/zip distribution from ftp.cinemage.com/pub and extract the contents of the archive file. If you have a static IP address, then download the static version, and if you are assigned a dynamic IP address, you will need the distribution with a DHCP client. If you are running Windows 9x, download ducling-stat-W9x-1-0.zip or ducling-dyn-W9x-1-0.zip. Extracting the .tgz file with Winzip (www.winzip.com) will produce a file, ducling-dyn-1-0.exe or ducling-stat-1-0.exe and directory modules. The .exe file is a self-extracting image that formats a floppy disk and writes the image to that disk. Run the ducling-stat-1-0.exe or ducling-dyn-1-0.exe file and place a floppy disk into the floppy disk drive. Note that any data on the disk will be overwritten.
If you are using MS-DOS or Windows 3.1, the TSR utility FDREAD.EXE must be loaded at the DOS level first if you wish to read and write to the 1,722KB format disk. FDREAD.EXE is a freeware program from Christoph H. Hochstätter.
If you are running Linux, download ducling-dyn-1-0.tgz or ducling-stat-1-0.tgz, untar the image (the example here is for the DHCP-enabled dynamic IP address distribution):
tar xvfz ducling-dyn-1-0.tgz
and write the image file, ducling-1-0.img, to a formatted floppy using the Linux fdformat and dd commands:
fdformat /dev/fd0u1722
dd if=ducling-dyn-1-0.ima of=/dev/fd0u1722
Once the floppy disk image is created as mentioned above, you will have a bootable Linux floppy diskette.
The zipfile/directory named modules contain the required network driver modules as well as optional modules for firewall masquerading. Copy the contents of the module zipfile or directory onto a separate second MS-DOS-formatted floppy diskette for the configuration portion of this discussion (below). In Linux, format a second floppy disk by running
fdformat /dev/fd0
followed by
mkdosfs /dev/fd0and mounting the floppy drive and copying the modules over. Read the documentation included in the README files, which will give you details on configuring your firewall/router.
If you are unable to fit all the desired packages and modules onto a single floppy diskette, you will need to examine alternative setups that use dual floppy diskettes (see the included README files with the DUCLING distribution), a bootable CD-ROM or even a small hard disk. Refer to the on-line sources of LRP documentation for further information.
You may be surprised to discover that LRP uses DOS-formatted floppies. You may be even more surprised to discover that the DUCLING distribution installs itself as a 1,722KB bootable disk image. The 3.5" high-density floppy is technically a 2MB format medium, and you may see these diskettes rated as 2MB “raw” or “unformatted” capacity. The 1,440KB formatted capacity is merely the result of a conventional format that writes 80 tracks on the magnetic media with 18 sectors per track. With the appropriate tools, you can create diskettes that have 80 sectors and 24 tracks per sector, giving 1,920KB per floppy. Floppies having 1,680KB (80/21 sector/tracks per sector) are used regularly for LRP distributions and seem to have a reliable track record; 1,722KB (82/21), 1,743KB (83/21) and 1,760KB (80/22) also are reported to be in use. I have found the 1,722KB format floppy to be reliable enough for testing and have no problems to report so far.
I have created and used large-format floppies of up to 1,920KB. Extremely large-format floppies tend to be nonbootable, apparently as a result of a conflict between PC BIOSes and the nonstandard sector size on the diskette. It has been reported that large-format floppies larger than 1,680KB can suffer from floppy disk hardware dependability problems. Windows NT and Windows 2000 are reported to have reliability problems writing to large-format floppies larger than 1,680KB.
MS Windows 9x operating systems generally read standard as well as large-format floppy diskettes with no configuration changes. In Linux systems, it is often necessary to mount the floppy disk with the correct format specified, i.e., /dev/fd0u1722, where fd0u1722 specifies floppy disk device 0 (fd0) and the u1722 specifies a 1,722KB format. The standard floppy disk drive in Linux /dev/fd0 defaults to /dev/fd0u1440, the 1,440KB format.
For creating and manipulating large-format floppies, consult the LRP Boot Disk HOWTO by Paul Batozech. You'll find this, and other useful articles, in the resources listed at leaf.sourceforge.net/devel/thc. For MS Windows, I have found Gilles Vollant's WinImage (www.winimage.com) to be particularly useful and user friendly. However, it is in some ways more limited than the Linux tools, such as fdformat, mkdosfs and the more recent superformat application. The self-extracting 1,722KBps images for MS Windows discussed here were created using WinImage.
Before you begin to work with LRP it is useful to note how the distribution works. If you examine the bootable diskette, you will see a series of files, including ldlinux.sys, linux, syslinux.cfg, root.lrp, etc.lrp, modules.lrp and local.lrp.
The file ldlinux.sys is the bootstrap loader that loads the kernel (the file named linux) and initial root.lrp package into memory. The kernel starts and creates a RAM disk and extracts the root.lrp package. A RAM disk is a portion of memory that is allocated as a partition. In other words, the kernel creates a space in memory and treats it like a read/write disk. The kernel then mounts the boot device specified in syslinux.cfg. The remaining .lrp packages on the boot disk are extracted as specified in syslinux.cfg and loaded to the RAM disk. The .lrp packages are merely standard UNIX tarballs (tar-gzipped archives). Once the .lrp packages are installed in the directory tree on the RAM disk, the system begins a boot based on the standard Linux rc file boot hierarchy.
LRP is simply a stripped-down standard Linux kernel with loadable modules and other software contained in sets of .lrp packages. LRP is truly Linux; generally, anything that will run on a generic Linux distribution should run off the LRP diskette. Often the obstacle to extending LRP's applications and capabilities is the space constraint of a single diskette. If you require additional capabilities, for example, remote administration through ssh, a DNS server and so on, you will want to look at multidiskette, CD-ROM or even the full disk drive distributions of LRP that are available.
Once the bootable floppy disk is created, make sure the floppy is placed in the floppy disk drive of the machine on which you wish to run the firewall/VPN. Ensure that the BIOS is configured to boot from a floppy disk. Upon booting the firewall/VPN, you will see the LRP splash screen, messages from the Linux loader followed by a login prompt.
If you have made it this far, congratulations! You have installed an LRP distribution successfully. Now you can start to configure the firewall properties of the LRP as outlined in the bundled documentation.
Once any firewalling tweaks are completed, the VPN needs to be configured. The bundled DUCLING documentation discusses the details for configuring a subnet-to-subnet setup. This involves configuring IPSec's authentication mode (/etc/ipsec.secrets), the IPSec network configuration (/etc/ipsec.conf) as well as the firewalling rules to allow access to ports 500 (UDP), 50 and 51 (TCP).
Note that you need not necessarily require a static IP address in order to run VPN links. A “roadwarrior” configuration is described in the next section, in which the one VPN client has an undetermined static IP address. I have run VPNs between pairs of nodes with dynamically assigned IP addresses. The management of VPN nodes with DHCP-assigned IP addresses becomes tricky if both IP address assignments change frequently. The following section discusses a roadwarrior configuration using DUCLING and a Microsoft-based IPSec client.
This example shows an MS Windows 9x/2000 client point-to-site using SSH Communications Security Sentinel 1.1 (Public Beta 3). FreeS/WAN is interoperable with a wide range of IPSec implementations. The ease of implementation and computability will vary depending on the product. Many IPSec products that support 3DES/MD5 encryption through IKE are interoperable with FreeS/WAN. However, I found that legally obtaining fully functional IPSec implementations that support strong encryption can be arduous, especially if you live outside of the United States.
Many vendors offer only limited capabilities in their freely available IPSec implementations. For example, a product may only support weak encryption (DES) or may limit VPN capabilities to transport mode only. It is important to distinguish between the two VPN modes that are offered through IPSec: transport mode and tunnel mode. Transport mode encrypts and authenticates traffic between two fixed end points. Tunnel mode is more useful for connecting subnets and allows tunneling through firewall and router parameters into different subnets. Basically, transport mode restricts traffic to point-to-point communication. Tunnel mode also allows point-to-site (point-to-subnet) or site-to-site communications. At least one vendor does not seem to allow its implementation of IPSec to run over a connection using a static IP address.
The SSH Communications Security Sentinel product (www.ipsec.com) does not seem to suffer from any of these problems, possibly due to the fact that the company is based outside of the US. I downloaded and tested the 30-day trial beta 3 release of Sentinel 1.1 and found it to be very easy to configure on a Windows 98 desktop PC. The Sentinel documentation provides configuration examples for interconnectivity with a FreeS/WAN VPN gateway.
Here is a summary of a roadwarrior configuration that allows remote users with dynamically assigned IP addresses to connect transparently to a LAN behind a firewall. You will need to open ports 50, 51 (TCP) and port 500 (UDP) to the dynamic IP address or the ISP's DHCP address range. Figure 1 shows the basic setup. You will need to edit /etc/network.conf on the DUCLING FreeS/WAN firewall (go into lrcfg, choose 1), then 1) and set
eth0_IP_SPOOF=NO
to disable the blocking of tunneled packets. The bundled documentation contains the detailed instructions on how to do these tasks.
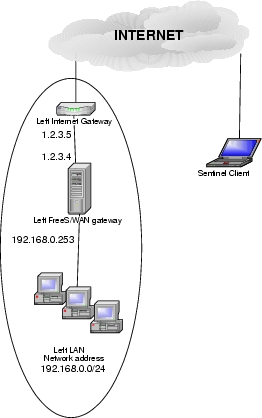
Figure 1. A Roadwarrior-to-Site Configuration
The contents of the FreeS/WAN ipsec.conf file are given in Listing 1. The corresponding ipsec.secrets file contains the entry
1.2.3.4 0.0.0.0: PSK "Put your roadwarrior secret
string here"
where the phrase in quotes is a shared-secret string. The IP address 0.0.0.0 denotes any IP address, so remember to choose a secure shared-secret string. The rightsubnet and rightnexthop parameters are left blank and imply that the connection is a point-to-subnet connection.
Listing 1. The FreeS/WAN conn Listing for the Setup Shown in Figure 1.
To set up the Sentinel IPSec service:
Download SSH Sentinel from www.ipsec.com and install, following the instructions.
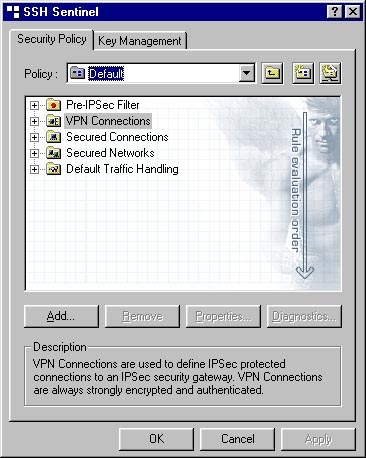
Go into the Sentinel Policy Manager (Figure 2).

Figure 2. Sentinel Policy Manager
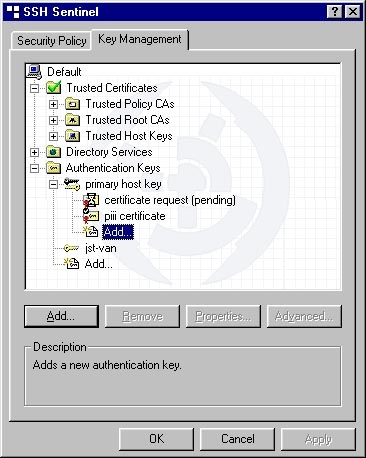
Choose the Key Management tab, Authentication Keys and select Add (Figure 3).

Figure 3. Adding a New Key
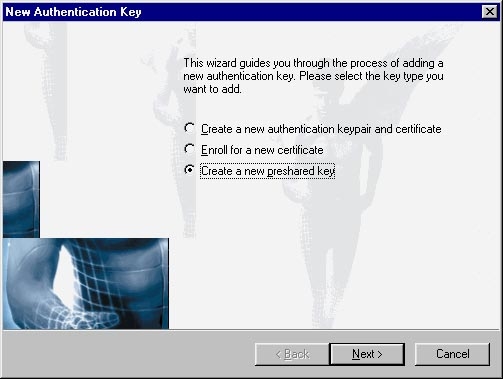
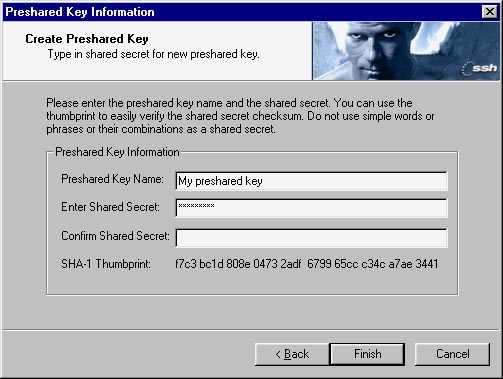
Select Create a new preshared key then Next (Figure 4).

Figure 4. Configuring Preshared Key
Type in your preshared key. It must be identical to the shared-secret string you have inserted in /etc/ipsec.conf (without the quotes). (See Figure 5.)

Figure 5. Typing in Shared Secret
Press Finish.
On the main console of SSH Sentinel Policy Manager, in the Security Policy pane, select VPN connections®Add.
Enter in the IP/hostname of the remote VPN gateway; for our example, it is 1.2.3.4, and choose the preshared secret that you created in step 5 as the Authentication key (Figure 6).

Figure 6. Entering Key and UP Information
Select 3DES encryption, Main Mode and MODP 1024 for IKE Mode and IKE Group, respectively. The Advanced pane generally can be left with the defaults.
Set the IKE SA lifetime (i.e., the interval between rekeying) to the same value as in the ipsec.conf file, typically 480 minutes (eight hours).
Save all settings and try to ping an internal node behind the firewall (try the internal interface, 192.168.x.254). You should be connected. Try running Sentinel's diagnostics to make sure you are connected. I have found that Sentinel's diagnostic mode can hang the FreeS/WAN-Windows connections sometimes. If this happens, go to the FreeS/WAN gateway and do a restart of IPSec and then bring up the various connections.
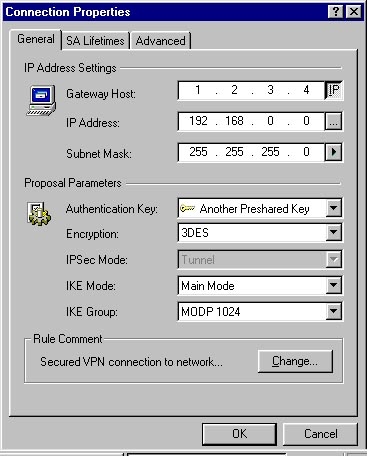
Figure 7. The VPN Connection Properties Tab
Once again, if you need to restart the connection, log in to the LRP box and type
#/etc/initd.d/ipsec restart
to restart the IPSec components.
I also found in Windows 2000 Professional (but not Windows 98) that I had to add the routing manually to the shared subnet 192.168.0.0/24 from the DOS console:
route ADD 192.168.0.0 MASK 255.255.255.0 1.2.3.4
(refer to the documentation for the Microsoft route command).
This article outlines the means to implement a firewalling VPN gateway from a single 3.5" floppy diskette. With a single floppy diskette, you should be able to connect hosts and networks of various topologies securely using the Internet. The DUCLING distribution is a bare-bones distribution. Once you are convinced that a FreeS/WAN VPN can fulfill your needs, you can look at either going to a more full-featured LRP distribution or even a full-blown Linux system, implementing such things as remote access (via the secure shell, ssh, for example) or a DNS server.

Duncan Napier runs Napier Systems Research, a Network and IT consultancy based in North Vancouver, British Columbia, Canada. He can be reached at napier@computer.org.
