
Supporting IPv6 on a Linux Server Node
The current version of the IP protocol, IPv4, has proved to be robust, easily implemented, interoperable and has stood the test of scaling to the size of today's Internet, most of which uses IPv4—now nearly 20 years old. IPv4 has been remarkably resilient in spite of its age, but it is beginning to have problems. The initial design of IPv4 did not take into consideration several issues that are of great importance today, such as a large address space providing a solution for the address crunch problem, mobility, security, autoconfiguration and quality of service.
To address these concerns, the Internet Engineering Task Force (IETF) has developed a suite of protocols and standards known as the IP version 6 (IPv6), which incorporates many of the concepts and proposed methods for updating IPv4. Some of the IPv6 features include a new header format, a larger address space (128 bits), an efficient and hierarchical addressing and routing infrastructure, the availability of stateless and stateful address security, built-in security, better support of mobility and a new protocol for neighboring node interaction. As a result, IPv6 is not only going to fix a number of problems in IPv4, it also will add many improvements. IPv6 is expected to replace IPv4 gradually, with the two coexisting for a number of years during a transition period.
There are two main IPv6 implementations for Linux: the implementation that comes as part of the Linux kernel and the USAGI (UniverSAl playGround for IPv6) implementation. The USAGI Project works to deliver a production-quality IPv6 protocol stack for Linux, tightly collaborating with the WIDE, KAME and TAHI Projects. It is run by volunteers from various organizations contributing to the Linux and the IPv6 communities via the delivery of the IPv6 protocol stack. Currently, there are many efforts in the different distributions teams, and USAGI is trying to unify them so that there is one IPv6 implementation for all Linux distributions.
For the purpose of this article, we use Linux kernel 2.4.5 from kernel.org. We first show how to build a kernel with IPv6 support, then how to upgrade the basic networking software to support IPv6 and finally, how to connect your IPv6-enabled server to the IPv6 Internet using the services from the www.freenet6.net Project.
The first step is to download the Linux kernel from kernel.org and uncompress it:
tar -xzf linux-2.4.5.tar.gz
You will have a directory called linux. You need to move this directory into /usr/src and rename it linux-2.4.5 to reflect the kernel version. Next, you need to create a link to the 2.4.5 source directory:
ln -s /usr/src/linux-2.4.5 /usr/src/linuxHaving done that, you need to configure the new kernel to enable support for IPv6:
cd /usr/src/linux
make xconfig (or menuconfig)
We need to enable two options in the kernel configuration. First, go to Code Maturity Level and enable development/incomplete code/drivers:
"Prompt for development and/or incomplete
   code/drivers"    YES

Figure 1. Enabling Support for Experimental Features
Then go to the Networking Options. There you will enable the IPv6 protocol:
IPv6 Protocol (EXPERIMENTAL) YES

Figure 2. Linux Kernel IPv6 Configuration
This is all the configuration you need at the kernel level. Next, you should save this configuration and exit by clicking on the Save and Exit button (see Figure 3). This will create a .config file in /usr/src/linux, which is the kernel configuration file. Now you are ready to compile the kernel by following these steps:
make clean
make dep
make bzImage
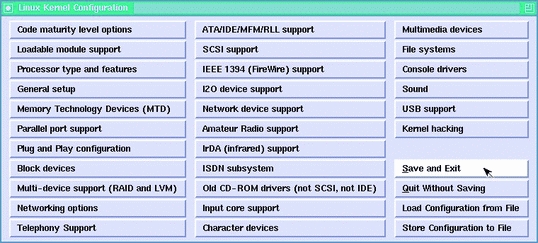
Figure 3. Saving the Configuration
The result will be a new kernel image created in /usr/src/linux/arch/i386/boot/. If you added other features as modules you need to compile and install the modules by applying:
make modules
make modules_install
At this point you need to copy the new IPv6-enabled boot image to /boot:
cp /usr/src/linux/arch/i386/boot/bzImage
    /boot/bzImage.ipv6
and update your System.map file:
cp /usr/src/linux/System.map \
/boot/System.map-2.4.5-ipv6
ln -fs /boot/System.map-2.4.5-ipv6 /boot/System.map
The only remaining step is to update /etc/lilo.conf file to add an entry for the new IPv6-enabled kernel. Edit the /etc/lilo.conf file and add a new entry as follows:
image=/boot/bzImage.ipv6
label=linux_ipv6
root=/dev/hda1 # change this to reflect your own
               # partition
read-only
Then update the LILO configuration by applying
/sbin/liloThis will add an entry called linux_ipv6 that will be presented at LILO at boot time. You are now ready to reboot your server. When LILO comes up, choose to boot linux_ipv6. Et voilà! Your system will boot with IPv6 support in the kernel. Type ifconfig at the prompt to verify and see the outcome. It should show the IPv6 local address ::1 in your loopback configuration (see Figure 4).

Figure 4. ifconfig Loopback
Once the kernel supports IPv6, you need to install some tools to test your setup and to use IPv6 transport with other systems. First, you need the basic network utilities to support IPv6 to be able to configure your interface, in addition to some other IP utilities such as ping6, telnet6, etc., and to be able to do some basic IPv6 testing.
There are three packages that provide these utilities: net-tools, iputils and the NetKit utilities. The must-have packages are the first two; NetKit is optional. In addition, if you want to have the ability to debug potential IPv6 network problems that may arise, you need to have support for IPv6 in tcpdump and libpcap. In the following sections, we cover the installation of all the above-mentioned packages.
net-tools is a collection of programs to control Linux's networking, which includes commands such as arp, hostname (domainname, dnsdomainname, nisdomainname), ifconfig, ipmaddr, iptunnel, netstat, rarp, route and plipconfig. This package is available for download from www.tazenda.demon.co.uk/phil/net-tools.
To install the package on your system first download the packages directly into /usr/src. Then enter these commands separately:
cd /usr/src
tar xIvf net-tools-1.60.tar.bz2
cd net-tools-1.60
./configure.sh config.in
The configuration will ask a few questions that you need to answer to be able to configure net-tools. It is suggested that you answer yes to the following questions:
INET6 (IPv6) protocol family (HAVE_AFINET6) [n]    y
SIT (IPv6-in-IPv4) support (HAVE_HWSIT) [n]        y
Build iptunnel and ipmaddr (HAVE_IP_TOOLS) [n]     y
Then, you need to compile and install net-tools:
make
make install
The binaries will be installed in /sbin and /bin, and you can start using them assuming that you have rebooted into an IPv6-enabled kernel.
This package includes the following tools: ping, ping6, traceroute6, rdisc, clockdiff, tftpd, tracepath, tracepath6 and arping. It may be that the installed IP utilities on your system do not support IPv6. The first step is to check if the currently installed version is IPv6-compliant by typing the following at the command shell:
rpm -q --qf "%{NAME}-%{VERSION}\n" iputils
If the outcome is iputils-20000121 or newer, then you do not need to perform the installation of the latest iputils package. Otherwise, you need to follow these steps to install the utilities on your system. First, download the package from ftp.inr.ac.ru/ip-routing. For our setup, we used iputils-ss001110.tar.gz. Next, untar the package in /usr/src:
tar -xzf iputils-ss001110.tar.gzFinally, compile iputils with make.
The package does not provide a make install. Therefore, you are free to place the binaries in a directory of your choice. However, you need to make sure that the old versions of the tools you have do not conflict with the newer versions in your path. Save the new binaries in /usr/local/iputils/bin/. The package provides man pages for every tool. You also need to move the new man pages into a directory that man searches; to check which directories are in the man path, type manpath.
These utilities are basic tools to work with and test your new IPv6 configuration. NetKit includes the following tools: ping, finger, telnet, rwho and their respective dæmons. These are very useful utilities because we can compile them with IPv6 support. The package is available for download from freshmeat.net/projects/netkit. The version we tested was nkit-0.5.1.tar.gz.
Here are the steps you need to follow to install these utilities on your Linux server. First, download the latest NetKit package from the referenced web site. Then move the downloaded file to /usr/src. Unpack the package with:
tar -xzf nkit-0.5.1.tar.gz
Next, run ./configure. Compile with make clean and make, and copy the binaries to /usr/local/bin:
cp telnet/telnet /usr/local/bin/telnet6
cp telnetd/in.telnetd /usr/local/sbin/in.telnetd6
cp finger/finger /usr/local/bin/finger6
cp ping/ping /usr/local/bin/ping6
cp fingerd/in.fingerd /usr/local/sbin/in.fingerd6
At this moment, you should have basic functionalities, as you can, for instance, ping6 your local IPv6 loopback (Figure 5).

Figure 5. ping6 in Action
Please note that if you are using Red Hat 7.x, you need to apply a patch to the NetKit package. The patch is available from ftp.bieringer.de/pub/linux/IPv6/netkit.
There are several optional utilities that you can install on your system that extend their support for IPv6. For the purpose of this article we mention only three packages: libpcap, tcpdump and xinetd.
If you need to understand what is happening at the packet level of your IPv6 network/connection, you need to have IPv6 with libpcap and tcpdump. libpcap is a system-independent interface for user-level packet capture that provides a portable framework for low-level network monitoring. On the other hand, tcpdump is a tool that provides network monitoring and data acquisition.
If you want these functionalities, you need to download the latest versions and install them on your system. The versions we tested were tcpdump 3.6.2 and libpcap 0.6.2. First, download the packages from www.tcpdump.org and move them to /usr/src. Then unpack them with:
tar -xzf libpcap-0.6.2.tar.gz
tar -xzf tcpdump-3.6.2.tar.gz
After unpacking, you will have two directories, one for each package. Next, you need to follow these steps for each package; however, you need to apply them first to libpcap and then to tcpdump. First, run the configuration script while enabling IPv6:
./configure --enable-ipv6Then compile with make clean and make. Lastly, install the binaries with make install.
After following these steps, you need to adjust your path to include the new binaries that support IPv6. You also may want to edit /etc/profile and include /usr/local/sbin and /usr/local/bin within your PATH variable, and reload /etc/profile for the new changes to take effect:
source /etc/profile
If you want to be able to telnet6 to your system, you need to compile xinetd with inet6 support. Normally, the installed inetd dæmon isn't ready to handle IPv6 addresses. Therefore, you need to upgrade to xinetd. To download the latest version of xinetd go to synack.net/xinetd. Our setup was tested with xinetd-2.1.8.8p3.tar.gz.
Download xinetd-2.1.8.8p3.tar.gz (or latest) into /usr/src and unpack it with:
tar -xzf xinetd-2.1.8.8p3.tar.gz
Next, run the configuration script:
./configure --with-inet6 --prefix=/usr/local/binThe --prefix=/usr/local/bin is used to specify that the resulting binaries should go under /usr/local/bin. Then compile and install:
make clean
make
make install
Next, you need to create a configuration file from your old inet.conf:
/usr/sbin/xconv.pl < /etc/inetd.conf > /etc/xinetd.confwhere /usr/sbin is the path to the xinetd executable.
As a side note, you need to make sure that in the xconv.pl script, the first line contains the right path to the Perl binary to be able to execute.
Next, you need do some very minor changes in /etc/xinetd.conf to reflect the usage of the telnet6d and tftp6d, instead of the usual IPv4 Telnet and TFTP dæmons. Having done that, you will be set to Telnet and FTP to your system over IPv6.
There is a wide range of applications that support IPv6. However, we are going to mention only one server application, the Apache web server. Apache is the most popular web server on the Internet (source: Netcraft.com). The latest beta release, Apache 2.0.16 beta, includes support for IPv6, which makes it a good application for testing your IPv6 setup. If you download the latest version of the Apache web server and install it on your system, you will be able to serve web pages over IPv6.
Figure 6 presents a screenshot of the Mozilla browser when trying to access “http://[::1], which is the IPv6 local loopback.
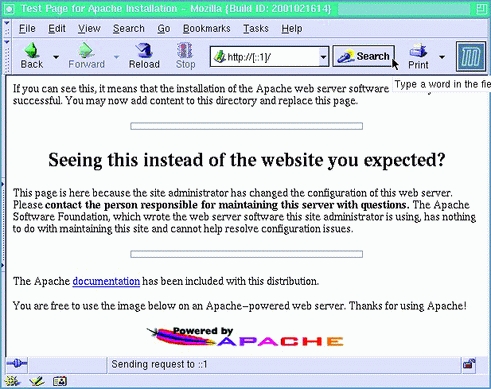
Figure 6. A Request for ::1
For your convenience, you may want to update /etc/hosts file to include:
::1 ip6-localhost ip6-localhost
Then, instead of using ::1, you can use ip6-localhost.
Don't forget to check the /etc/protocols. If the below-mentioned entries are not there, you need to append them for IPv6-protocol support:
ipv6   41 IPv6             # IPv6
ipv6-route 43 IPv6-Route   # Routing Header for IPv6
ipv6-frag  44 IPv6-Frag    # Fragment Header for IPv6
ipv6-crypt 50 IPv6-Crypt   # Encryption Header
                           # for IPv6
ipv6-auth  51 IPv6-Auth    # Authentication Header
                           # for IPv6
ipv6-icmp  58 IPv6-ICMP  icmpv6 icmp6M   # ICMP for
                                         # IPv6
ipv6-nonxt 59 IPv6-NoNxt   # No Next Header for IPv6
ipv6-opts  60 IPv6-Opts    # Destination Options
                           # for IPv6
Back in 1996 when the first IETF specifications for IPv6 were done, there was an interest in having a test backbone for IPv6. During IETF-Montréal in 1996, the 6bone (IPv6 backbone) was born. It uses test (but still valid) addresses in the 3ffe::/16 range. At the beginning, most of the backbone was done using tunnels over the current IPv4 Internet. This makes a virtual IPv6 network over the IPv4 Internet. Nowadays, the 6bone is made of both native links and tunnel links. The 6bone is there for testing, so there is no service-level agreement between the organizations, but this doesn't mean it is not reliable or valid. Any traffic from and to 3ffe::/16 is valid without any limitation.
In July 1999, the three regional registries, ARIN for Americas, RIPE for Europe and Africa and APNIC for Asia, started to give regular nontest addresses to providers, starting in the 2001::/16 range. All the sites that have addresses from that range form the production IPv6 Internet.
To connect to either the 6bone or the IPv6 Internet, you need (as in IPv4) a provider that offers the service. If you can't find one directly, or if your current one does not offer the service, then the easy solution is to make a tunnel to a provider or a site that is willing to offer you the transit service.
As in the early days of the Internet, a project aimed to help people start using IPv6 is offering a free and automated tunnel service that can connect any individual or organization to the IPv6 Internet. The project is called Freenet6.net and is run by Viagénie, a consulting firm, as a free, volunteer and run-on-a-best-effort basis. The service is very popular in the community because of the easy and fast access to the Internet.
Freenet6 is modeled from the tunnel broker (RFC 3053) where an IPv6-over-IPv4 tunnel is established between a node and the tunnel broker. Freenet6 is an enhanced version where the node is using a tunnel setup protocol (TSP) to negotiate the establishment of the tunnel with the server. The client node may be a host or a router. The TSP server Freenet6 provides not only tunnels but also a large address space to any user of the service. The address space provided is a /48, which gives (16 bits) 65,536 subnets, each may have up to 264 nodes (64 bits). This is much more than the entire current Internet! This address space is assigned to the user and will survive over a change in the IPv4 address of the client node. This enables any user or organization to have the freedom of billions of addresses for servers and services; this was not easy to do with NAT in IPv4.
An IPv6-over-IPv4 tunnel is made with both end points configuring the IPv4 and the IPv6 address of the other end point. When one of the end points changes its IPv4 address, then both end points of the tunnel need to change their configuration accordingly. This is especially cumbersome when the IPv4 node is doing dial-up or changing addresses often. TSP, as implemented in the Freenet6 service, can be configured to take care of this. Each time the tunnel client changes its IPv4 address, for example, at boot time with DHCP service, the TSP client sends updated and authenticated information to the server, so the tunnel remains active. Supported client nodes of the Freenet6 service are Linux, FreeBSD, OpenBSD, NetBSD, Windows, Solaris and Cisco. Figure 7 illustrates the basic architecture of Freenet6.

Figure 7. Freenet6 Architecture with One Host
To use the Freenet6 service after installing IPv6 on Linux, you have to take the following steps. First, go to www.freenet6.net and register a user name. Then download the TSP client for Linux. Follow the instructions for compiling and installing it. Next, configure the tspc.conf file provided. Add your user name and password. Then start the tspc client:
tspc -vf tspc.conf
You may want to put the tspc client command in your boot sequence so that it will automatically re-enable the tunnel at boot time, even if your IPv4 address changes.
Freenet6 can give you either one IPv6 address if you have a host, or it can give you a full /48 if you have a router. Freenet6 will configure Linux to fit the role.
In the router case, you will receive a /48, and the first subnet on your router will be configured for router advertisements. This means that hosts on that subnet will receive the prefix and autoconfigure themselves, as shown in Figure 8.
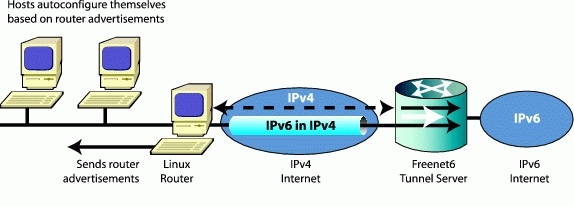
Figure 8. Freenet6 Architecture with a Router and Multiple Hosts
There are many ways to connect to the IPv6 Internet. Freenet6, together with the TSP protocol, enables an easy IPv6-tunneled connection with a permanent address space so that if you change your IPv4 address, the IPv6 addresses and connection remains stable.
As part of our activities in the Open Architecture Research at Ericsson Research Canada, we are conducting several IPv6-related projects, such as supporting IPv6 on our telecom-grade server nodes, porting application servers to work with IPv6 and establishing research projects in different IPv6 areas.
One of the interesting activities we carried out was to experiment with the Linux IPv6 implementations currently available and present recommendations to decide which implementation to adopt for our Linux processors. The recommendations were based on IPv6-implementation characteristics, such as its development speed, its compliance to the standards and its performance vs. other implementations. The results were presented during the Linux Symposium in Ottawa, Canada, June 26-29 (www.linuxsymposium.org/2002/view_txt.php?text=abstract&talk=93).
For 2002, we continue to support IPv6 on our Linux clusters. Our current efforts are in the direction of supporting IPv6 on the SIP and SCTP implementations for Linux, as well as building an IPv6 benchmarking environment capable of testing the performance and scalability of platforms and applications running over IPv6.
In closing, it's important to know that one of the key advantages of IPv6 is addresses. Any individual can receive as many addresses as the current IPv4 address space. This empowers users with complete freedom to deploy servers and services without having to take care of NAT problems and limited address space. Welcome to the freedom of deploying services on the Internet!
We'd like to thank Ericsson Open Architecture Research for approving the publication of this article, Canarie, Inc. (www.canarie.ca) for funding part of the Freenet6 Project and David Gordon (David.Gordon@Ericsson.ca) for his help in the ECUR Lab setting up IPv6 nodes and editing and reviewing this article.
Ibrahim Haddad (Ibrahim.Haddad@Ericsson.com) currently is a researcher at the Ericsson Corporate Research Unit in Montréal, Canada. He is primarily involved in researching carrier-class server nodes for real-time, all-IP networks and represents Ericsson on the Technical Groups of the Open Source Development Lab. Marc Blanchet works at Viagénie, a consulting firm specialized in IP engineering, IPv6 and network security. He has been involved in IPv6 since 1995 and has written many IETF documents on IPv6. He also wrote Migrating to IPv6, published by Wiley.
