
InDepth
On the Internet, one can find a mass of information that is often organized into very different kinds of directories. The first attempt to establish a standard for directories was made by X.500, an address book designed to provide mail addresses for the X.400 mail application. To retrieve data from this directory, the directory access protocol (DAP) was used, but it was something of a heavyweight.
Other directories were later developed, and although often quite different, most had in common a base in the X.500 standard. There also came a new protocol to retrieve data, the lightweight directory access protocol (LDAP), which nowadays can be used on almost any computer platform to get data out of almost every X.500-compatible directory.
The use of this lightweight directory access protocol will be examined in this article. First we'll take a look at the composition of the directory from which one can access data using LDAP, then we will take a look at how this protocol can be used for Linux. Finally, I will explain how you can even use an LDAP directory to authenticate users on your system, which can be an interesting alternative to network information service (NIS).
LDAP can be used to get information from an X.500-compatible directory. This directory is a hierarchically organized database in which different kinds of data are made accessible. Often it is used to store names and mail addresses, but you can also keep information about resources on the network or everything needed to authenticate users on your Linux computers. The hierarchy of the directory is created by the use of container objects, which are also referred to as directory components (DCs). These DCs can be compared to the domains used in the DNS hierarchy. The LDAP containers even can be linked to DNS domains; so if your company has a registered DNS domain name, like azlan.com, you can make LDAP organizational units to obtain names, such as ou=training, dc=azlan, dc=com.
In the container objects are the leaf objects, also referred to as entries because they are actually nothing more than entries in the LDAP database. An example of such a leaf object is a user with his or her associated mail address and, if you like, all the other information needed to authenticate this user on your system. Each of these entries has a unique name, called the distinguished name (DN). For example, the user Paul in the training department at Azlan, which has a registered .com domain, gets the distinguished name of cn=Paul, ou=training, dc=azlan, dc=com. Besides that, the entry has a common name (CN), a unique identifier of the object in its container; you can compare that to a person's surname.
All these objects have attributes that define the information associated with the object; a user object, for example, can have such attributes as an e-mail address and a password. If you want to use LDAP to authenticate Linux users, it is important that these attributes have the proper values. That is, you need an attribute that represents the UID field from /etc/passwd if you want to be able to use your Linux resources. The exact definition of the entries, the place where they can occur in the directory and the attributes associated with them, is done in the schema. In Linux, the entries are defined in the file slapd.oc.conf and the attributes in slapd.at.conf.
The common data format used to get information into the LDAP database is the LDAP data interchange format (LDIF). If you want to use it, it is very important that mandatory attributes for each of the entries are specified; if not, you get some nasty error codes when you try to define the objects. Mandatory attributes are defined in spad.oc.conf.
In Linux, probably the most used LDAP implementation is OpenLDAP (www.openldap.org). Proprietary directories are available that are LDAP-compatible, such as Novell's eDirectory or Netscape's directory. After installation of OpenLDAP on Linux, (often part of a default server installation) some files are copied to your system. Before we take a look at the actual configuration, let's get an overview of the different files copied.
The most important program file that is part of your LDAP installation is the dæmon slapd, the standalone LDAP dæmon. This is the process you need to activate if you want all the goods of LDAP on your system. If you use more than one LDAP server on your network, and you want to replicate data between these servers, you also need slurpd. slurpd is the process that replicates data from an LDAP master server to one or more LDAP slave servers.
To configure your LDAP server, of course, you need to edit some configuration files. Most of them are in /etc/openldap, but pay attention. Sometimes the same files are also in other directories, such as /etc, which can make it hard to get a good configuration. If the files in /etc/openldap exist in more than one location, I personally prefer to keep only the files in /etc/openldap and make links to them at all other locations.
The most important configuration file is slapd.conf; you can specify almost all the behavior of slapd in it, and it is the file you want to edit before you run slapd. Besides slapd.conf, there are two files in which the schema is kept: slapd.oc.conf and slapd.at.conf. In most cases you don't need to do anything with these; they are good as they are. In some cases, however, you do need to edit them in order for an application to work. The last configuration file is ldap.conf; it is a small but important file used on an LDAP client to identify the server from which the client needs to get its data.
Besides these configuration files, there are some commands you can use to get data in your directory and to test if there's actually anything in it. ldapadd is used to add data to the directory, ldapmodify to modify attributes of existing entries and ldapsearch to find some specific entries. With these and a few other commands, you can manipulate data in your directory by means of LDIF files.
The last files we'll talk about are the modules that are used if you want to get your system to authenticate on an LDAP server. They are part of other software packages, so they are not always installed on your system. The module that's used by the nameservice switch is called nss_ldap. You need to specify in /etc/nsswitch.conf that you want to retrieve information from an LDAP directory instead of, for example, /etc/passwd. Another important module is pam_ldap. This is the module you need in Linux to let your users authenticate on an LDAP database, by means of the pluggable authentication modules (PAM). In fact, it's not difficult to configure an LDAP directory on your system. Only four steps are needed to complete setup.
If LDAP isn't installed as part of the default server installation on your system, you can download and install it from http://www.openldap.org/ or one of its mirror sites. To accomplish the installation, first untar the tarball with something like:
tar -zxvf openldap-stable-xxxxx.tgz
where xxxxx is the version number of the file you downloaded. Then activate the directory created in the preceding step, and run the configure script in this directory. This script verifies that all conditions to install LDAP on your system have been met. Run make; first you make the dependencies with make depend, then you compile the program with just make. Now you can see if everything compiled correctly by running make in the directory /test. Finally, you can actually install the software on your system; type make install in the directory created when you expanded the tarball.
After the installation, you'll find an example of the configuration file slapd.conf in the directory /etc/openldap. You will need to edit it to meet the requirements of your organization. For starters, you don't need to make it too complicated; edit the example file to look something like Listing 1.
Listing 1. Example of slapd.conf
Let's take a look at the most important lines in this file. The first two lines are used to include two extra configuration files. In this case, they are the schema files, which are not modified at all, but you do need to instruct slapd as to where it can find them. The line “schemacheck = off” is also not too exciting; it tells slapd that it doesn't have to check the schema. After that there are another two lines that point to some extra files: slapd.pid, which keeps the PID slapd is using, and slapd.args, which keeps the arguments that were used when slapd was started. Then there's the line that defines the kind of database you are using. You can specify ldbm, shell and passwd, but ldbm is the most common.
Then there are three important lines. The first begins “suffix dc=azlan, dc=com”; this line defines the standard container in which slapd should work. In my case, it is equal to the DNS name of the company I work for. Then the name of the account allowed to manage or make modifications to the database is mentioned by its full distinguished name. The third line defines the password used by this manager; as you see, it is written as a plain text password, which isn't very secure, but we'll talk about that later.
The line “directory /usr/local/var/openldap-ldbm” defines the location of the directory where the LDAP database will be installed. Make sure that its mode is 700 and that the owner of the slapd process can read and write to it.
After these lines there are some options that aren't strictly necessary but can be very handy. First is “lastmod on”, an option that keeps track of the users that make modification to objects. For that, the attributes modifiersName, modifyTimestamp, creatorsName and createTimestamp are used. Then we have options that do some indexing. Unfortunately, OpenLDAP isn't the fastest LDAP directory around, so it could be worthwhile to speed things up with some indexfiles. loglevel 64, which accomplishes extensive logging, is good if you want to make things work more quickly. The minimal value for this parameter is 1, the maximum is 256 and between that you can use 2, 4, 8, 16, 32, 64 and 128.
Lastly, there is the specification of some access rights to the directory. The default is “read”, meaning anyone can read anything, including the passwords. The four lines starting with “access to attr=userpassword” contain the specifications for who can do what with the passwords in the directory. The first line specifies that everyone is allowed to modify his or her own password. Root is allowed to write to any password, while normal users can read but not write to passwords (necessary, of course, to be able to log in to the system).
Once you've edited slapd.conf to your satisfaction, the next step is to start the LDAP dæmon slapd. Of course, you could type slapd to do that, but you can also tell it to show you all debug messages by adding the option dn, in which n represents the number of the debug level you'd like to see.
Now you can go on to the next step, which is to add data to the directory. In this example, we'll add some simple data. To do this, you have to compose an LDIF file that could have the contents shown in Listing 2.
If you've made a file like Listing 2, which could be called ~/users.ldif, you can add it to the directory with
ldapadd -D "cn=manager, dc=azlan, dc=com" -W < ~/users.ldif
You will be prompted for your password, which is, of course, the password of the root account as specified in slapd.conf. If everything goes well, the data should now be added to the directory.
Many errors can be solved by verifying whether slapd is really running (oh yeah, it happens) and whether you have any extra spaces in your configuration or LDIF files.
Now that you've added the data to the directory, you can actually determine whether it works with the command
ldapsearch -L -b "dc=azlan, dc=com" -W "(objectclass=*)"
You should get all data in the directory returned as a result (see Figure 1).
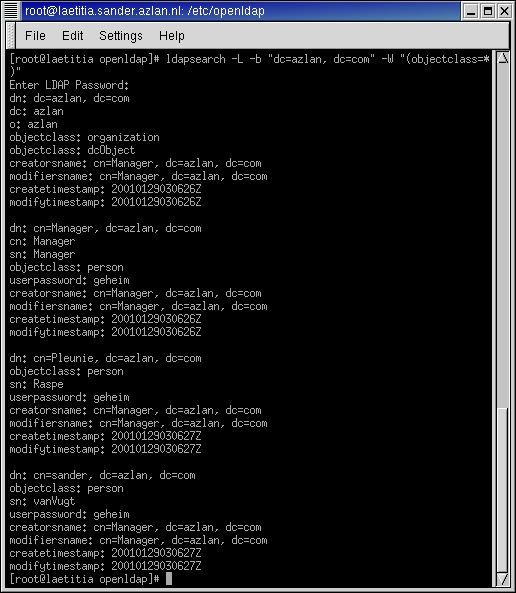
Figure 1. ldapsearch
Now that you've come this far, you can do a lot of things with your directory. You could, for example, simply take your browser and look for data in your LDAP directory. That isn't the most interesting part though. As an alternative, you can configure your Linux client so that authentication is no longer done on your local password and shadow files, but on the LDAP server, giving you one central point from which to administer all user data instead of hundreds of computers with all their individual password files. To make it all happen, do the following.
Before you can configure your client to authenticate on an LDAP server, you should make sure all necessary software is installed. If you are using RPMs, the packages openldap, auth_ldap and nss_ldap should be present. You can verify that with rpm -q packagename. If they are not present, you can find them at rpmfind.com.
Often, two files are named ldif.conf on systems. One is in /etc and is used by nss_ldap and pam_ldap to determine where they can find required information. The other is in /etc/openldap and is used by utilities such as ldapadd and ldapsearch to determine in which container they should work. As stated before, delete one of them and make a link to the other to make things easy. Once that's done, you can put the necessary data in it. For a simple configuration you only need two lines:
BASE    dc=azlan, dc=com
HOST    laetitia.azlan.com
The first line specifies the default container where the client should look for data, and the second line gives the name of your LDAP server. Of course, your system must be able to resolve this name by means of DNS or something similar, otherwise you could use an IP address.
Next, you have to tell the nameservice switch where it should look for data. Do this by editing the file /etc/nsswitch.conf; it should contain the following lines:
passwd: files ldap
shadow: files ldap
group: files ldap
With these lines, your system first tries to authenticate users on your local password files, and if that doesn't work, it tries to authenticate on the LDAP database. So if a user exists in /etc/passwd, and he or she gives the password that is in /etc/shadow, LDAP will not be used.
Next, you should take a look at PAM. This is the mechanism used on most modern Linux distributions by the different programs that have anything to do with user authentication. It can, for example, be used by login, but also by FTP, su, ssh, passwd, etc. In recent versions of PAM, each of these programs has a configuration file, normally in /etc/pam.d. In this configuration file you can specify the PAM modules that should be used by the module.
If you want the login process to do authentication on LDAP, the corresponding configuration file could look like Listing 3.
Listing 3. Login Doing Authentication
Let's give a brief explanation. There are four processes in which user and password information is used. First there is authentication, represented in the PAM file by “auth”. This process lets you into the system, and one of its responsibilities is to check your password. Then there is “account”, which verifies whether the user has any account restrictions that could prevent him or her from logging in to the system. After that there is “password”, which is used if you want to change your password. Lastly, “session” specifies the tasks to be done if you want to use other resources on the system on which you are already authenticated.
Each of these modules has specific tasks. These tasks are specified in the PAM modules, and one of the most important is pam_unix.so. This module takes care of the normal passwd/shadow authentication and is normally required if you want access to the system. But if you are using LDAP, it is also good if LDAP is able to let you in. So before the line where pam_unix is called, there is a line where pam_ldap is called. It is not required (you still want to be able to use your system if the LDAP server is down) but it is sufficient. That is, if you can be authenticated by pam_ldap, you don't have to go to pam_unix afterward. Besides these two major modules, there are some minor modules that are not discussed here.
After you have done the four preceding steps, your computer is ready to authenticate on the LDAP directory. But is your directory also ready? To prepare your directory for authentication, you need to put all relevant user attributes in it, all the information normally in /etc/passwd and /etc/shadow. Otherwise, how could you use your precious resources without a proper user ID and all the other nice things from these files? To get the information, you can use some Perl scripts specially created to get information out of the files on your computer and into the LDAP database, or you can make your own LDIF file to import the users you want.
If you want to do it all automatically, many Perl scripts are available at http://www.padl.org/. There are scripts to import almost all settings that can also be in an NIS database—your password files, your host file, your network file, etc. Before you can use them, however, you have to edit the general configuration file, migrate_common.ph. In this file you have to change some parameters that specify the location where the data has to be created. Especially important are DEFAULT_MAIL_DOMAIN and DEFAULT_BASE; they specify the DNS domain in which users have their e-mail accounts and the LDAP container in which users must be created, respectively. Once that's done, you can start the import. For each different kind of information, there's a separate script; probably the most interesting of them are migrate_all_online.sh, which imports all network information, and migrate_passwd.pl, which imports the users on your system.
The other way to get things done is by means of an LDIF file, the contents of which must be added to the database using ldapadd. The most important thing for this file is that all the right properties are specified. Listing 4 shows an example of how to ensure this.
Listing 4. Sample Property Specification for an LDIF File
There are only two disadvantages to this method. First, the home directory isn't automatically created when you create the user in the LDIF database, but there's a PAM module named pam_mkhomedir.so that can take care of it for you. The other problem is user passwords; there's no nice method to get them in encrypted form in the database. A less elegant way to accomplish this is to create the user once in /etc/passwd and /etc/shadow, give him or her a password and copy the encrypted string out of /etc/shadow and into your LDIF file.
Once this is done, you can try the whole thing out. Delete the user from your local files, open a login prompt and try to log in; it should work just fine.


