
Checking Your Work with Scanners, Part II: Nessus
Last month we began exploring the dangerous and fun world of scanning, focusing on the powerful port scanner Nmap. Nmap helps system administrators and security auditors (and yes, prospective crackers too) determine for what services a given host is accepting connections.
Seeing what points of entry a host offers is a good start in evaluating that host's security. But how do we interpret the information Nmap gives us? For example, in one of the scans we tried last month, the output looked like Listing 1.
Listing 1. Nmap Scan Using TCP Connect, UDP and RPC Modules
Just what does this mean? Sure, we know this host is running a web server (on TCP 80), some level of RPC services (UDP 111, UDP 1026) and probably Windows shares, too (UDP 137, TCP 138-139). But which of these services are actually exploitable?
This is where security scanners come in. At the risk of getting ahead of ourselves, let's look at the output from a Nessus scan of our test target (see Figure 1).
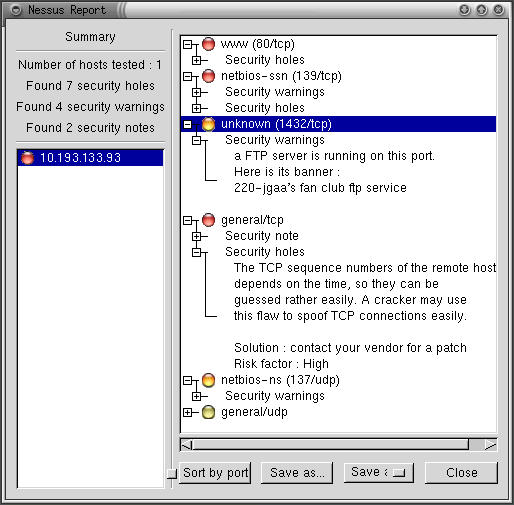
Figure 1. Nessus Scan of Windows 98 Host from Listing 1
Space doesn't permit me to show the entire (expanded) report, but even this abbreviated version shows that Nessus identified seven apparent “holes”, or potentially exploitable vulnerabilities in our target system. It also generated four additional warnings and provided two supplemental security notes.
Among other things (you can't see all of this in Figure 1, so you'll have to take my word for it), Nessus determined that this host was running the Sambar web server with no administrative password and with the dangerous mailit.pl cgi-script, had its entire C:\ drive shared without any password set (and even if one had been set, Nessus determined that this system was vulnerable to both “Null session” connections and “first-letter” passwords), was running an FTP server on TCP port 1432 (which Nmap had incorrectly guessed was running the blueberry-lm service) and had a TCP/IP stack that used predictable TCP sequence numbers. These can be exploited a number of ways, including TCP-hijacking and IP-spoofing attacks.
Yow! This host is ripe to be owned.
So, what is this deadly magic called Nessus? And why did it dance little circles around Nmap when it came to analyzing this system?
Whereas a port scanner like Nmap (which is the gold standard in port scanners) tells you what's listening, a security scanner like Nessus tells you what's vulnerable. Since you need to know what's listening before even trying to probe for actual weaknesses, security scanners usually either contain or are linked to port scanners.
As it happens, Nessus invokes Nmap as the initial step in each scan. Thus, it was misleading of me to imply that Nessus out-analyzed Nmap: Nessus depends on Nmap.
Once a security scanner has determined which services are present, it performs various checks to determine which software packages are running, which version each package seems to be at and whether they're subject to any known vulnerabilities. Predictably, this level of intelligence requires a good vulnerability database that must be updated periodically as new vulnerabilities come to light.
Ideally, the database should be user-editable, i.e., it should be possible for you to create custom vulnerability tests particular to your environment and needs. This also ensures that, should the scanner's developer not immediately release an update for a new vulnerability, you can create the update yourself. Not all security scanners have this level of customizability, but Nessus does.
After a security scanner locates, identifies and analyzes the listening-services on each host it's been configured to scan, it creates a report of its findings. The better scanners don't stop at pointing out vulnerabilities; they explain them in detail and suggest how to fix them.
So meaty are the reports generated by good security scanners that highly paid consultants have been known to present them as the primary deliverables of supposedly comprehensive security audits. This is a questionable practice, but it emphasizes the fact that a good scan produces a lot of data.
There are a number of free security scanners available: VLAD, SAINT and Nessus are just a few. Nessus, however, stands out as a viable alternative to powerful commercial products, such as ISS' Internet Scanner and NAI's CyberCop Scanner. Developed primarily by Renaud Deraison and Jordan Hrycaj, Nessus surely ranks with the GIMP and Apache as tools that equal and in many ways exceed the usability and flexibility of their proprietary counterparts.
Before we go any further, I should repeat last month's caution: knowledge is power—use it responsibly! Tools such as Nessus and Nmap should only be run against systems and networks you're authorized to scan. And note that unauthorized port scanning, while frowned upon, is generally not illegal, but unauthorized security-scanning can get you into a great deal of trouble. Consider yourself warned.
Nessus has two major parts: a server, which runs all scans, and a client, with which you control scans and view reports. This distributed architecture makes Nessus flexible and also allows you to avoid monopolizing your workstation's CPU cycles with scanning activities. It also allows you to mix and match platforms; you can use the UNIX variant of your choice as the server, with your choice of X, Java or MS-Windows clients. (Note, however, the Java client no longer appears to be in active development.)
nessusd listens for client connections on TCP port 3001 and also TCP 1241 (1241 was recently assigned to Nessus by the Internet Assigned Numbers Authority; 3001 will be phased out eventually). Client sessions are authenticated using an El Gamal-based public-key scheme and encrypted using a stream cipher whose session key is negotiated dynamically for each connection. In this regard, Nessus' cipher layer (implemented by Jordan Hrycaj using his libpeks library) behaves similarly to SSL.
Nessus' client component, nessus, can be configured to log in either transparently (i.e., with no password associated with your private key) or with a password that protects your private key, thereby preventing unauthorized users from connecting to the Nessus server from your workstation.
Once you've connected with a Nessus server, you're presented with a list of plugins (vulnerability tests) supported by the server and a number of other options. If you've compiled it into Nessus, you may also be given the option to run a detached scan that can continue running even if you close your client-session. A whole page of options pertaining to the creation and maintenance of a knowledge base can also be compiled in, allowing you to store scan data and use it to track your hosts' security from scan to scan (e.g., to run differential scans).
Note that these are both experimental features; they must be explicitly compiled into Nessus due to minor stability issues, but these will have been fixed (and the features fully integrated) by the time Nessus version 1.2 is released. I mention them here because the Detached Scan feature in particular is a good example of the value of Nessus' client-server architecture.
Once you've configured and begun a scan, Nessus invokes each appropriate module and plugin as specified and/or applicable, beginning with an Nmap scan. The results of one plugin test may affect how or even whether subsequent tests are run; Nessus is pretty intelligent that way. When the scan is finished, the results are sent back to the client. If the session-saving feature is enabled, the results may also be stored on the server.
Nessus, like most open-source packages, is available in both source-code and binary distributions. Red Hat 7.0 binaries of Nessus version 1.0.7a (the latest version as of this writing), however, are available only from redhat.aldil.org/rpm.html?id=73, courtesy of Matthias Saou (these binaries have not been compiled with the experimental features).
If you don't use Red Hat 7.0, if your distribution doesn't have its own Nessus packages (Debian 2.2 does) or if you want to use experimental features, you'll need to compile Nessus from source. Not to worry, if you first install a few prerequisites and follow Nessus' installation instructions, this compile should go smoothly. The Nessus FAQ (www.nessus.org/doc/faq.html) and Nessus Mailing List (list.nessus.org) provide ample hints to compile and install Nessus.
Nessus' prerequisites are: Nmap, the port scanner we discussed last month; gtk, the GIMP toolkit, including the packages gtk+, gtk+-devel, glib-devel and XFree86-devel; and the scripting environment m4, or libgmp (whose package is simply called gmp).
Once you've installed these, your distribution may have further prerequisites; I'm aware of two such situations. First, gmp-2.0 is needed for Red Hat 7.0 (which usually includes gmp-3.0 but not 2.0; you'll need to use RPM's --force option if you install 2.0 and 3.0 is already in place). This package is available from www.redhat.com/swr/i686/gmp-2.0.2-5.i686.html.
Second, to install or compile Nessus on SuSE Linux you must first install the packages bison, flex, gtkdev and glibdev. See www.nessus.org/doc/faq.html for more details.
After all prerequisites are in place you're ready to compile and/or install your Nessus packages. Compiling is easy: for each of the four packages simply 1) un-gzip and un-tar it; 2) cd into its directory and run ./configure; 3) make; and 4) make install. The packages should be compiled and installed in the following order: nessus-libraries, libnasl, nessus-core and nessus-plugins.
Before you run the configure script for nessus-core, consider whether you want to use the session-saving and/or knowledge-base features. Session saving allows both crash recovery (e.g., the resumption of a scan interrupted by an application or OS crash) and detached scans (see above) and is enabled by including the flag --enable-save-sessions when you run configure.
The knowledge-base feature allows you to store scan results in a database on the server, which in turn allows you to run differential scans. The configure flag to activate the knowledge base is --enable-save-kb.
Thus, if I want to compile Nessus to enable both session-saving and the knowledge base (and their corresponding features), before I compile nessus-core, I'll invoke configure this way:
./configure --enable-save-sessions --enable-save-kb
See http://www.nessus.org/documentation.html for detailed instructions on compiling and using these features (because they're experimental, that's the last thing I'll say about them in this article).
After all four packages are compiled and installed, make sure that the file /etc/ld.so.conf contains the line /usr/local/lib (if it doesn't, add it with the text editor of your choice). Then, run ldconfig to update ld's (the dynamic linker's) cache.
Finally, since one of the strengths of Nessus is the regularity with which the developers add new vulnerability scripts, it makes sense to start out with a complete vulnerability database. If you run the script nessus-update-plugins, all plugins created since the current version of Nessus was released will be automatically downloaded to your system using lynx. I recommend the usage nessus-update-plugins -v, since without the -v flag the script will not print the names of the plugins it's installing. After downloading, uncompressing and saving new scripts, nessus-update-plugins will reset nessusd so it sees the new plugins (assuming a nessus dæmon is active at that moment).
At present this script does not check these scripts against MD5 or other hashes; this mechanism can therefore be subverted in various ways. If that bothers you, you can always download the plugins manually from www.nessus.org/scripts.html, one at a time, but even then you won't know if anything's fishy unless you review each script (they go in /usr/local/lib/nessus/plugins) before the next time you run a scan.
Unless you're only going to use the Nessus server as its own client (i.e., run both nessusd and nessus on the same host), you'll need to perform additional installations of Nessus on each host you wish to use as a client. While the Nessus server (the host running nessusd) must be a UNIX host, clients can run on either UNIX or MS-Windows. Compiling and installing Nessus on UNIX client machines is no different than on servers (as described above).
Installing any of the Windows clients (WinNessus, NessusW and NessusWX) is a bit simpler, as all three are available in binary form. Personally, I prefer WinNessus of the three, since it so closely resembles the UNIX GUI (I'm lazy that way). All three Windows clients are available at www.nessus.org/win32.html.
Before we talk about proper use of the Nessus client, we'd better start our dæmon.
Okay, we're back at our Nessus server's console and ready to fire Nessus up for the first time. (Are you excited? For good reasons and not evil, I hope!) nessusd is different from many other dæmons in that it can be invoked either as a proper dæmon (i.e, running in the background) or with flags and parameters that reconfigure Nessus. Therefore, to actually start the dæmon in dæmon mode, we enter nessusd -D.
As we'd expect with a client/server application, we also need to create some Nessus user accounts on our server. These are independent of the server's local UNIX user accounts. Nessus accounts can be created two different ways. First, we can invoke nessusd with the -P flag immediately followed by a username and one-time password. This neither interferes with a running nessus dæmon nor starts a new one; it does, however, immediately update Nessus' user database and transparently restarts the dæmon.
For example, to add user “bobo” with a password of “scuz00DL”, we enter:
nessusd -P bobo,scuz00DL
The password is called a one-time password because by default, after bobo first logs in and gives this password, his public key will be registered with the Nessus server; subsequent logins will not require him to enter this password again (they'll be authenticated transparently using an SSL-like challenge/response transaction).
The second and more powerful way to create new user accounts on the server is to use the nessus-adduser command. This script actually does most of its magic by invoking nessusd, but it presents you with a convenient interface for managing users with more granularity than a simple nessusd -P. You are prompted not only for a username and one-time password, but also an IP address from which the user may connect and rules that restrict which hosts the user may scan with Nessus.
I leave it to you to read the nessus-adduser man page if you're interested in this level of user account management. Our remaining space here is better spent discussing how to build, run and interpret Nessus scans.
Before we leave the topic of authentication, though, I should mention the other kind of authentication Nessus uses: one local to each client session. When you start Nessus (the client, not the dæmon) for the first time, you are prompted for a passphrase. This passphrase protects a private key stored in the home directory of the UNIX account you're logged into when you start Nessus, and you'll be prompted for it every time. Then, when you connect to a Nessus server, your private key will be used in the transparent challenge/response transaction I described earlier; it actually authenticates you to the remote nessusd process.
If all this seems confusing, don't worry: just remember that the password you're prompted for each time you start Nessus has nothing to do with the password you use the first time you connect to a Nessus server.
Now the real fun begins! After Nessus has been installed and at least one user account set up, you're ready to scan. First, start a client session and enter your client-private-key's passphrase when prompted (by the way, you can change or delete this passphrase with the command nessus -C, which will prompt you for your current passphrase and what you'd like to change it to).
Next, enter the name or IP address of the Nessusd host (server) you wish to connect to, the port it's listening on, your preferred encryption method and your Nessus login/username (Figure 2). The defaults for Port and Encryption are usually fine.
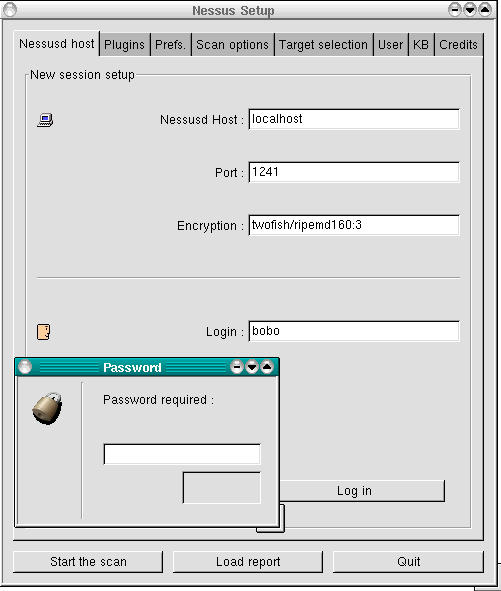
Figure 2. User “bobo's” First Login to a Nessus Server
When you're ready to connect, click the Log in button. If this is the first time you've connected to the server using the specified login, you'll be prompted for your one-time password (next time, you won't be). And with that, you should be connected and ready to build a scan.
If you click the Plugins tab, you're presented with a list of all vulnerability tests available on the Nessus server, grouped by family (Figure 3). Click on a family's name (these are listed in the upper half of the window) to see a list of that family's plugins. Clicking on a family's check-box allows you to enable or disable all its plugins.

Figure 3. Plugins Screen (Windows Family Selected and Displayed)
If you don't know what a given plugin does, click its name and an information window will pop up. If you hover the mouse-pointer over a plugin's name, a summary caption will pop up that briefly states what the plugin does. Plugins with yellow triangles next to their check-boxes are dangerous: the particular tests they perform have the potential to interrupt or even crash services on the target (victim) host. Enable these with extreme care.
Don't be too worried about selecting all, or a large number of, plugins. Nessus is intelligent enough to skip, for example, Windows tests on non-Windows hosts. In general, Nessus is efficient in deciding what tests to run and in what circumstances.
The next screen to configure is Prefs (Figure 4). Contrary to what you might think, this screen contains not general, but plugin-specific, preferences, some of which are mandatory for the corresponding plugin to work properly. Be sure to scroll down the entire list and provide as much information as you can.
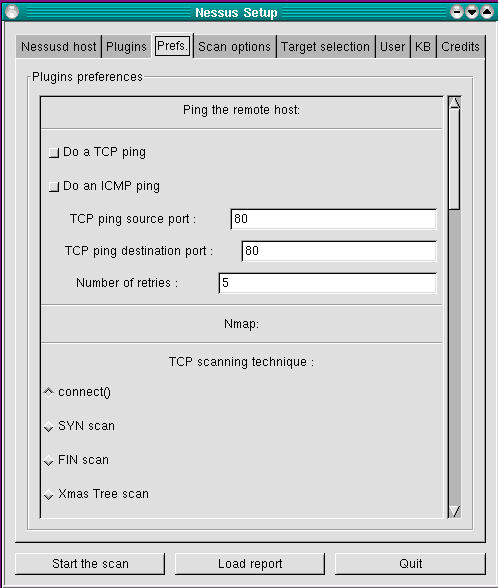
Figure 4. Preferences Screen
Take care with the Ping section (at the very top); more often than not, selecting either ping method (TCP or ICMP) can cause Nessus to mistakenly decide that hosts are down when in fact they are up. Nessus will not perform any tests on a host that doesn't reply to pings—when in doubt, don't ping. Warning: in the Nmap section, Linux users should select only tcp connect() and should deselect all other scan types, due to a bug in libpcap that affects the way Nessus performs port scans.
After Prefs comes Scan Options (Figure 5). Note that the Nessus installation in Figure 5 was compiled with the save-session feature, as evidenced by the Detached Scan and Continuous Scan options, which would otherwise be absent. As in the Prefs screen, you should deselect everything under Port scanner except Nmap tcp connect() scan due to the bug mentioned above.

Figure 5. Scan Options Screen
The “Optimize the test” option tells Nessus to avoid all apparently inapplicable tests, but this can result in false negatives, at least theoretically. Think about how much that worries you versus whether you want the scan to complete as quickly as possible. Speaking of speed, if you care about it you probably want to avoid using the “Do a reverse (DNS) lookup...” feature; it attempts to determine the hostnames for all scanned IP addresses.
And now it's time to specify our victims...oops, I mean targets. We specify these in the Target(s): field of the Target Selection screen (Figure 6). This can contain hostnames, IP addresses and network addresses in the format x.x.x.x/y (where x.x.x.x is the network number and y is the number of bits in the subnet mask, e.g., 192.168.1.0/24) in a comma-separated list.
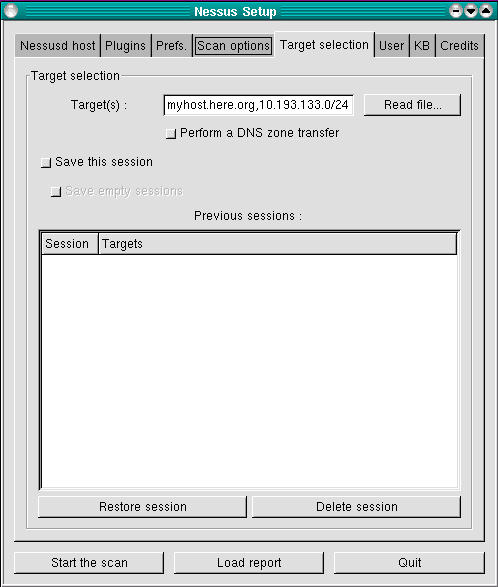
Figure 6. Target Selection Screen
The “Perform a DNS zone transfer” option instructs Nessus to attempt to obtain all available DNS information on any domain names or subdomain names referred to in the Target(s): box. Note, most internet DNS servers are configured to deny zone-transfer requests from unknown hosts. The other options in this screen have to do with the experimental save-session feature I mentioned earlier—see www.nessus.org/documentation.html for more information on what the experimental features do and how to use them.
Finally, one last screen before we begin our scan: User (see Figure 7). (We're skipping KB, which only applies if you've compiled and wish to use the knowledge-base features.) In this screen, we can change our client passphrase (this has the same effect as nessus -C), and we can list exceptions (fine tunings, really) of the targets we specified in the Target Selection screen.
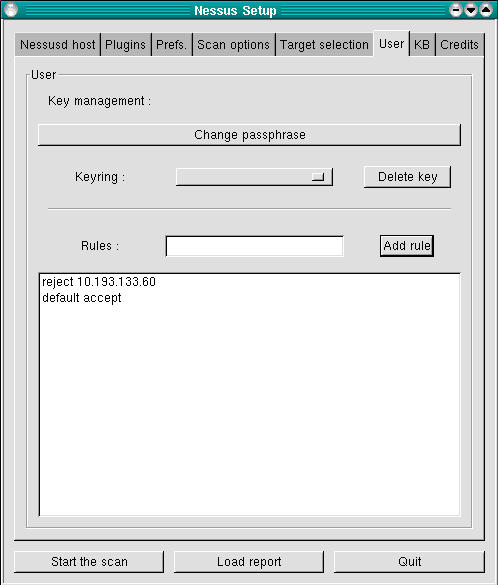
Figure 7. User Screen
These exceptions are called rules, and they follow a simple format: accept address, deny address, default accept or reject. In Figure 7, the rules listed mean don't scan 10.193.133.60, but scan everything else listed in the previous screen.
And now, the payoff. We click the Start the Scan button at the bottom of the screen, and we're off. The scan's length will vary, depending mainly on how many hosts you're scanning and how many tests you've enabled. The end result? A report such as that shown in Figure 1.
From the Report window, besides viewing the report and drilling down into its various details, you can save the report to a file. Supported report file formats include HTML, ASCII, LaTeX and, of course, a proprietary Nessus Report format, NSR (which you should use for reports you wish to view again within Nessus).
Read this report carefully; be sure to expand all + boxes and fix the things Nessus turns up. Nessus can find problems and can even suggest solutions, but it won't fix things for you. Also, Nessus won't necessarily find everything wrong with your system.
It's a fact of life with security scanners; they can only do so much, and not all plugins are equally effective at finding the things they're supposed to find. Even to the extent they are effective, Nessus obviously can't find vulnerabilities it doesn't have plugins for, so be sure to update your plugins regularly.
Nessus is a powerful, flexible, commercial-grade, but completely free security scanner. When generated and interpreted properly, Nessus reports can help you stay ahead of the well known vulnerability curve. We haven't discussed how to write custom plugins, but these allow you to test not only for commonly known vulnerabilities but even brand-new or hitherto unknown exploits.
Again, please, use this tool responsibly. Assuming you will, have fun!


