
That's Vimprovement! A Better vi
The Linux system comes with a vi clone called Vim. However, this editor can do more than just mimic vi. It has literally hundreds of additional functions, including commands for a help system, multiple windows, syntax coloring, program compilation and error corrections, advanced searching and many more.
By default, Vim starts in vi-compatibility mode. This means that many of the advanced features are turned off. To turn on these Vim improvements you need to create a $HOME/.vimrc file.
Listing 1 contains a sample .vimrc file. You can also create one by copying your .exrc file if you have one. A zero length file works as well.
There are two flavors of the Vim editor. The command vim starts the console version of the editor. In this version, you edit inside the terminal window in which you executed the command. The gvim command creates its own window. This second command is preferred because you get features, such as a command menu and toolbar, not found on the console version.
One of the most useful innovations that Vim has is the on-line, integrated help.
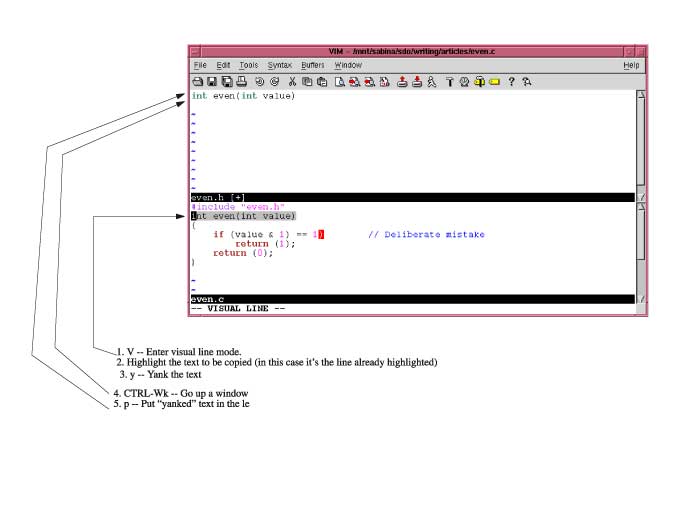
Figure 1. Vim Help Window
The :help command displays a help window. For specific help :help / displays the help text for the search (/) command (see Figure 1).
You can move through this text using the normal editing commands, such as h, j, k, l, <Page-Up>, <Page-Down>, etc.
As you scroll through the text, you'll see some lines that look like
/<CR> Search forward for the [count]'th latest used
  pattern |last-pattern| with latest used |{offset}|.
The text enclosed in vertical bars (|) is a Vim hyperlink. Position the cursor over one of these items (say |last-pattern|) and press CTRL-]. This will make the screen jump to the given subject.
To go back to where you were before the jump, use the command CTRL-T.
To get out of the help system, use the normal Vim exit commands :q or ZZ.
To see how some of the new Vim commands can help you, start by creating a simple program file containing the following text:
#include "even.h"
int even(int value)
{
  if (value & 1) == 1)       // Deliberate mistake
      return (1);
  return (0);
}
The first thing to notice is the changing colors of the text. This is called syntax highlighting. Each component of a program (keyword, string, constant, preprocessor directive, etc.) gets a different color. In our initialization file, this was enabled by the :syntax on command. If you do a :syntax off, the highlighting disappears.
The next thing to note as you type in the file is that you don't have to do any indenting. All the lines are automatically indented for you. This is because of the cindent option being turned on by the magic lines:
:autocmd FileType c,cpp :set cindent
This applies to C and C++ files only. (Unfortunately a full discussion of autocommands is beyond the scope of this article. You can do a :help autocmd for full instructions.)
Note: The actual commands in the sample .vimrc file are a little more fancy than the ones presented in this section, but they do the same thing.
Now, let's have a little fun. Position the cursor on the “r” of one of the return statements and type xxxxxx. The return disappears. Now type “u” to undo the last change. The “n” returns.
The old vi editor had only one level of undo. Vim has many. Type “u” again, and notice that you've got “rn” back. Type “u” four more times and the whole word returns.
So how do you undo an undo? Through the new “redo” command:' CTRL-r. By typing this a couple of times, you redo the delete, which causes parts of “return” to disappear.
Now that you have a C file, you should create a header. It would be nice to be able to copy and paste the prototype from the C file into the header. With vi you couldn't do this. With Vim, it's easy.
First, bring up both files in the editor. The command :split even.h splits the current window in two. The top-half gets the file even.h, and the bottom even.c (see Figure 2).
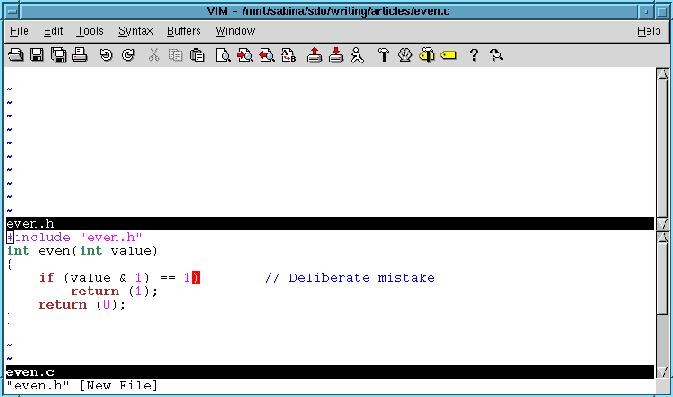
Figure 2. Multiple Windows
To move the cursor from the top window to the bottom window use the command CTRL-Wj. To move up a window, use the command CTRL-Wk.
To close a window, use the ZZ or :quit command.
Vim has one new major mode: visual mode. In visual mode, highlight the text you want to edit, then type an editing command. In this example, you need to copy the first line of the function even from the bottom window and paste it in the top window.
Start by sending the cursor to the bottom window (CTRL-Wj) and positioning it on the first line of the function even. Next, enter line visual mode by typing the V command. The current line is highlighted, which indicates that this line will be affected by any editing command you type. At this point you can use the cursor commands to move the cursor down a few lines. As you move the cursor, the text that you pass over is highlighted. Move the cursor up, and it's unhighlighted. Go past the starting point, and the text above will be highlighted.
Highlighting is done on a line-by-line basis. That's because you've entered visual line mode. If you had typed v, for character visual mode, you could highlight text on a character by character basis. Finally, there is block visual mode (CTRL-V) that highlights a rectangle on the screen. This is good if you are working with text tables because you can manipulate columns of figures on the screen.
Now, to copy a single line from the bottom window to the top one, use line visual mode (V) and highlight that line. Then use the yank y command to copy it into the unnamed register. Next go to the top window and do a p to put (paste) the text into the top window. All you need to do now is add a “;” to the end of the line and you have an even header. Figure 3 shows these commands in action.
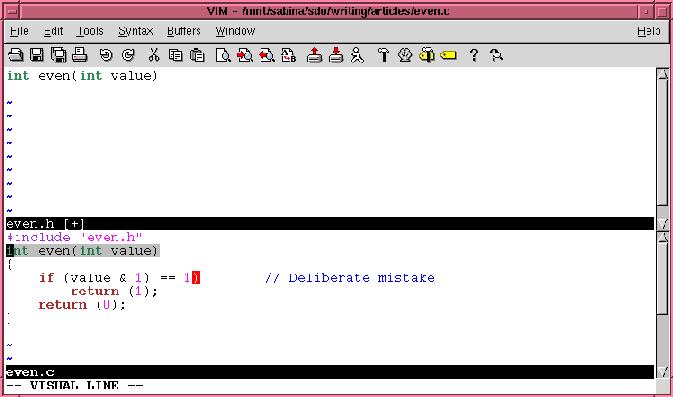
Figure 3. Copying a Line
In order to compile our program we need a Makefile. (This exercise is left to the reader.)
Once our Makefile is in place we use Vim's integration with make to compile the program. All we need to do is issue the :make command from within Vim and the editor will run make and capture the output.
Our program contains an error:
even.c:4: parse error before `=='
Vim captures the output of the :make command and parses it. From this it can see that we have an error on line 4 of even.c, so it moves the cursor to this line and displays the error message at the bottom of the screen. (It will even switch files if it has to in order to locate the error.)
This makes it easy to fix the error. To see the next error, issue the :cn command. If you want to see the current error again, use the :cc command. The previous :cp. Finally, if you're done editing this file and want to see the first error in the next file use the :cnf command.
Vim is smart regarding the location of errors. When you add or delete lines at the start of the file, Vim adjusts the location of errors at the end of the file to reflect these changes. This avoids the problem you have with conventional editors like vi, where fixing an error at the start of a file throws off the line numbers for the rest of the file.
The grep command is great for finding out where a function is used and defined. Simply enter the command:
$ grep -n even *.c
and you get a printout of each line that contains the word even.
Vim has a :grep command that does the same thing. Actually this command is very similar to the :make command. It runs grep, captures the output and lets you navigate through the files using :cn, :cp, :cc, and :cnf.--just like :make.
If you turn on the cindent option, Vim will indent your program correctly when you insert new text. But what about the text that's already there? That's where the = command comes in.
It will run a block of text through Vim's internal indentation program. (Actually, you can select which program is to be used for indentation through the equalprog option.)
Let's see how this can work to indent a basic C statement block. There are two ways of invoking the = command. The first is to use ={motion}. The second is to enter visual mode, select a block of text and then press =.
So, one way to indent a block of code is to go to the first “{” of the block. Now enter =%. The = tells Vim to indent the text from here to where the next command takes the cursor. The next command in this case is %, which tells Vim to go to the matching “}”.
If you wanted to do things using visual mode, you would position the cursor on the first “{”, then enter line visual mode with the V command. Next position the cursor on the corresponding “}” using any set of commands that get you there. Finally, the highlighted block is indented with the = command.
Vim has some interesting searching options. The first is the incremental searching option, which is enabled with the command:
:set incsearch
Normally when you do a search, say for include, you would enter the entire command: /include<CR> and Vim would start searching for the string. When incremental searching is enabled, Vim starts searching when you type the first character of the search. In other words, when you type /i, Vim searches for the first “i” in the text. Type the next character “n”, for /in and Vim looks for “in”. As you type each character the search moves on (if needed) to find the string that you've typed so far.
The other major innovation in searching is the highlight search (hlsearch) option. If this is enabled, then when Vim finds a string that matches a search, it highlights it. Not only is the current match highlighted, but all matches are highlighted.
This is useful if you're searching for a misspelled variable name or word, because all occurrences of the incorrect word are highlighted.
If you want highlighting to temporarily disappear, you can issue the the :nohl command. This clears the highlighting until the next search command is entered.
Vim also maintains a search history. Let's say you've done a number of searches. Now press / to start a search, and then the <UP> key. The previous search is displayed. Press <UP> again, and you get the next oldest search. Thus using the <UP> and <DOWN> keys you can scroll through a set of your recent searches.
One of the most powerful commands in Vim is the . (dot) command. It repeats your last edit. But this command is limited. It will only repeat a single command.
But what if you have something more complex to do? That's where Vim's keyboard macros come in. They allow you to record a series of commands in a register and then execute them.
To see how this works, let's suppose you have the following lines that you want to edit:
stdio.h
time.h
unistd.h
stdlib.h
You want to make each of these into a #include line, e.g., #include <stdio.h>
You start by entering the command qa. This causes all subsequent commands to be recorded in register a. (Any register from a to z can be used.)
Next do the edits. Go to the beginning of the line (^) insert #include <, then finish by adding a > to the end of the line. Finally go down a line to be ready for the next edit.
All these commands are now recorded in the a register. The q command tells Vim to stop recording. The text now looks like:
#include <stdio.h>
time.h
unistd.h
stdlib.h
with the cursor positioned on the second line. To execute the macro, use the command @a. The results are:
#include <stdio.h>
#include <time.h>
unistd.h
stdlib.h
The @ command takes a repeat, so you can finish off our work using the 2@a command.
#include <stdio.h>
#include <time.h>
#include <unistd.h>
#include <stdlib.h>
The command ctags (which comes with Vim) can be used to generate a program table of contents for a set of C files. (This is now a tags file.)
A typical ctags command is:
ctags *.c
This creates a tags file containing the location of all the functions in the C files in the current directory.
Once generated the tags file can be of great use to people editing with Vim.
Let's suppose you are editing a file and are looking at the read_paragraph function. As you go through the code you discover that read_paragraph calls read_sentence. You'd like to see what this function does.
If you position the cursor on the function name, and press CTRL-], Vim jumps to the definition of that function. You quickly discover that read_sentence calls read_word, so you position the cursor over read_word and press CTRL-]. Again the editor jumps to the definition of that function.
Vim keeps track of where you've been through the use of tag stack. To see where you are in this list, use the :tags command.
:tags
# TO tag        FROM line  in file/text
1  1 read_sentence       3  read_sentence();
2  1 read_word           8  read_word();
>
In this example, we've gone from read_word (not listed), to read_sentence and then read_word. To go back, use the CTRL-T command. It pops you up one level in the tag stack.
When you jump to a tag using the CTRL-] command, the entire screen jumps. If you use the command CTRL-W CTRL-], the current window is split and you do a tag jump in the new window.
Suppose you have five or six small programs in a directory, and you want to jump to the definition of one of the main functions. If you do a:
:tag main
command, the editor will jump to the first definition of main that it can find. This may or may not be the one you want.
The :tselect command displays all the tags that match a given name and lets you select the one you want. For example:
:tselect main
# pri kind tag               file
> 1 F C f    main              a_test.cpp
    int main( int argc, char* argv[] )
2 F   f    main              acp.cpp
    int main( int argc, char* argv[] )
3 F   f    main              add.cpp
    int main(int argc, char* argv[])
Enter nr of choice (<CR> to abort): 3
What if you only know part of a name? In other words, you want to go to the function whose name is “something- process-something-data”. The :tags command can take a regular expression. In this case the command:
:tag /process.*datagoes to the first tag matching this expression. If several functions match the expression, you can use :tselect to go to the right one.
Programs contain code and comments. Code has its own structure. You do not want an editor that line wraps when you write code. But comments are merely text and it's okay to wrap text. In fact in most cases, it is highly desirable to have an editor that wraps long text lines.
The Vim editor understands the difference between commands and code. It can be configured to wrap comments and leave the code alone. This is done by putting the following lines in our .vimrc file:
:autocmd FileType c,cpp
\     set formatoptions=croql cindent
\     comments=sr:/*,mb:*,ex:*/,://
(Note: continuation lines in *begin* with \.)
The :autocmd command tells Vim that these commands are to be executed whenever it determines that it is working on a C or C++ file. (File names ends in .c or .cpp.)
The formatoptions tells Vim that we want to automatically wrap comments but don't want code wrapped. The next line:
set comments=sr:/*,mb:*,ex:*/,://
tells Vim what a comment looks like. In this case we've defined the standard C comment (/*, */) and the C++ comment (//). We've also told Vim that if we are in the middle of a C-style comment, to please begin each line with a “*”.
With these options set, when you type /*<RETURN>, Vim automatically puts in a “ *” to begin the next line. Given the limited space allowed in this article, all I can really tell you is that this is a really neat feature, and you should play around with it. If you need more details, you can check out the on-line help text.
Vim is a very versatile editor. In this article we've touched on a few of the more interesting features of this editor. But we only scratched the surface. There are still hundreds of commands and options that we've not discussed. You can find out about these by reading the help text and other documentation that comes with the editor.
By introducing you to some of the new features in Vim we've given you a start toward more effective editing. How far you go from here is up to you.

