
The Artist's Guide to the Linux Desktop, Part 3
Window Maker is a descendent of the GNUStep project. GNUStep is, in a sense, more like GNOME and KDE than Window Maker. GNUStep attempts to provide underlying features of the desktop—features which are not visual, but functional. Window Maker includes some of this functionality, but is more akin to Enlightenment, a window manager, than GNOME, a desktop environment. Designed for additional integration support of GNUStep applications, Window Maker takes its look from NeXTSTEP, the desktop interface from the Apple-devoured NeXT company, one of Steve Jobs' post (and pre)-Apple projects.
Window Maker includes support for running as the window manager in KDE, GNOME and Open Look (yet another environment, although you aren't likely to see it on Linux). The KDE support appears more complete than the GNOME support (which tends to be a bit of a moving target at times). The source distribution contains README files describing how to use the window manager in both KDE and GNOME. Window Maker has some of its own session management capabilities, but does not directly provide drag-and drop-between applications.
Again, we'll assume you already have Window Maker installed. If not, instructions can be found in my article “Installing Window Maker” in “Strictly On-Line”, http://www.linuxjournal.com/lj-issues/issue74/4050.html. Be sure you have version 0.61 or the latest release.
The first time Window Maker starts, you'll see a display similar to Figure 1. This is the default screen display, which isn't that fancy, initially. Unlike Enlightenment, Window Maker doesn't presume any graphical pizzazz on your part. It lets you define it right from the start.
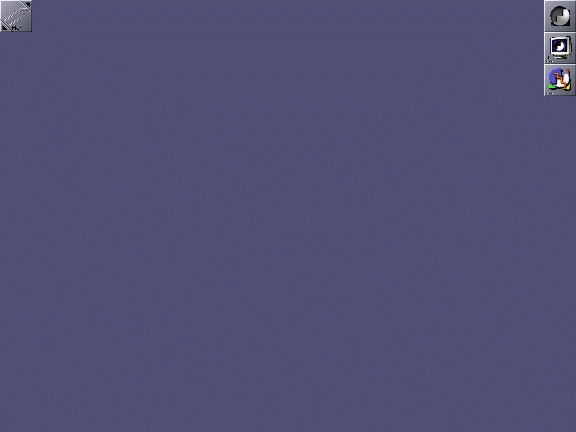
Figure 1. The Default Window Maker Display
Note that on my desktop, I use the XPM-based default icons (see Figure 1), whereas on my laptop, I used the TIFF-based default icons. I never could get the TIFF-based version, which has much nicer icons, to work properly on my desktop even though the desktop and laptop systems are configured—as far as I can tell—exactly the same. This is a negative mark for Window Maker. Neither FVWM2 (my normal window manager) nor Enlightenment exhibits this sort of problem.
Figure 1 shows three important pieces of the Window Maker desktop: appicons, the clip and the dock. Window Maker uses icons in two distinct ways: as appicons and as mini-windows. This is another terminology dance we users have to play, as developers struggle with ways to define the complex to the uninitiated. Don't let it worry you much. The images along the right side of Figure 1 are appicons. They represent a running application whose windows can be open or iconicized. This differs from a mini-window, which is what you get if you iconicized a window. Click on the small box on the upper left of a window, and the window collapses into a mini-window. Visually, you can tell the difference between a mini-window and an appicon, as the mini-window has a tiny title bar in it, as shown in Figure 2.

Figure 2. Appicon and Mini-window
Appicons (see Figure 2) are created each time you start a new application from a command line. This is different behavior from most other window managers, and I initially found it annoying. Fortunately, you can change this behavior by using the Dock, which I'll discuss in the section on managing the desktop.
In the upper left corner of Figure 1 is the Clip. This is essentially the pager for Window Maker, although it lacks the visual cues that other pagers provide. It also has some special behaviors when used with appicons. Dragging an appicon onto the clip connects the icon to the clip for the current workspace (see Figure 3). After a moment, unless you keep the mouse over the clip icon, the icon you just connected to it will be hidden. This allows you to use drag-and-drop to place applications on a particular desktop, plus it hides all those nasty appicons. The clip is a tool for managing which applications are on which desktop.

Figure 3. The Clip with Appicons “Attracted”
This leads to another issue: Window Maker doesn't have desktops. It doesn't have pages, either. Instead, it has workspaces. More terminology, but in this case, it's not needed. A workspace is the same thing as a desktop. Unlike E (Enlightenment) or FVWM2, Window Maker doesn't have multiple pages for each desktop. It just has an unlimited number of desktops connected in a sort of linear—left to right—pattern.
Dragging windows between workspaces is configurable using the Preferences utility (discussed in more detail later). Drag to the left or right edge to get to the next workspace. You can warp (i.e., jump) a window to another workspace by using the window's Title Bar menu “Move To...” option. When you get to the edge of the last window, you can't drag past the right edge unless you configure in the Preferences utility to wrap back to the first workspace or to create a new workspace—either is configurable. The same thing applies when trying to drag to the left edge of the first workspace.
Adding new workspaces can be done by clicking with the middle mouse button (normally mapped to both buttons on a two-button mouse) on the Clip. This brings up a menu, the first item of which is “New”. A right mouse click on the Clip brings up a menu for managing the current workspace, from renaming it to grabbing all appicons to managing how icons are displayed.
When switching workspaces with the Clip, the name of the workspace you've switched to is shown in the center of the display (over any windows, if necessary): it then fades from view. This is a cute trick that happens to be a bit useful as well. It's nice to know the name of the workspace you just entered.
Over on the top right side of Figure 1, you'll see the Dock. This is a special application that manages appicons. This is the place to add appicons to launch applications. It's similar to the GoodStuff bar in FVWM2, or less similarly, to the panels in KDE and GNOME.
Using the Dock is a little confusing at first. Let's walk through an example of adding an appicon to the Dock, so we can start xterms at will. The first thing to do is open an xterm manually, which you can do by right-clicking on the root window to get the root menu. The third item down should be “XTerm”. Click on it. A generic black text on a white background xterm should open, and its appicon placed in the lower left of the screen. Left-click on the appicon and drag it up under the appicons under the Dock. When you're close enough, a white box is displayed under the icon, and when you let go of the mouse button, the xterm's appicon is neatly positioned under the other icons.
Now you have an icon that will always be there (you can remove it manually later) when you start up your X session. Right now, its application—the xterm—is already running. Exit out of the xterm by typing “exit” at the command prompt or clicking on the “x” in the upper right corner of the xterm window. Notice the xterm's appicon now has three small dots in its lower left corner. That means you can start an xterm by double-clicking on the appicon. If you do this now, the xterm opens again and those dots disappear.
The problem here is that you can't open more than one xterm. You have to configure the appicon, while it's docked, to allow for more than one instance of the xterm to be started. Here is how you do that:
If it's not open, open an xterm by double-clicking on the docked appicon.
Right-click on the title bar and choose “Attributes” from the menu.
In the “Inspecting...” dialog, select the “Application Specific” option.
Click on the “No Application Icon” button, then click on “Save”.
Click on the “Close” button (the X in the upper right) of the “Inspecting...” dialog to close that window.
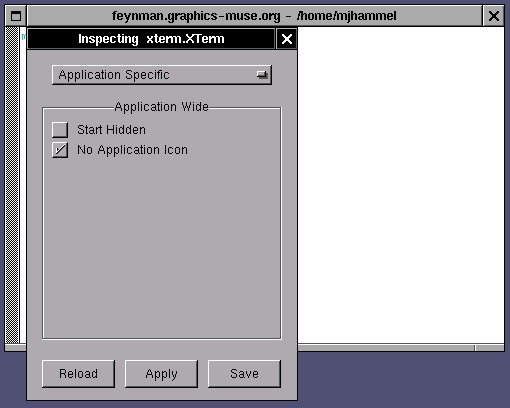
Figure 4. Turning Off the Application Icon
Now you should be able to launch multiple xterms from the single terminal icon hanging off the Dock. This process works for any appicon you connect to the Dock.
If you want to remove an appicon from the Dock, just click and drag it down to the bottom of the screen and let go; it will disappear. First, make sure you've closed all instances of the application started with that icon, however.
The default Dock applications are shown in Figure 5. The top one is the Dock itself. The next one down will launch generic xterms. The last one opens the Window Maker Preferences utility. The icons you see may differ if you are using the TIFF-based icons instead of the XPM-based icons.
Root and window menus can be partially displayed off-screen depending on where you open them, but you can scroll them back into view by moving the mouse pointer to the edge of the screen (while over the menu) and holding it there for a moment. You can see this by right-clicking near the left or right edge of the display.
In the default root menu (see Figure 6), the entry “Preferences Utility” under “Appearance” didn't work for me. That's because I changed the default installation directory (using --prefix when I built from the source). To fix this, edit the file $HOME/GNUstep/Library/WindowMaker/menu and comment out the line for “Preferences Utility”. You don't actually need this if you use the Application Dock. The last icon on the dock in the default configuration, the one with the heartbeat line, will launch the Preferences Utility correctly.
Clicking in the title bar of a root menu will anchor it—the menu gets a close button in the upper right, and doesn't close when the other menus are closed. To close it, click on the Close button.
There is a tool in the Preferences Utility for managing the root menu graphically, but if you use it, you lose access to the text-based versions of the menus. The graphical tool converts the text-based menu into a sort of compiled format. For moderately intelligent users, the text-based menus are quicker to update, and for internationalized menus, you are required to use the text-based menus—internationalized menus can't be managed using the graphical utility. Making manual changes to the text menus does not require restarting Window Maker; the changes are recognized the next time you open the root menu. If you choose to use the graphical interface for menu management, its updates are also recognized immediately.
The default root menu is GNUstep/Library/WindowMaker/menu. This single file holds all the menus you see hanging off the Root Menu (the Applications, Editors and Miscellaneous menus, for example). To add or delete entries from these menus, just edit this file using your favorite text editor. The root menus will get updated automatically once you save the file back to disk.
Now you know what you're seeing on-screen. The next step is to decide what to do with all of this. Many of Window Maker's features have equivalent counterparts in Enlightenment, such as shaded windows: double-click the title bar to shade the window, again to open it back up. Windows can be grouped in E using manual configuration. In Window Maker, you have to select windows. Left-click in the root window, hold and drag over the windows you want to group. You can now drag these windows to another desktop. To unselect them, just left-click once in the root window.
Moving between desktops is easy: simply type ALT-#, where # is the desktop number as shown in the Clip. This is a fast way of bouncing around your desktops, something I can't currently do in my window manager, FVWM2. You can also move between desktops using the root menu Workspace submenu, the Clip menu, and, if it's enabled, by moving the mouse to the left and right edges of the display.
As you've seen, an important part of the Window Maker desktop is the Dock. It allows you to launch applications quickly. It can also be used by special Dock Applications, small programs (similar to E's epplets) that run right in the icon. Examples of these programs include clocks, system information, stock and weather reports and a chess game (see Figure 7).
Docked applications can launch multiple instances of an application using the technique described earlier. Some applications don't behave properly under Window Maker, however, and you can't disable their application icon, so that technique won't work. Never fear: there are alternate ways to launch multiple instances. The simplest is to use the Launch option in the docked appicons menus (right-click on a docked appicon). Selecting Launch will open another instance of that application. Alternatively, you can change the command to run in the “Settings” dialog, also from the docked appicons menu. For example, XV is normally launched as xv. This gets changed to
/bin/sh -c "exec xv&"
Now, a double click on the XV appicon in the dock will launch a new instance of XV every time.
There are many dock applications available for Window Maker. The primary web site for finding these is the DockApps Repository at http://www.bensinclair.com/dockapp/.
You can also find a number of interesting icons and themes plus various bits of useful documentation at http://wm.current.nu/.
Window Maker doesn't permit quite as much variation to the window border system as Enlightenment does, but this actually simplifies the creation and use of themes. The last item in the default menu, “Appearance”, allows you to access some predefined themes and styles (essentially the same thing, from a user's perspective). The Preferences Utility is used to make specific changes to window borders and backgrounds, after which you select the Appearance-->Save Theme option to save those settings.
The Preferences Utility is not what you use to set the background, however. To set the background image, you use the wmsetbg program. Unfortunately, there doesn't appear to be a way to choose files randomly for setting the background built into the default configuration. You'll have to add entries to the root menus for each image you wish to use as a background. On the plus side, once you've set the background for a given workspace, you can save the setting so that it's always used in the future.
The Window Maker Preferences Utility (see Figure 8) is the heart of configuration for the look and feel of WM. All visual settings are configured here:
Animations can be disabled here. Useful for memory-limited systems like laptops.
Icons can be sized up or down from their default 64x64 size.
You can configure extra paths to search for pixmaps and icons.
Many keyboard shortcuts are configurable by using a graphical interface. This is very useful for someone like me. On my laptop for instance, I have one of those post mice (IBM-style red-capped post). I hate it, and I don't like moving back and forth to my real mouse on my desktop, either. I prefer just bouncing around using the keyboard when possible. Being able to configure these shortcuts easily is a welcome feature.
The mouse is fully configurable, too. You can specify which mouse button will open menus, how fast the mouse responds to double clicks and so forth. This is a very useful but seldom provided feature for window managers. It's especially nice that it has a graphical interface.
The Window Maker Preferences Utility, known simply as WPrefs, is also used to configure the backgrounds, window borders, title bars and icons to use for specific windows. You can't get as creative as you can with E, but the interface for making changes is fairly sophisticated and rather intuitive. As I mentioned before, the only thing it doesn't do is set the background image of the root window, which must be done manually using wmsetbg.
Some changes made using the WPrefs utility are immediate, while others require restarting Window Maker to take effect. Things like icon sizes, window auto-focus and window auto-raise all require restarting the window manager. The Exit-->Restart menu option in the Root Menu will restart Window Maker without requiring you to exit your X sessions.
Until I discovered how to resize the icons, I really hated Window Maker. I'm a minimalist at heart; my FVWM2 configuration uses very little screen space for the GoodStuff bar. The large icons are annoying to me, so I resize them down quite a bit. This has a drawback, however. Since clocks are docked appicons, they tend to require lots of space in order for me to see the clock analog hands or digital text. Similarly, many of the dock applications require at least a 64x64 appicon, or else you can't read their contents. In other words, they're cute, but they take up too much space for my taste.
One other thing about Window Maker is it supports sound. I don't like my computer making noises at me. That's why I have a stereo; I pipe CDs played on the computer through the stereo, so I don't use the sound features found in Window Maker or other window managers. However, sound support is there, if you want it.
As with my Enlightenment testing, I ran Window Maker on two systems: a 400MHz AMD K6 desktop with 256MB memory and a 200MHz Celeron laptop with 32MB memory. Both systems ran stock Red Hat 5.2 using glibc 2.0. I also ran with the latest release of Window Maker, namely the 0.61.1 release. Performance on the desktop was good in all cases. Performance on the laptop was nearly as good, although a little jumpy in a few places.
Window Maker is a little less resource-intensive than Enlightenment, mostly because Window Maker doesn't provide the wild window borders you can get with Enlightenment. That feature of E is visually stimulating, but also memory-intensive.
I found that Window Maker performed quite well on my laptop, certainly as good if not better than Enlightenment. Opaque window moves are the default and require constant redraws. This wasn't so noticeable on the desktop, but was obvious on the laptop. Opaque moves are fairly slow to update and make WM appear to be sluggish, but in reality it's not really bogged down by such movements. This can be turned off, forcing transparent (outline only) moves which give the appearance of much better performance.
Window shading was not very smooth on the laptop, even with the fast speed set. I found it worked much better if I turned off the animations on my laptop. When I double-clicked on the title bar, the window (except for the title bar) just disappeared. Double-click on the title bar again, and it comes back. Since this happens very quickly, it makes it appear as if the system is working more efficiently.
Animations, including 3-D animations for iconizing windows, were generally fairly smooth. Neither shading nor animations are as smooth as on my desktop, but neither is slow enough to be distracting or prevent me from doing other work. The bells and whistles of Window Maker can all be turned off, so performance shouldn't be a big issue for laptops.
Running Netscape and GIMP on my laptop with Window Maker was no problem. Of course, very large GIMP files will bog down any system, so I just worked on small web-sized images. Still, Window Maker ran quite well.
There is actually a fair amount of documentation available for Window Maker. A user's guide for a previous release is on-line, but it's not quite up to date with the latest (0.61.1) release. A FAQ in text form comes with the source distribution, and an HTML version is available on-line from both the main Window Maker site (http://www.windowmaker.org/) and a few other user-supported sites. Man pages for all tools included in the source distribution are also available.
Window Maker has many nice features. For artists, Window Maker makes personalizing the desktop very simple. Themes are easy to create, easy to save and easy to install. This leaves the artist time to focus on the creative side—the creation of the tiles, backgrounds and other images used in the desktop. That's the way a desktop should work.
Window Maker also has many things I don't like. The icons are too big, initially. Since most Dock applications expect to be running in 64x64 icons, my laptop screen space is compromised. I can scale these down, but I lose the functionality in the dock appicons. I also don't like having the dock appicons running along the right side of my display. I like them along the top of the display, and I couldn't figure out how to change this orientation.
The lack of a visual pager is also a drawback. Although pagers take up screen space (and you'd think I would hate that), their usefulness far outweighs their size. The Clip is helpful, but not as much as the pagers you can get with Enlightenment or FVWM2.
Most importantly, I never iconize anything under FVWM2, so all this icon twiddling in Window Maker is a bit annoying to me. I far prefer configurable menu bars, like FVWM2's GoodStuff, where I can use very small icons (mostly for visual appeal) but still have quick access to many different applications.
Despite its drawbacks, Window Maker is a solid performer in various environments. It supports both KDE and GNOME and has a very easy-to-use graphical configuration tool. Themes are a breeze to create and save.
The main web site for Window Maker is a good place to get started, but it lacks any real details. The man page is well-written, with lots of details on what directories are used and what they are used for. Most of the truly useful information you'll find on the Web will be at user sites.
Window Maker is available precompiled in most Linux distributions these days. You don't have to build from source, but it's fairly easy to do so. There are few external requirements to get it running. This is how Window Maker differs from E: you can skip the need to know about compiling and installing software from source, something that Enlightenment depends on in its current state.
I like Window Maker, but between it and Enlightenment, I still prefer the latter. Then again, I'm an experienced desktop user. If you're new to Linux, you may find the graphically configurable Window Maker a little easier to learn. Both provide multiple desktops, themed interfaces and graphic-based desktop management tools. It's mostly a matter of taste.
The last article in this series is supposed to be on AfterStep, a window manager very similar to Window Maker and also based on the GNUStep environment. However, I may go with blackbox or sawmill instead. Both are very stable and provide some minimalistic aspects I find interesting. AfterStep is very much like Window Maker, and I'd prefer to talk about a window manager with a different design intent. If you want to get a jump on me, start out over at http://themes.org/. You can find links to all these window managers there, as well as some very useful information on configuring and using your favorite.
email: mjhammel@graphics-muse.org
Michael J. Hammel (mjhammel@graphics-muse.org) is a graphic artist wanna-be, a writer and a software developer. He wanders the planet aimlessly in search of adventure, quiet beaches and an escape from the computers that dominate his life.
