
PCI Symphony Network Cards
Manufacturer: Proxim
E-Mail: sales@proxim.com
Price: $120 for PCI-card, $130 US for PC-card
Reviewer: Denny Fox
Recently, I integrated a wireless segment into my SOHO (small office, home office) network based on widely available and relatively inexpensive cards from Proxim, their new Symphony series. After watching the wireless networking developments for quite a while, I have finally found an affordable wireless solution that works with Linux. Until now, wireless network cards cost hundreds of dollars and hubs cost thousands.
My goal was to give my notebook computer running Win98 the ability to move about my SOHO. I was successful in accomplishing this at a cost of only $250 by utilizing my existing Linux server and two Symphony cards.
I use Linux as a multi-function server with Samba and dial-on-demand ISDN to provide masquerading for all the machines on my internal network. The Linux server is connected to the internal network on its eth0 interface. I added a Proxim PCI Symphony card to this box, which is now up and running as eth1. (See Figure 1.)
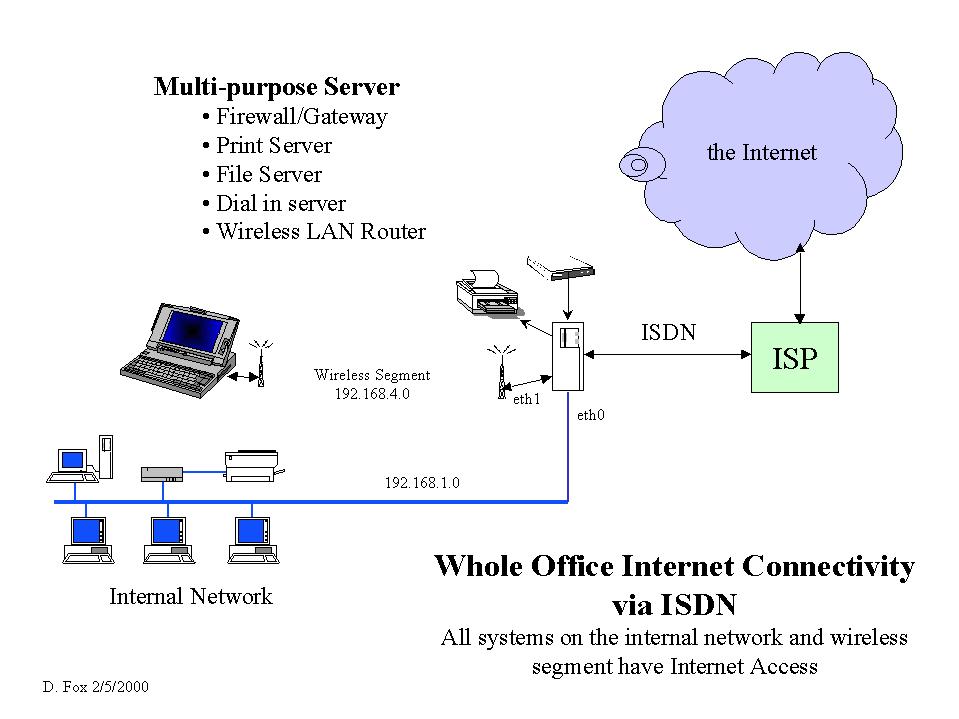
Figure 1. Network Diagram
Now that all the networking is set up, I have full connectivity to my internal network and to the Internet, and am able to work anywhere in the house. There is no apparent reduction in performance browsing the Web or e-mailing, since the bandwidth of the wireless segment is not the constraint. An FTP download from the server to the notebook transferred a 560KB file in about nine seconds, for a throughput of just under 64KB per second. It's not quite like a wired Ethernet, but it's also not too shabby.
My home has finished ceilings downstairs where my SOHO is located, making it very inconvenient to pull network or phone wires to other areas. I also have visions of being able to work outside on the deck when the weather permits. Clearly, some form of wireless networking would be ideal. I had been watching the wireless networking offerings off and on for the last couple of years, but prices were just too high.
Recently, I came across the Proxim “Symphony” line of wireless networking products. They use the 2.4GHz technology found in cordless phones to achieve a raw throughput of 1.6Mbps. This gives performance that is comparable with the ARCnet I ran before Ethernet became ubiquitous. Even better, the product line is widely distributed and is reasonably priced.
Proxim produces a full complement of wireless components in the Symphony line. There are cards for both the ISA and PCI bus, and a PC-Card for notebook computers. They also offer a Wireless Bridge and Wireless Modem for users who need them. I found the interface card products on the shelf at the local Best Buy, and the full line of products on-line at OnSale/Egghead and AtCost. There are many other sources such as CDW, HardwareStreet.com, Office Max, Office Depot and Staples. I ordered a PCI card for the Linux server and a PC Card (see Figure 2) for my notebook from OnSale's AtCost for about $120 US and $130 US respectively, with free shipping. As you will see below, those of us fortunate enough to employ Linux as our Internet connectivity server can avoid purchasing the Wireless Bridge for about $370 or the Wireless Modem for about $225.

Figure 2. PC Card with Plug-On Antenna
The Proxim web site at http://www.proxim.com/symphony/index.htm has a complete set of information including on-line manuals, software, FAQs and tech tips. Under operating system support, they point you to Linux drivers from www.komacke.com/distribution.html. Proxim does not directly support Linux, but I had great help from Dave Koberstein, the rl2 driver developer, and other folks on the rl2-library mail list. You can easily subscribe at www.komacke.com/maillists.html. The rl2 part of the name comes from the original and much higher-cost Proxim product line RangeLAN2. The mail list was instrumental in answering several basic questions I had regarding the usefulness of these cards under Linux and getting the driver working.
The Proxim data sheets did a fine job of describing the products and functionality for use in a Windows NT environment, but did not provide some of the gory technical details I needed. Proxim delivers a layer of peer-to-peer networking setup software to configure and operate their products that insulates the user from the Microsoft networking properties dialogs. My questions were:
Did these cards act like standard Ethernet interface cards to the operating system? Yes, the cards present a standard Ethernet interface to Windows and Linux. Under Win9x and NT, you use the standard Microsoft network property dialogs to set up and control the wireless network card.
Could standard network routing be used on a Linux server to eliminate the need for a costly Wireless Bridge to provide the connectivity to the rest of an installed Ethernet? Yes, once a Proxim wireless card is installed and set up on the Linux box, standard TCP/IP routing provides the connectivity to the other Ethernet hosts and the Internet.
Thanks to the Linux driver mail list, I had enough information to proceed.
The existing network operates on the private class C network 192.168.1.0. The Linux server provides IP masquerading for all systems on the internal network through an ipfwadm firewall and diald support for an ISDN connection to the Internet. I am currently running Debian 2.0 with kernel 2.0.34 on the server. I chose to use 192.168.4.0 as the network number for the new wireless segment.
Installation of the Proxim drivers on the notebook is quite straightforward. Make a note of the Secid you use, since this will need to be used for the Linux driver and any other nodes that will be on the same wireless segment. After the Proxim installation is done, go to the “Microsoft Network Neighborhood | Properties” to bring up the Network dialog box. On the Configuration tab, select TCP/IP Symphony Cordless PC Card Adapter—Properties to set the network parameters, using the appropriate addresses for your system, as follows:
IP Address:
     IP address:         192.168.4.2
     Subnet Mask:        255.255.255.0
WINS Configuration:
     Enable WINS Resolution Add 192.168.1.254 as a WINS server
Gateway:
     Add 192.168.4.1 as a new gateway
DNS Configuration:
     Enable DNS
     Enter a Host name and your Domain name
     Enter one or more IP addresses of your DNS server(s)
     Add Domain Suffix Search Orders as desired
The “new gateway” entry will be the IP address of the eth1 interface on the Linux box.
I use the domain name of my ISP and their DNS servers. You will need to use entries that correspond to your network and ISP. With diald, the first DNS query for a new connection brings the line up to the ISP. I chose to use a different host name for the notebook, depending on whether the Symphony card is active or if the regular wired 10/100 PC Card is active. When on the wireless network, the notebook is on the 192.168.4 segment; when it is on the wired Ethernet, it's on the 192.168.1 segment. I use different host names so I can state them explicitly in the /etc/hosts table on the Linux server.
On the Identification tab, set the computer name, workgroup and an optional computer description. Use the same name you used in the DNS setting above, and the name of the workgroup for your Microsoft networking. This will allow you to browse the shares on your Linux Samba server if the workgroups match. Once again, I made sure that the notebook, when on the wireless interface, had a different name than when it was on the wired network, since its IP address will be different.
First, you need to fetch the driver from the ftp.komacke.com/pub/rl2isa-drive site. If you are running a 2.0.3x kernel, I would recommend trying the rl2-1.5.1.tgz version. As of this writing, the latest version, rl2-1.5.3.tgz, had changes to support 2.2.x kernels, but broke for the older kernels. A kind soul from the driver mail list helped identify the version that worked for me. The Symphony driver is used as an installable module, so you must have module support compiled into your kernel.
Place the .tgz file in a suitable directory, and unpack it with:
tar -xvzf rl2-1.5.1.tgz
This will create a tree of directories under the current directory. I like to use /usr/src for source files, so I ended up with the driver source tree in /usr/src/rl2-1.5.1.
The rl2-version directory contains very good README files explaining the installation process. The examples and defaults are for Red Hat Linux, so I needed to answer several of the prompts differently for my Debian Linux host during the make config step.
For Debian, I answered as follows:
Module location?     /lib/modules/2.0.34/net
Executables?             /usr/local/bin
Man pages?               /usr/man
System header files?     /usr/src/kernel-source-2.0.34/include
CardType default []:     5
PC Card support? []:     n
Be especially careful with module location and system header files. Until I got them right, the driver module produced would not load. The README file gives the CardType values; 5 is PCI.
Next, do make modules followed by make modules_install. If the driver module compiles without error, you should be able to do an insmod rlmod and see the initialization message on the console and in /var/log.messages. You can confirm that the module has been loaded by doing lsmod. Since I used a PCI card, the I/O address and interrupt were set automatically when the driver module loaded.
Establish the IP address for the eth1 interface by typing
ifconfig eth1 192.168.4.1 broadcast 192.168.4.255\ netmask 255.255.255.0
Set the Secid for the Symphony wireless segment with the following command:
rl2cfg dev eth1 secidUse the same Secid you used when setting up the notebook above, making sure you type it the same, including upper/lowercase. The Secid needs to be set only once; it is stored on the card in nvram. The rlmod driver versions after 1.5.1 use proxcfg instead of rl2cfg to set parameters for the Symphony card. Check the man page and READMEs.
Now, establish the route for the eth1 interface by typing
route add -net 192.168.4.0 dev eth1
You can check your results by typing ifconfig eth1 and netstat -r. You should be able to see that the eth1 interface is fully configured with its IP address and that there is a route using eth1 to the 192.168.4.0 network.
There is one more configuration command that sets the Symphony card mode to “master” and sets its name. Type the following, using an appropriate name for your server:
rl2cfg dev eth1 msta
If you don't have a firewall running on your Linux system, you should be able to ping the notebook from Linux and ping Linux from the notebook using the IP addresses. You should also be able to telnet to the Linux system from the notebook, again using the Linux server's IP address. If this works, you're just about there; if not, check your log files for errors.
Add a line to the /etc/hosts table on the Linux server, giving the IP address of the notebook when on the wireless subnet, using your domain as appropriate.
192.168.4.2 wnb-dfoxwnb-dfox.
If you don't already have a c:\windows\hosts file with an entry for the Linux server on your notebook from a wired Ethernet configuration, create one now. The pertinent line entry in my c:\windows\hosts is:
192.168.1.254 server1 server1.If you have a firewall running on the Linux server, you will need to add input and output rules for the eth1 interface to allow the packets to be passed. I added lines to these two sections of /etc/rc.boot/masq as shown:
# local interface, local machines, going anywhere
# is valid
ipfwadm -I -a accept -W eth1 -S 192.168.4.0/24\
  -D 0.0.0.0/0
# local interface, any source going to local net
# is valid
ipfwadm -O -a accept -W eth1 -S 0.0.0.0/0 \
 -D 192.168.4.0/24
Depending on your Linux distribution and version and whether you are using ipfwadm or ipchains, the location and name of the rules file will vary. Refer to the documentation for your firewall package. At this point, you should be able to ping and use telnet by host name between the notebook and all systems on your original network.
To allow packets to be forwarded to the Internet through the firewall from the wireless segment, you will need to add rules similar to the following:
# Masquerade from local net on local interface to
# anywhere
ipfwadm -F -a masquerade -W eth0 -S 192.168.4.0/24\ -D 0.0.0.0/0
ipfwadm -F -a masquerade -W ppp0 -S 192.168.4.0/24\ -D 0.0.0.0/0
ipfwadm -F -a masquerade -W sl0 -S 192.168.4.0/24\ -D 0.0.0.0/0
Due to the way diald works, there are rules for both ppp0 and sl0. Remember to restart your firewall rule set after making changes.
Once I had the firewall rules in place, I had full connectivity from the notebook to all local hosts and the Internet. The last service to get working was the Samba sharing from the Linux server. It took a little head scratching, but finally I realized I had a line in /etc/smb.conf that limited which networks had access to the Samba server. Since the wireless segment was new, it needed to be added to the config file, and then Samba needed to be restarted. The revised line in /etc/smb.conf is shown below.
hosts allow = localhost, 192.168.1., 192.168.4.
Once everything is working, you need to add the commands to initialize the wireless eth1 interface on system boot. Debian Linux uses SysV init, so I added the following lines to the /etc/init.d/network file after the eth0 interface section and before the line setting the default route:
insmod rlmod
ifconfig eth1 192.168.4.1 netmask 255.255.255.0\
  broadcast 192.168.4.255
route add -net 192.168.4.0 dev eth1 \
  /usr/local/bin/rl2cfg dev eth1 msta name server1
These lines load the module, configure the eth1 interface, add the route and set the mode to master. Make sure it all comes up on reboot.
When on the wireless segment, the notebook has full connectivity to the rest of the local network and to the Internet; it's just a little slower. The Proxim specs state a range of 150 feet. I have had no trouble with the connection anywhere within our house. I've measured FTP performance for a half-megabyte file at about 64Kbps download and about 56Kbps on upload between the notebook and Linux server. I am pleased with this performance, since I don't plan on transferring large amounts of data while on the wireless segment. When I need to do that, I simply take the notebook back down to the office and switch it back to the wired Ethernet interface. During normal Internet browsing and e-mailing, there is no noticeable performance degradation.
Proxim supplies a handy feature in the Maestro utility for switching back and forth between a wired and wireless Ethernet interface. The Maestro utility is installed as part of the Win9x setup, and normally resides at the bottom right side of the taskbar. If you double-click the Maestro icon, click Configure, then click the Network Profiles tab, you will be there.
Win9x can store only one set of many of the network parameters, even though there may be more than one network interface and environment. Maestro creates a couple of new registry sections, one for the “Original” network settings (profile0) and one for the “Symphony” network settings (profile1). This makes it very easy to switch between a wired Ethernet interface and a wireless Symphony card on your notebook. The alternative is to change settings on several different screens manually when changing interfaces.
After fiddling with it for a bit, I realized it saves the necessary network parameters for profile0 when you change to profile1 and click “OK” and vice versa. This makes it relatively easy to get the settings the way you want them without actually changing the cards and rebooting each time. You can click back and forth as many times as you want. For instance, select the “Symphony” profile, click “OK”, then use the Windows network properties dialogs to make changes. When finished, click the “OK” on the Microsoft dialog, but don't reboot. Then go back to Maestro, click the “Original” profile, then “OK”, and your profile1 settings will be saved. If you don't let it shut down your system, you can go back and forth until you get the settings you want for each profile.
When you actually want to switch cards, run Maestro and select the correct profile for the card to which you want to switch. Click “OK”, then confirm the box that offers to shut down the system. After the system powers down, insert the correct card and power it up. It will have all the appropriate settings for that interface card and environment. If you are curious and want to see everything it saves, use regedit to look in HKEY_LOCAL_MACHINE\Software\ProximSwitch.
Proxim states that you may have up to ten machines on a wireless segment. You may also have several wireless segments within the same physical area by using different Secids for each wireless segment. For some installations, this may be very useful. Dave Koberstein reports that the ten-unit limit is based on limitations of the Proxim Wireless Bridge and Wireless Modem. If you use Linux as the wireless router, you are limited only by what you consider acceptable performance and how many nodes you can fit into a 150-foot radius.
There are some exciting new developments for 2.2.x kernel versions and the later rl2 driver versions. Bridging is reported to work with kernel 2.2.14 and rl2-1.5.3. The configuration is more complex, but you can avoid the need for different names and IP addresses when on wireless. The next driver, rl2-1.6.0, will have improved reporting, improved troubleshooting capability and will show up in the Win9x Symphony tools network map. Subscribe to the mail list to check these out.
After using my notebook on a wireless segment for a couple of weeks now, I must say I am quite pleased. I have good performance at a reasonable price and am able to configure and operate the wireless network with standard networking tools. I have great expansion capabilities and have avoided purchasing a costly Wireless Bridge. There is a great deal of help available, both from the Proxim documentation and web site and the Linux driver web site and mail list. This solution meets my needs quite nicely.


