
Blender
Blender is a free, full-featured 3-D modelling and rendering environment. In the words of the Blender web site:
Being the in-house software of a high quality animation studio, Blender has proven to be an extremely fast and versatile design instrument. The software has a personal touch, offering a unique approach to the world of three dimensions. Use Blender to create TV commercials, to make technical visualizations, business graphics, to do some morphing or to design user interfaces. You can easily build and manage complex environments. The renderer is versatile and extremely fast. All basic animation principles (curves and keys) are well-implemented.
Way back in 1989, Ton Roosendaal started up an animation studio called NeoGeo with a handful of friends. They wrote their own in-house 3-D software, “Traces”, but Ton was not satisfied with it. He evaluated it (as well as SoftImage and Alias), analyzed its shortcomings, and in 1995 started work on Blender. In January 1998, NeoGeo released the SGI version of Blender. Due to the immense popularity of the program, Linux and FreeBSD versions were soon released in April. In mid-1998, NeoGeo was partly taken over by another company (Alatis), so Ton created a new independent company, “Not a Number”, to take over Blender development.
The main Blender web site is at http://www.blender.nl/blender.html. The software is available at NeoGeo's FTP site, but it is best to find an FTP site geographically closer to you. Linux and FreeBSD x86 versions are available, but if you have an Alpha, SPARC or Power PC, you are out of luck. Hopefully, ports will soon be released for other platforms. However, there is a broader availability for SGI's—from R3000-based Indigos all the way to the R10000-based Octanes.
Download the archive file you want, either blenderLinux-dynamic_x.xx.tar.gz or blenderLinux-static_x.xx.tar.gz, where x.xx is the version number. (The current version at the time of this writing is 1.37.) The dynamic version is linked to the Mesa 3.0 libraries as well as a few others, so if you don't have Mesa, get the static version.
If you want, you can also grab the Blender tutorial files (tutor_1.01.tar.gz and tutor_2.0.tar.gz). The version 1.01 tutorials aren't actually tutorials—they are example files, but they don't show you how to create the files. Regardless, try them out, since they are pretty cool. Examples include a bat animation, a short sequence from “The Lost Ride”, a 3-D game by NeoGeo and a cool walking spider animation, in addition to a bunch of others. The version 2.0 tutorial shows how to morph a cube into a sphere and includes a tutorial on how to do the morphing. In addition to the two tutorial files, you can get the Blacksmith demo which includes examples of particle animation (i.e., fire and smoke).
I would suggest getting the manual—manual_1.02.html.tar.gz. While it is a little out of date, some of the information still holds true. It especially helps in understanding how Blender is object-oriented.
Even though the Blender web site says the minimum system is a Pentium 90 with 32MB of RAM, I've found that a fast 486 (DX2 66 or better) with 16MB of RAM is adequate for simple modelling and even for some more complex stuff. Still, if you want to do serious modelling, you definitely need at least a P90. As noted above, however, at this time you must have an x86 machine. You will need at least an 800x600 resolution screen (the buttons are a bit squashed though, so if you can get 1024x768 or better, go for it) and you definitely need at least 15bpp. You might be able to get away with 8bpp, but I would heavily advise against it. For one thing, everything is green, and in some rare cases, Blender might even crash.
Once you've downloaded the Blender archive file, move it to the installation directory and unpack it:
gunzip -c blenderLinux-xxx.tar.gz | tar -xvChange directories to the blenderLinux_xxx directory (cd blenderLinux_xxx).
Copy all of the .B files to your home directory (cp .B*h ~).
For bash users: edit your /etc/profile file (or if you're installing locally, $HOME/.bash_profile) by adding a line that reads:
export BLENDERDIR=/For tcsh and csh users: create an environment variable BLENDERDIR in your $HOME/.cshrc file:
setenv BLENDERDIR /Restart your shell.
Run Blender (blender).
If you haven't used 3-D software before, the GUI may look complex and difficult at first, but you'll get used to it. When you first start up Blender, you'll see a large grid in the center of the screen—that's the 3-D window. Down on the bottom is the buttons area. Finally, at the top is the options area, where you choose which scene to edit, font paths, etc. If you are running on a small display (800x600 or less), you may not be able to see most of the top window. In this case, click on the edge of the top window and drag it down until you can see it. For now, you need only be concerned with the 3-D window and the buttons window.
Basic keystrokes/mouse movements

Figure 1. Initial Blender Screen
All of the Blender widgets and menus are rendered through Mesa; this means you can zoom in and pan around almost anything. For example, in the buttons window (down at the bottom), you can hold Ctrl-MiddleMouseButton and drag around to zoom in or out. Notice that when you zoom, the buttons, including the fonts, are scaled. To pan, use the middle mouse button and drag around. This works everywhere—even in the button bars on each window.
The black cross with a red and white striped circle around the center is called the 3-D cursor. Whenever you add an object, it will be placed at the location of the 3-D cursor. To move the 3-D cursor, just left-click on the spot where you want it.
The black triangle with the little yellow ball (a few units down from the center) is the camera. Right-click on it to select, then press g to move it around. When you decide on a location for the camera, click the left mouse button.
The Blender windowing system is somewhat similar to HTML frames. Each window can be infinitely split (though a practical limit does exist—if you can't see the windows any more, you've gone too far) by moving the mouse into the window to be split, then clicking with the middle mouse button on the window pane perpendicular to the direction of split. If you want to split a window horizontally, click on either the left or right vertical pane. Then when “Split?” comes up, click on it. To join two split windows, right-click on the pane you want to remove, then click on “Join?” when it comes up.
Two main editing modes are included: normal and edit. You can toggle between the two using the tab key. When you add an object, Blender automatically switches to edit mode (for most objects, anyway). For example, let's say we add a Mesh cube. When the cube appears on the screen, it is in edit mode. If you right-click on one of its vertices (the purple dot means it is not selected, the yellow dot means it is), you can then press g to move the vertex around. If you press b, which stands for “Border Select”, you can draw a rectangle over the selected vertices.
The Toolbox is brought up using the space bar and enables you to add objects. Note that you can also use the Add primitive function (shift-A), which brings up the Toolbox and the Add submenu. Most of the hot keys are placed here. If you need to get out of the Toolbox window, either press esc (the standard for Blender windows) or move the mouse away from the window.

Figure 2. Building a Blender Scene
To build your first scene, follow these steps:
Switch over to top view, if you aren't already there (number pad 7).
Move the 3-D cursor to the center of the grid.
Bring up the Toolbox (space bar).
Left-click on Add, then on Mesh, and finally on Cube. Another way of saying that is Add->Mesh->Cube.
Press tab to leave edit mode.
Click on the red sphere in the button area (Materials).
On the right side of the screen, click on the icon with a white horizontal bar.
In the left side of the buttons area are some sliders labeled R, G and B (Red, Green and Blue). Slide the Blue all the way to the right, and slide Red and Green all the way to the left. The “material preview” rectangle should turn blue.
Move your mouse cursor back into the 3-D window.
Change to side view (number pad 3). Move the 3-D cursor to somewhere above the cube, though it should be somewhat close (no further than 20 units away).
Click on Add then Light.
Press f12 and watch the scene render.
Press f11 to get rid of the render window.
Press f2 to save the created scene. Once the file window comes up, click in the second input box from the top (under the directory name) and enter a name for your scene. Then press enter twice to save the file.
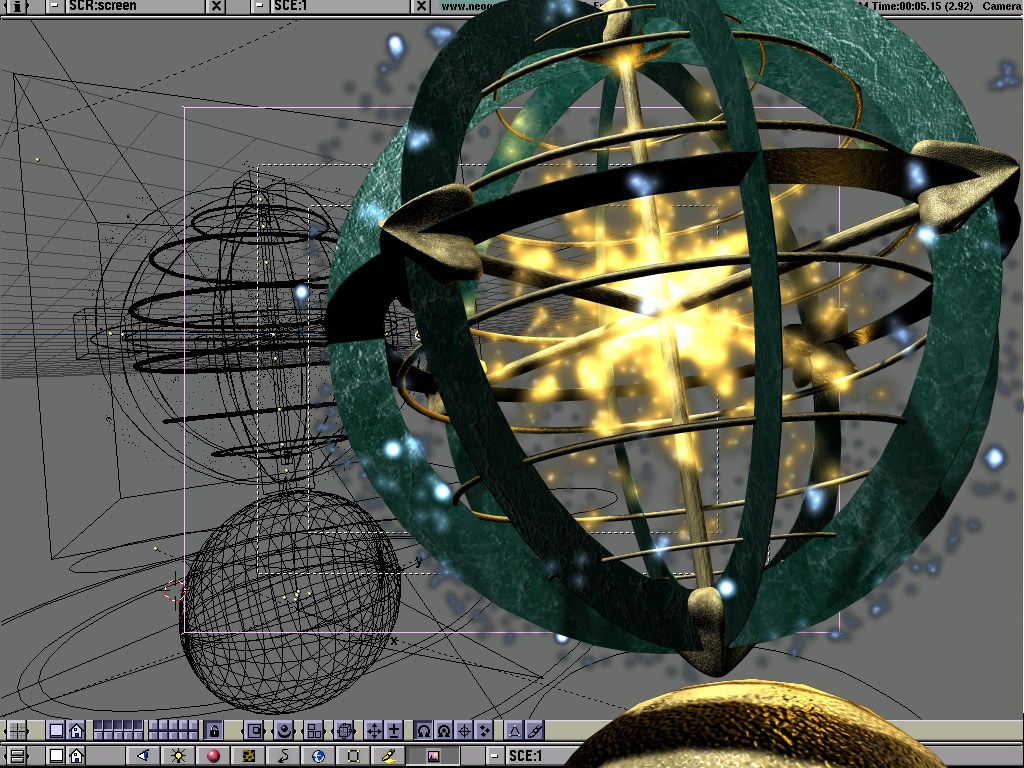
Figure 3. Blender Designed Scene by Bart Veldhuizen
Ton Roosendaal hopes to eventually port Blender to a number of systems, but right now that isn't a priority. By the time this article is printed, the manual and a free version of Blender 1.5 will have been released. After the manual goes out, a commercial CD-ROM will be published containing Complete Blender (version 1.8)--hopefully, by mid-1999.

