
x-automate: Control Your Home with Linux
Ever since I was a kid watching the Jetsons, I've envisioned living in the home of the future, with intelligent appliances and a central computer controlling the house, in sync with the occupant's activities.
Well, we're not quite there yet, but it has been looming on the horizon for some time. One of the early pioneers in the home automation industry was the X10 protocol. Pico Electronics, a small design house in Glenrothes, Fife, Scotland, developed the X10 project based on a previous project called X9, which was a random-access scheme for accessing tracks on an audio tape (much like CD technology of today). Pico was also responsible for designing some of the first calculator chips. While the X10 system does have its limitations (some of which are addressed in recent additions), it is a fairly cheap way to implement home automation without rewiring your home from scratch.
The X10 system consists of controllers and modules. The controllers send “power on”/“power off” messages through the existing house wiring to the controllers, which either throw a relay or use a triac circuit (an electronic circuit used in light dimming/motor speed control applications) to perform dimming operations. Each module is set to an address (1-16) and a house code (A-P), and the controllers are set to a house code. If multiple units are set to the same address, they can all be controlled by one message. If you need additional coverage, you divide the facility into zones by house code. X10 modules and controllers, as well as the CP-290 interface for computer control, can be purchased from a number of mail order vendors, or from Radio Shack.
One limitation of the X10 systems is one-way communication—no acknowledgement of the signal being received is returned. Also, the system is limited in range, sometimes having difficulty getting from one side of the 220V line (split to provide 110V to the home) to the other, in the U.S. anyway. Bridge modules help with the second problem, and new units are now available that implement two-way communications (TW-523).
What does all this have to do with Linux? After having played around with Linux for a while and learning about cron, I started thinking about leaving my machine on all the time and controlling functions around the house using my existing X10 gear and the CP-290 interface which I used to plug into my old DOS box to control the house lights. The CP-290 can download programs and run the house on its own, but by letting Linux do the job, I get the extra bonus of letting the system do other tasks such as upload/download my mail, announce the time of day and give me verbal reminders.
Fortunately, someone else had the same idea. Aaron Hightower (aaronh@acm.org) wrote x10-amh, a command-line program which communicates with the CP-290, controlling those items a person might wish to control around the house.
x10-amh alone is enough to work with cron and do tasks automatically; you just make the appropriate x10-amh commands in your crontab file, and off you go. Here's a sample from my crontab file:
55 4 * * mon-fri exec /usr/local/bin/x10 -n 3,4,11
15 5 * * mon-fri exec /usr/local/bin/x10 -f 3,4,11
0 7 * * mon-fri exec /usr/local/bin/x10 -f 10,11,12
0 23 * * sun-thu exec /usr/local/bin/x10 -f 1,4,3,9,6,7
0 9 * * mon-fri exec /usr/local/bin/x10 -f 1,2,3,4,5,6,7,8,9,10,11,12
I'm a frequent participant in Usenet, and one of the groups I follow is comp.home.automation. If you read this group for any length of time, you see a plethora of announcements of the latest, greatest home automation software, with fancy GUIs written for MS Windows. Being an acknowledged Linux advocate, I started thinking that Linux deserved a fancy home automation GUI of its own.
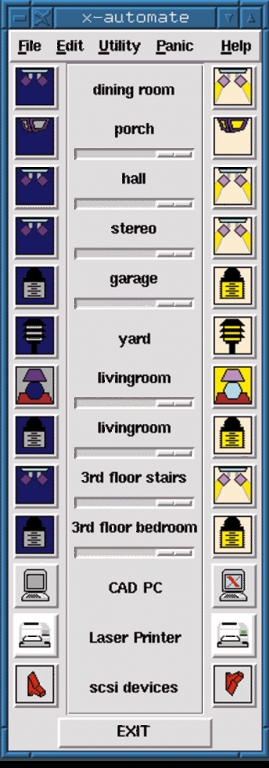
Figure 1. x-automate Interface
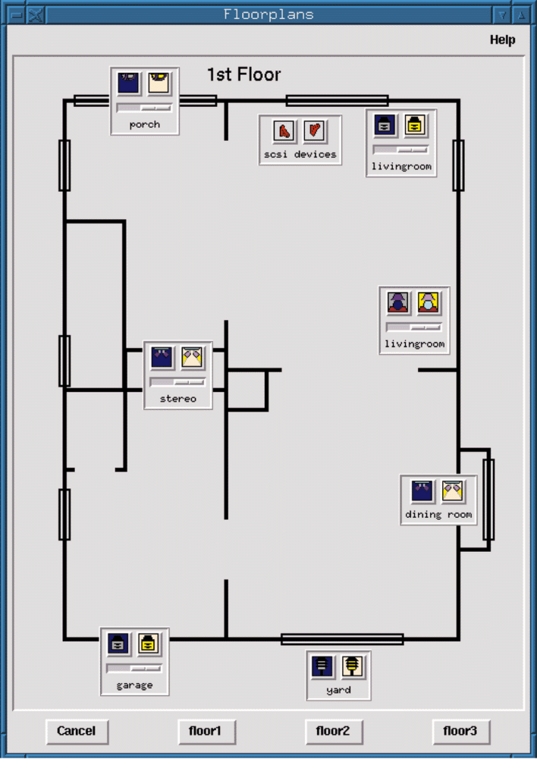
x-automate is a Tcl/Tk frontend that works in conjunction with Aaron's x10-amh. It's fully customizable, with a remote-control-type interface (Figure 1) and an assortment of icons representing a few typical home-automation candidates around my home. In addition to the remote control interface, you can set up floor plans of your home (Figure 2), with the devices placed in a reasonable representation of their actual locations. Carrying the Jetsons' theme one step further, I also wrote a C program, speak, that sends ASCII text through another serial port to a bgmicro Digitalker speech synthesis board which then “says” what the system is doing. This part is optional. You can configure the system without sound or implement another approach such as cat xxx.au > /dev/audio with the appropriate sound file.
The program and its associated files should be stored together in a directory. (In my case, it's ~/x10.) You'll have to run the program from its directory to pick up the bitmap files. The configuration for your X10 modules is stored in ~/.x10rc and should look something like the one shown in Listing 1.
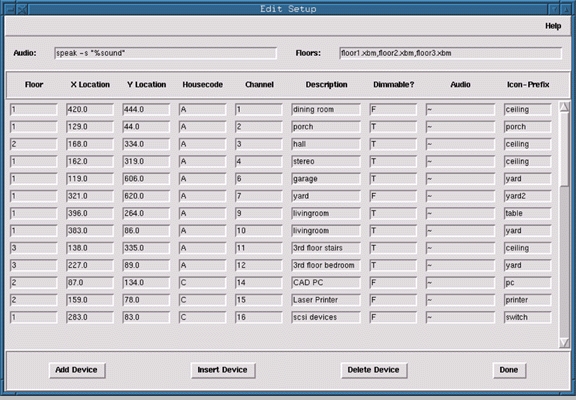
Figure 3. Configuration Interface
The program includes a tabular input section for modifying your configuration (Figure 3). The screen is much like a spreadsheet, with cells to edit the various parameters for each unit. You need to indicate the floor the unit is on (for multistory facilities), the x,y coordinates of the icon for the floor plan (you can fine-tune this once you load the floor plan), the house code and the unit number. In addition, you need to assign a descriptive phrase for the icon prefix and the device, whether it is dimmable, and the phrase to speak if you're configured for sound. You can tab from field to field, as well as insert and delete rows. Once you're finished, store the setup in your .x10rc file.
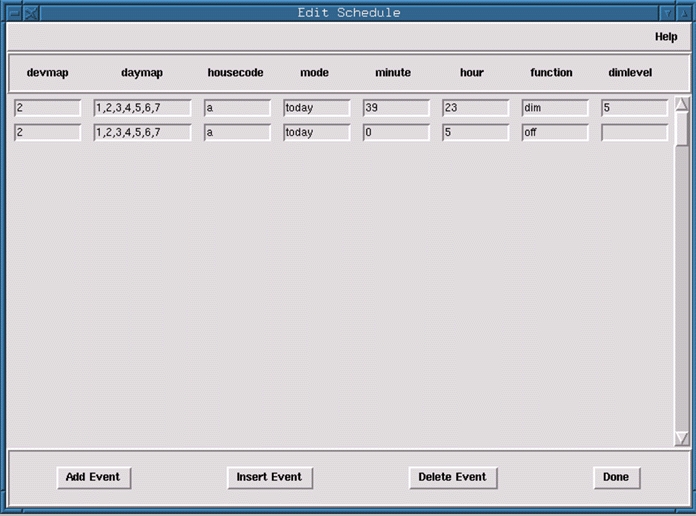
There is also a tabular screen for configuring scheduled events which can be uploaded to the CP290. x10-amh stores event data in the following format:
event {
        devmap 2
        daymap 1,2,3,4,5,6,7
        housecode a
        mode today
        minute 39
        hour 23
        function dim
        dimlevel 5
        }
The table in x-automate simplifies editing this data (Figure 4). In short, you need to define the device, the days of the week for the event, the housecode, the mode, the minute, hour, function and dimlevel, if applicable. To upload this data from the command line, you run x10-amh filename, where filename contains the schedule data in the above format.
x-automate also has the means for accessing other command-line options of x10-amh, mostly through the menu. You can set the CP-290's date/time, query the status of the CP290 and perform a self-test.
To create your floor plans, I recommend using xfig, saving or converting the file to an “xbm” file for displaying within x-automate. Keep in mind your screen size when designing your floor plan. A separate drawing can be made for each floor or area, with the file names entered in the .x10rc file. Your control icons will be displayed at the x,y coordinates as defined in your .x10rc file, and can be used to control devices in the same way as with “remote control”. Clicking on the edge of the icon and dragging will move the icon on the floor plan and update the x,y coordinates in the configuration, which can be resaved to your .x10rc file. A group of icons in both large and small sizes (for the floor plan) are included in the distribution. Feel free to make your own—if you make some nice ones, send them to me. Now, Linux users can have a fancy home-control GUI, just like that “other” operating system.


