
Linux as a Proxy Server
Proxy servers are software applications that run on your firewall machine in order to provide indirect Internet access to your network. The firewall can be either a “single-homed” host or a “dual-homed” host. A single-homed host is a machine with one network card. This configuration relies on the Internet router to block all packets to any machine except the firewall. A dual-homed host is a machine with two network cards that has routing capabilities disabled. Computers behind the firewall can talk to the dual-homed host, and computers on the Internet can communicate with the dual-homed host. However, since routing between the network cards is disabled, the computers behind the firewall cannot talk directly to the computers on the Internet.
The proxy server is used to allow Internet access from inside the protected network through either the single or dual-homed host firewall. The client applications speak directly to the proxy server and the proxy server in turn speaks directly to the Internet hosts on behalf of the client, thusacting as a proxy. This interaction allows Internet access to all clients on the internal network, but leaves only one machine, the firewall, directly vulnerable to attacks from the Internet.
The proxy server takes a packet from inside your network that is bound for the Internet and changes the “from” address to its own address. It then forwards the packet to the destination host. The beauty of the proxy server is that the destination host thinks it is talking only to the firewall. When the firewall receives the response from the destination host, the proxy server sends the packet back to the original requesting machine. The client has the illusion that it has been communicating directly with the host on the Internet. The host on the Internet has the illusion that it is only dealing with the firewall.
This method is a big advantage when you access FTP sites that do double-reverse lookups. These sites, as a security measure, want to ensure you are truly coming from the address you've given. The host name of the requesting IP address is looked up in the DNS records. The server then does a lookup of the host name it received. If the IP address it receives from this last lookup does not match the requesting one or if the DNS lookup failed to find any entries, the server denies access.
If you are denied access to one of these sites, there is most likely a problem with your DNS setup. When you have to manage several machines across your network, keeping all the entries up to date can be a daunting task. With a proxy server in place, your entire network appears to come from the IP address of the proxy server, thus reducing the total number of properly configured DNS entries you need.
Another advantage of using a proxy server is that since all outbound traffic must pass through the firewall, as an administrator, you can monitor which types of Internet activity are occurring. The proxy server has very robust logging capabilities which allow you to see who is accessing what on the Internet. Attempted access from the outside is also logged closely.
I will not go into the details of setting up a packet-filtering router, since that type of information is vendor specific. However, I will give you the basic information on setting up a dual-homed host firewall. Assuming you use a Linux machine for your host, you will need to have two network cards installed in your machine. Read the “Multiple-Ethernet” mini-HOWTO located at ftp://sunsite.unc.edu/. I used two 3Com509 cards.
Auto-sensing the modules to load is a common problem when using two identical cards, so I compiled the drivers into a monolithic kernel instead of a modular one. I also added the following line to my /etc/lilo.conf file:
append="ether=11,0x300,eth0 ether=10,0x270,eth1"
This ensures that the proper parameters are passed at boot time.
Configure your kernel to keep it from routing IP packets (see Listing 1). To further ensure protection and anonymity, use one of the “bogus” class addresses (see Table 1) as per RFC1918. These IP addresses are set aside by the INTERNIC for use behind a firewall. Any packet with one of these IP addresses is dropped by the Internet backbone routers. See Figure 1 for an example of a network topology with a dual-homed host firewall. The example configuration files in this article are based on this basic topology. Our protected network is assigned the “bogus” Class C address 192.168.50, and we assume that the valid IP address of the Internet side of the firewall is 111.222.333.1.
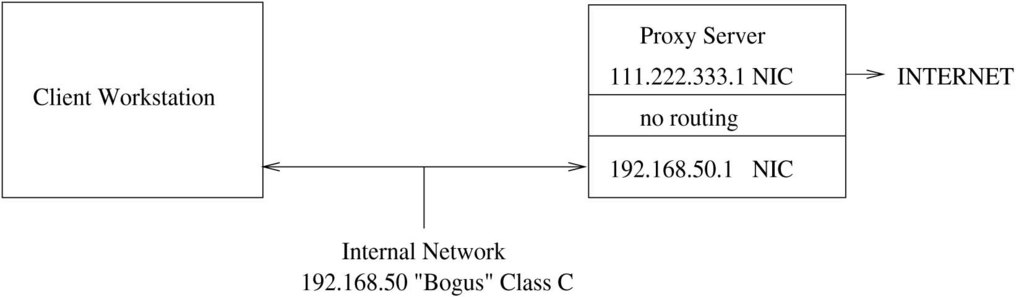
Figure 1. Dual-homed Host Firewall
The Socks5 server is freely available from http://www.socks.nec.com/. There are several advantages to using the Socks5 server. Many TCP/IP applications have support for Socks5 proxies built in. There is an INTERNIC RFC for it (RFC1928). It proxies all services through one port, allowing you to block incoming packets on most other ports. Finally, it has support for the most commonly used services that your users will want: HTTP, FTP, TELNET, finger, archie, whois, ping and traceroute. Unix clients are included and compiled with the source distribution. A client application for Win 3.11, Win95 and WinNT is also available for download. If you have custom applications, you can use the Socks5 library to compile Socks5 support into your application.
I was able to compile the source distribution for Socks5 correctly the first time. A configure script is used to set up all the necessary flags, parameters and Makefiles for your system. Afterward, it's as simple as executing make and then make install to put all the binaries and man pages into the /usr/local/ directory tree. The following are the steps required to build and install the Socks5 software:
tar -xvzf socks5-beta-0.17.2-exportable.tar.gz
cd socks5-beta-0.17.2-exportable
./configure
make
su
make install
The server can be started via inetd or run as a daemon. Running as a daemon has the advantage of increased performance to the user. Running via inetd leaves the firewall less burdened when not in use. If your site is like mine, there is never a time when the Internet is not being accessed. I configured the Socks5 server to run as a daemon and added the command to start the server to my /etc/rc.d/rc.local file.
Configuration of the firewall is done in two steps. First, there is a configuration file on the server that must be set up specifically for your site. The default file is /etc/socks5.conf (see Listing 2). The man page gives information on the appropriate syntax, and there are also example configurations at http://www.socks.nec.com/v5examples.html. Second, there are configurations that must be done on each of your client workstations. On Unix clients, this is the /etc/libsocks5.conf file (see Listing 3).
On your Win-based machines, several different things need to be done. If all of your users limit their Internet usage to the Web, you can keep your configuration limited to the options available in both Netscape Navigator and Microsoft Internet Explorer. For Netscape Navigator, the appropriate settings are located in “Options”-> “Network Settings”->“Proxies”. Select “Manual configuration” and then enter the Socks5 server IP address with port 1080 (note: this is the default port, and can be configured differently at compile time). For Netscape Navigator 4.0, the settings are found under “Edit”->“Preferences”->“Advanced”-> “Proxies”. The remainder of the configuration is the same as above. For MS Internet Explorer, select “View”->“Options”->“Connection”. Select “Connect through a proxy server”. Enter the IP address of your Socks5 server as well as the port 1080.
If your user's demands go beyond simple Web access, the download site for the Socks5 software also contains two versions of SocksCap, the Windows redirector: SocksCap16 and SocksCap32. The SocksCap16 software is used for Windows 3.11 clients while SocksCap32 is used on both Win95 and WinNT. The SocksCap16 application only needs to be running at the same time as the Winsock application in order to proxy the application. The SocksCap32 application, however, must be started first, and the Winsock application launched from within SocksCap32. Alternately, you can create a shortcut to the desktop or the “Start” menu that calls the Winsock application profile from the command line:
C:\Program Files\SocksCap\sc32.exe ws_ftp
Both versions of SocksCap require you to enter the appropriate IP address and port to your server when you start the application for the first time.
The Trusted Information Systems Firewall Toolkit (TIS fwtk) is another widely-used, freely-available, proxy-server solution. The TIS firewall toolkit provides very specific proxies for each service, giving you the ability to set up just an HTTP proxy server, for example, if you wish to limit your users to just that service. When the package builds, the proxies that are built include an HTTP (http-gw), FTP (ftp-gw), TELNET (tn-gw), rlogin (rlogin-gw), X (x-gw) and generic proxy (plug-gw). Also included is a secure replacement for sendmail (smap) as well as an authentication module (authsrv). The generic proxy gives you the ability to configure proxies for specific machines and ports. Possible uses for this proxy could be proxying Usenet news as well as accessing e-mail through the POP3 protocol. (Socks5 does not include support for either News or POP3.)
The TIS fwtk builds fairly easily. I had to apply the http-gw patch in order to get the HTTP proxy to build. If you are building this toolkit on a system other than Linux, make sure you use gmake instead of make. I ran into this problem when I tried to build this package on an SGI. Doing this may require you to first acquire and build GNU make, which is available at ftp://prep.ai.mit.edu/pub/gnu/.
There is no configure script available with the TIS fwtk. Instead, there are several versions of the Makefile.config. Simply apply the http-gw patch, move Makefile.config.linux to Makefile.config, run make and then run make install. Note that in order to build the x-gw X proxy, you need the Motif libraries. The easiest way to get them is to download lesstif, a Motif clone available at http://www.hungry.com/products/. The following are the steps required to build and install the fwtk software:
tar xvzf fwtk-2.0.tar.gz
cd fwtk
chmod -R 755 *
tar xvf ../http-gw.patch.tar
mv Makefile.config Makefile.config.orig
ln -s Makefile.config.linux Makefile.config
makea
su
make install
The binaries are placed in the /usr/local/etc directory, a location not likely to be affected by system upgrades. The proxies can be configured to run as daemons or by inetd. Take careful note of the man pages. There are specific command-line arguments that must be invoked in order to get the proxy to run as a daemon. As I mentioned above, you can configure as many or as few of the proxies provided. The configuration is much more complicated than for the Socks5 server. The configuration file is called /usr/local/etc/netparam and is parsed based on the proxies. Each line starts with the name of the proxy followed by a colon and then by the options (see Listing 4).
The client configuration is different from the Socks5 configuration. For the two browsers mentioned above, simply leave the Socks5 entry blank and fill in the HTTP proxy and port, as well as FTP and TELNET entries, if you have set these services up on the firewall. Good news for those using a browser other than Navigator and Explorer—you can use the TIS fwtk http-gw proxy with any browser. Simply prefix all web addresses with http://IP-or-name-of-firewall-host/. For FTP, you first FTP to the proxy-server host. When prompted for the user name, enter anonymous@ftp.ftpsite.com; the proxy then goes out and makes the appropriate connection. For News, you must configure the plug-gw as illustrated in the configuration file (see Listing 4). Accessing news is as simple as configuring your news client to point to the proxy server instead of the real news server.
When I first set out to construct a firewall/proxy server solution where I work, I initially chose the Socks5 server. (I had downloaded them both, but the Socks5 server compiled without errors, thus sealing my choice.) Within a day, I had figured out which settings I needed for my network and had the server running as a daemon.
Getting users excited about using the proxy server as opposed to direct Internet access is not easy. Recently, a user approached me ranting about how he could not stream video in from the Internet. After he calmed down, I asked him which URL he was trying to access. Then I quickly found a FAQ for the particular plug-in he was using with an entry similar to “How do I stream video through a firewall.” After reading the FAQ and looking at the available options, I found that this particular plug-in did not have Socks5 support. It did, however, have support for general HTTP proxying. So, I turned my attention back to the TIS fwtk I had abandoned 10 months before. I found a newer version, applied the http-gw patch, executed gmake and had the toolkit running later that day. The video streaming worked beautifully.
This story illustrates the fact that you do not have to make an either/or decision about Socks5 or the TIS firewall toolkit. The two packages can be used together to give your users a wide variety of Internet access.
Setting up a proxy server is a great way to give your users Internet access while still protecting your network from Internet attacks. Between both the Socks5 server and the TIS firewall toolkit, you can give your users as much or as little Internet access as you want.

