
Introduction to LyX
Although (or perhaps because) it is one of the most flexible typesetting tools, many people are a bit afraid of using LaTeX. They'd rather use a standard word processor. On the other hand, even for those of us quite accustomed to LaTeX, some kind of WYSIWYG editor would often come in handy, especially for shorter texts like letters.
Out on the Internet is a nice tool which may satisfy the needs of both. It is called LyX and its home page is http://la1ad.uio.no/lyx/. The primary download site is ftp://ftp.via.ecp.fr/pub/lyx/, but you can also simply follow the links from the home page. Initially it was written by Matthias Ettrich (ettrich@kde.org), one of the initiators of the KDE project, but it is now maintained by Lars Gullik Bjoennes (larsbj@ifi.uio.no). The most recent package is usually called lyx-current.tar.gz. For those of you running KDE, it may be interesting to know that Matthias Ettrich has just released a KDE version of LyX: KLyX (http://www-pu.informatik.uni-tuebingen.de/users/ettrich/klyx/klyx.html). From the screenshots it looks very promising, so it may be the version of choice if you have at least the basic KDE libraries installed.
For the installation of the source package, you will also need two libraries, which probably won't be included in your system. One is the Xpm library; the other is XForms, a library for simple XView GUI programming. You will need at least version 4.7 of libXpm and 0.81 of libforms. Both of them can already be obtained as Linux (ELF, a.out) binaries. You will find XForms at ftp://laue.phys.uwm.edu/pub/XFORMS/, ftp://ftp.via.ecp.fr/pub/xforms/ and ftp://ftp.cs.ruu.nl/pub/xforms/ and Xpm at Sunsite and its mirrors in libs/X/.
I will focus only on the installation of the binary distribution. It is available for several flavours of UNIX (even for OS/2) and is the easiest to install. Should you have any problems with the binaries, you can still switch back to compiling the sources (remembering to check for the other two libraries).
After you have downloaded lyx-current.tar.gz, log in as root and change to /usr/local. Now do:
tar xzf /
cd share/lyx
./configure
The configure program checks your local LaTeX installation and sets up the LyX configuration accordingly. Later on, you can view a file (from the Help/Documentation menu) that lists both the packages installed and not installed in your system.
Of course, you do not need to put the LyX package in /usr/local. Nevertheless, LyX can display its messages in languages other than English. For this feature, it expects to find the internationalization files in /usr/local/share/locale. If you install LyX in a different place, you will have to set the environment variable LYX_LOCALEDIR pointing to the appropriate share/locale directory. If you chose to install LyX in /opt, then for bash you would need:
LYX_LOCALEDIR=/opt/share/locale
and for tcsh:
setenv LYX_LOCALEDIR /opt/share/localeIf you don't need the internationalization, i.e., English-only messages are accessible, you can skip this step.
Each user can have his/her own resource file in which customizations can be made. Start by copying the file /usr/local/lyx/system.lyxrc to $HOME/.lyxrc. Now start LyX by typing lyx.
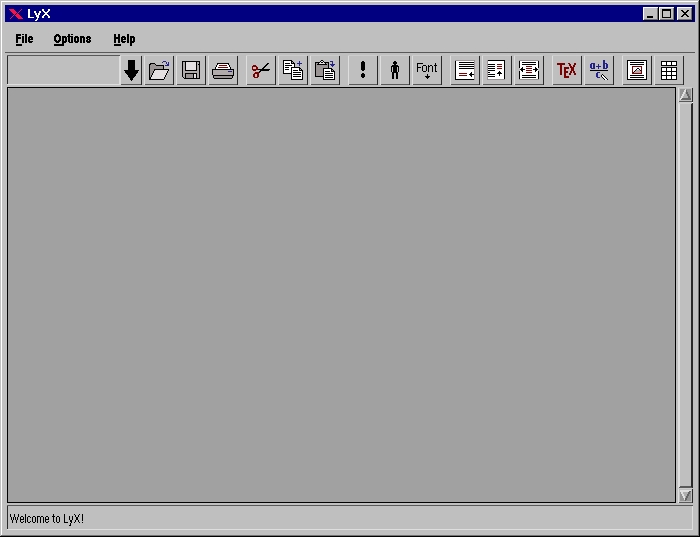
You will be welcomed by a window like the one shown in Figure 1. Looking at the LyX window, you will be reminded of any standard word processor. That's the main reason I think users who have been reluctant to use LaTeX will be encouraged by LyX to make the transition.
At the top is a menu bar with the usual features. Beneath is a button bar with a list box for choosing the desired style and several command shortcuts. (By the way, this button bar can be customized.) The window is dominated by a large text input area with a scrollbar. Finally, at the bottom is a status line.
If you do not wish to experiment on your own but would rather read a little introduction, choose the menu Help/Documentation. A file selector will open, letting you choose one of the package's documentation files. The file extension (*.lyx) shows that LyX uses its own format. However, each document can also be saved in LaTeX format.
Now back to the documentation. As the program is still in version 0.12, most of the files are not too detailed, but for a quick start I'd recommend either Main.lyx or Tutorial.lyx. In this selector you will also find the already mentioned results of the LaTeX configuration check (LaTeXConfig.lyx).
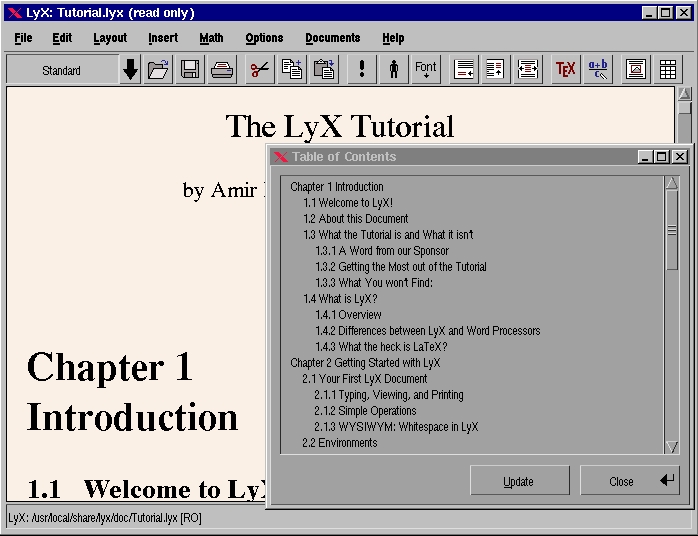
Let's suppose you selected the file Main.lyx. After confirming the message that this file is read-only, it takes a little while to load all the fonts into the X-server. At this point, error messages may appear in your console/shell window. Don't worry; it just means you have not installed all the X-server fonts LyX wants to use. Then, you are presented with one of the really nice features: a table of contents (TOC). A TOC is well-known in LaTeX, but LyX has the ability to display it in a completely interactive window, i.e., you can click with your mouse on any entry and the cursor jumps to the appropriate section (see Figure 2). If you prefer to read instructions on paper, print out the document. Select File/Print, check that everything in the opening dialog box is set to your needs and click on OK (or press enter).
Figure 2. LyX Table of Contents
Now let's start to write our first LyX document. Our goal will be a short article with a title, three sections, some mathematics stuff, perhaps a picture, some footnotes and a TOC.
First, if you opened Main.lyx before, close the TOC and select File/Close. If LyX asks you about saving any changes, say no. Now create a new document by selecting File/New. If you are not in your home directory, change to it by pressing the Home button. Now, type in a file name, e.g., MyFirstTest.lyx. After clicking on OK, you are presented with a blank page.
Very well. You (and LyX) are now ready to start typing. First, we create the title. Click on the down arrow beside “Standard”. A list box will open in which you can choose one of several styles. (If you know LaTeX, you will recognize most of them.) Move down and click on “Title”. The layout on the screen will change a bit and you can type in your title, “My First LyX Document”, then press enter. Note that the style changes back to “Standard”. This is a characteristic of LyX. One style is valid within only one paragraph (ended by enter). If you want to type in more lines, press Newline (ctrl-enter).
To begin the first section, select the “Section” style in the list box to type in the section name (e.g., “The First Section”) and press enter. To add an itemize style, type in some text (“A simple itemize style:” enter), and select “Itemize” style—an asterisk will appear. Now you can write some items which are separated by enter. This is an exception to the mentioned rule: to get back to “Standard” style, you must select this explicitly. You can play around a little with the two font styles, emphasize and noun, by clicking on the button with the question mark and the person. The next section will contain some math. After adding a new section headline, click on the formula button and open the math panel (Math/Math Panel, MP). First, enter a three-dimensional unity matrix: type E =, click on the parentheses button in MP and click on OK. Now add the matrix by clicking on the matrix button in MP (the one with nine squares), set the size (3 by 3) and click on OK. This fills in the nine entries. For a unity matrix, the three rows should read 1 0 0, 0 1 0 and 0 0 1. If you wish, you can play around a little with the numerous buttons within the MP.
We will add a third section and insert a PostScript picture into our document. First, select Insert/Floats/Figure Float and type in any figure caption. After that (without clicking on enter), click on the “Insert Figure” button (just right of the formula button). In the dialog, select the first item (encapsulated PostScript). If you left-click on the appearing frame, a settings box opens. Click on “Browse” and select the file /usr/local/lyx/clipart/platypus.eps (or change the path according to your installation). Set the width to 3 inches and click on OK. The platypus should now appear on the screen. You will notice a red frame around the complete figure, with a small grey rectangle to the left reading “fig”. If you press the left button in this field, the whole figure will collapse into a small, red “fig”. Left-clicking on this brings back the whole frame. Pressing the left button anywhere within the figure opens the “Floats” context menu, giving you a choice of actions to perform.
Figure 3. Completed Text Document
By this time, your document should look like Figure 3. Congratulations—you've just finished your first LyX document. Now save it to disk (File/Save), if you have not already done so. If you like, print it out (File/Print). This may take a little time. As you know, LaTeX is still working behind the scenes, which means that the standard LaTeX procedure of compiling and printing has to be gone through.
If you followed the opening of the documentation file, you have already seen LyX's feature of displaying the table of contents (TOC) of a document in a separate window, letting you jump to each entry by using the mouse. How is this feature set up and invoked? In fact, you do not have to do anything special. LyX keeps track of the “Section” style as you assign it to parts of the text. Choose Edit/Table of Contents, and there it is. You will find all the sections you created; if not, just press the update button. Clicking on each entry takes your text cursor directly to the specified point.
With LyX, you can do most any formatting that is possible in LaTeX. Experienced LaTeX users will notice some LaTeX commands (e.g., \pagebreak) are missing. This is not really a drawback. You can always assign the TeX style to any portion of text, either by choosing the style from the list box or by pressing the TeX button. This tells LyX that the marked portion of text is to be taken as native LaTeX code, thereby allowing you to use even those LaTeX commands which cannot be reached by menu entry. Even hard-core LaTeX hackers can still be satisfied by saving their document in the usual LaTeX format by selecting File/Make LaTeX file. Although I admit that this file will not necessarily look the way it would if you had written the text directly in LaTeX, it opens up the possibility of hacking in anything you like and then running LaTeX directly on the file.
Although LyX is close to WYSIWYG, you might often still like a preview of your document. For this purpose, LyX offers both xdvi and ghostview. If both these programs are installed on your system, you can get a preview by selecting one of these two options from the file menu. The necessary background LaTeX commands (running LaTeX and, for the PostScript output, dvips) are done by LyX automatically, so you don't have to worry about whether all your files are up to date.
If you save text, the file is stored in the working directory you specify. But all the intermediate LaTeX-related output files (like .log, .dvi, .ps) are stored in a /tmp directory (the actual path can be specified in ~/.lyxrc), unless you explicitly instruct LyX to make a LaTeX file from your text.
Now that you have finished your first LyX (and perhaps your first LaTeX) document, it is time to drop a few notes on the customizations possible within LyX.
The first issue (which, in fact, is not really a customization of the application) is the template, which you may have noticed in the File menu (New from template...). You may already know the template notion from standard word processors, and in LyX it works just the same: a standard template document defining the basic settings like fonts, layout, etc. A prototype of such a template may be a letter (some letter templates are included in the LyX distribution), where you would set up basic items like your personal address, a standard opening and closing phrase and the layout. To create such a template, you don't have to do anything special—just start editing a new document with the desired settings. For those parts of the text which are not standard and are to be changed in each document using this template (an example in the letter case may be the recipient's address), you can type in any text, e.g., “recipient's name”. Look at the distribution's templates for other examples. After you finish, save this template to disk like any other LyX document.
Unlike other word processors, LyX does not use a special format for templates. Any LyX document can be taken to be a template and vice versa. As a template is also a “normal” document, saving a newly created template to disk also saves all the layout options currently selected. So, if you have created a letter template using a letter-sized sheet of paper, this page size is also saved to disk, as is all the font information, etc. If you do not want each of your later letters to use all these settings, you have two options:
Leave the template file untouched. In this case, each time you create a new document using this template, you have to reset the settings to your specific needs after selecting the template. Remember, selecting a template is more or less like loading in a file; thus, all the settings saved in this file overwrite the current parameters.
Change the template file by hand using any plain text editor. In this case, you can remove all the layout commands which you do not wish to be set by the template.
The more general you wish your template to be, the more likely you will choose option 2. On the other hand, this requires some knowledge and understanding of the LyX command language. It won't be too hard if you already know LaTeX, but for the first experiments you should perhaps leave the file untouched.
The last issue to be mentioned here is the ~/.lyx directory which is the place where real customization can take place. Again, leave the files as they are until you have become a bit more acquainted with LyX. In this directory, all your personal configuration files are stored. As long as your configuration and the global system's are the same, nothing is stored here.
You can, for example, store your preferred key-bindings. There are two standard bindings (PC-modern and Emacs), but you can also define your own key-binding scheme and tell LyX the file where it is stored. You can also define your own tool bar, various (LaTeX-related) commands, printing defaults, file defaults and the like. It would take quite a while to discuss all these options in detail, but I recommend taking a look at the file. Fortunately, all options are explained well, so it is easy to figure out where to do what.
LyX, a WYSIWYG editor for LaTeX, is by no means a standard word processor. It heavily depends on LaTeX, i.e., you need to have LaTeX installed properly, and you can only do formatting that is also possible with LaTeX. It has the distinct advantage of directly displaying all the different style elements on the screen without fiddling around with “strange” formatting commands. Those who are not familiar with LaTeX will find it much easier to take the first step toward using this powerful package. Those who already know LaTeX will still find LyX useful for writing shorter pieces of text such as letters. And, after all, as the LaTeX file format is supported in output, you even have the freedom to hack the most complex LaTeX commands by hand if necessary.
Ulrich Quill received his diploma in physics from Ruhr-University Bochum, Germany. His thesis topic was image analysis with neural networks. He is now in the Ph.D program in the Department of Neurophysiology, working on biophysically realistic simulations of neural networks. He helps with the system administration of a SUN/Solaris, PC/Linux cluster. In his spare time, he enjoys reading, photography and spending time with his girlfriend. He can be reached at quill@neurop2.ruhr-uni-bochum.de.
