
New Projects - Fresh from the Labs
This nifty program caused quite a storm at SourceForge.net some time ago, but now that the publicity has died down, I'd like to put it back in the spotlight. As an unusually easy-to-use 3-D design program, this is a project I've wanted to cover for some time.
To quote the Web site: “Sweet Home 3D is a free interior design application that helps you place your furniture on a house 2-D plan, with a 3-D preview.”
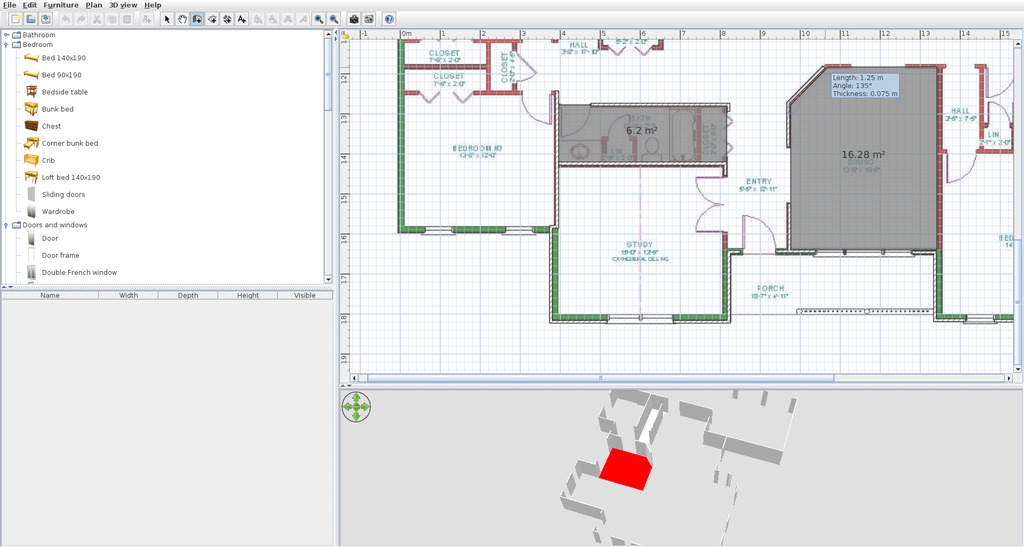
As soon as you start drawing walls on your blueprint, the house starts taking shape in the pane below it.
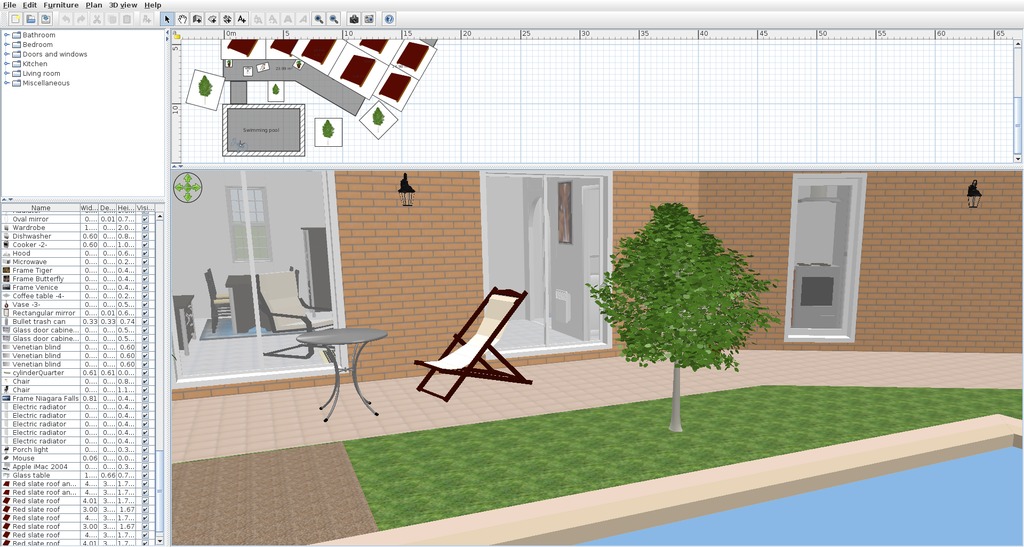
An example file for new users shows off some design possibilities, such as trees and a swimming pool.
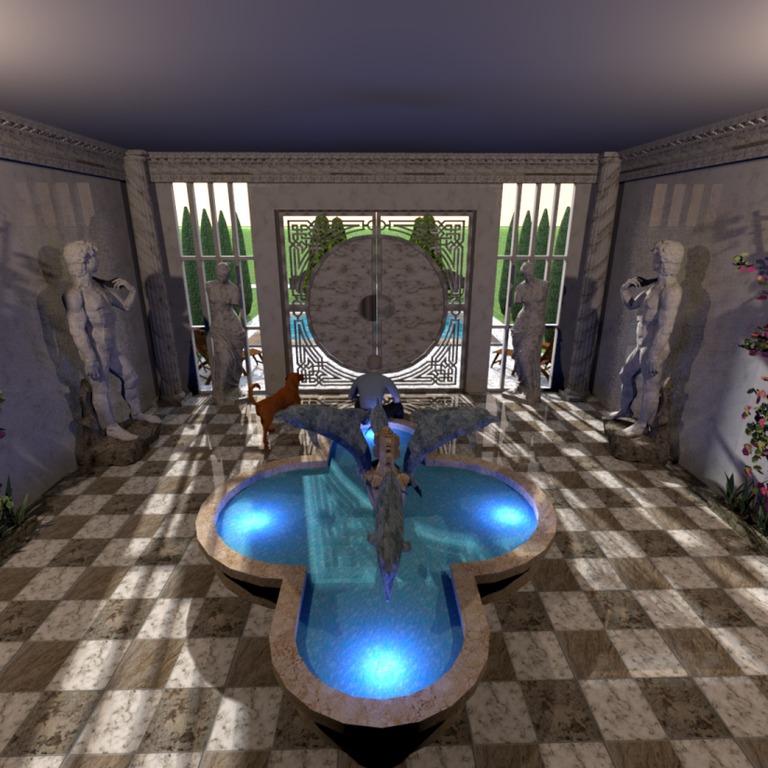
If you export as a picture, Sweet Home 3D can enhance the image greatly. Here's a spectacular design, copyright Whippetsleek.
Installation
As far as library requirements go, I couldn't find much in the documentation aside from Java and working OpenGL drivers. However, even Java might not really be needed, as there's a Java Runtime Environment folder contained in the given tarball, so perhaps Sweet Home 3D will run without it being locally installed.
When it actually comes to downloading and running Sweet Home 3D, this is one of the easiest program I've come across. Go to the Web site and head to the Download section. There you'll find a choice of 32-bit and 64-bit tarballs, with a source tarball also available at the bottom of the page.
Download the appropriate tarball for your system and extract it. In most modern file managers, you should be able to enter the new folder and click on the SweetHome3D file to run the program. However, if that doesn't work, open a terminal in the new folder, and enter:
$ ./SweetHome3D
Usage
Before I continue, I should mention that the Web site has a fantastic video tutorial that will unlock the working ideals of this program very quickly. The first thing it recommends is starting off with a blueprint image, and you then can draw over the top of it. You don't need one, but seriously, get one if you can.
To use the blueprint, from the main menu, choose Plan→Import background image. Choose the picture you want to import, and next you need to define the physical size from one end of the house to the other. You need the house's measurements for this, and there's a blue line below, which you drag onto one end of the house to the other. Although the default choice is in centimeters, it can be changed either to meters or millimeters, or you can set it to use the imperial system.
Next, you need to “Define the origin of the image, by clicking in its location below”. See that blue thing in the top-left corner? Drag it over to the top-left corner of the house (you may want to maximize this window to place it more accurately).
Once you've made your way through these dialogs, choose the Create walls button, and click on the edge of a wall in the blueprints to start drawing. Each click you make defines a corner and allows the wall to change direction. When you reach the end of a wall, such as an archway for instance, either double-click or press the Esc button. Click the mouse again at the start of the next wall to resume the process. As you draw walls over the 2-D image, you'll see a 3-D house begin to take shape in the pane below it.
Doors and windows can be dragged from the pane on the left to the main plans on the right. Sweet Home 3D is exceedingly clever at working out how long a door or window should be, as well as which way it should open—the program actually works it out on the fly as you hover your mouse over different sections of the house. Even if you get the placement wrong, each object has its own mini-UI for readjusting the placement.
The Create rooms button allows you to define individual rooms within the house (cleverly independent of whether walls are there to define the area). This function's main use is really for things like texture and color, where one room can have different walls and flooring from another.
The left pane also has a selection of household items, such as chairs, washing machines and so on. If you're copying the layout of your own house, this is a great tool for testing out how a new item is likely to fit or look in your room before you actually buy it.
The coolest feature is that the bottom pane on the right actually lets you fly around your house using the mouse wheel or arrow keys, and you even can take snapshots or record a video.
Ultimately, Sweet Home 3D was designed by passionate people who knew what they were doing. The UI takes certain liberties in 3-D design controls, fast-tracking you with areas that will make a house and leaving out some unnecessary clutter that often makes 3-D design a complete headache. This is one cool project.
Unlike the majority of projects I review, this one actually is a set of multiple programs, presented as one suite. Whether you're into crystalline structures or designing chemical molecules, this may be the project you're looking for.
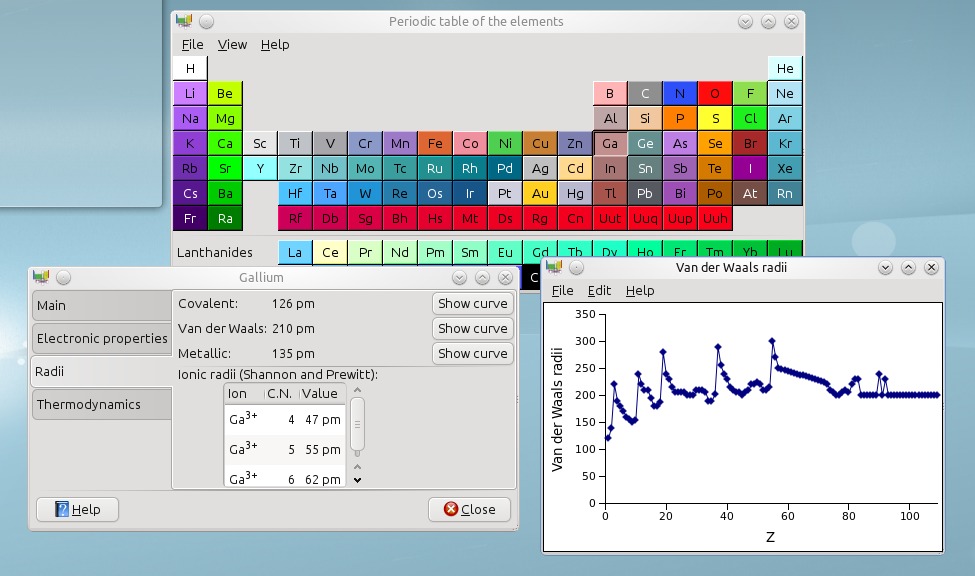
An excellent tool for any scientist, GChemTable provides not only a table of elements, but also a whole swag of info about each element.
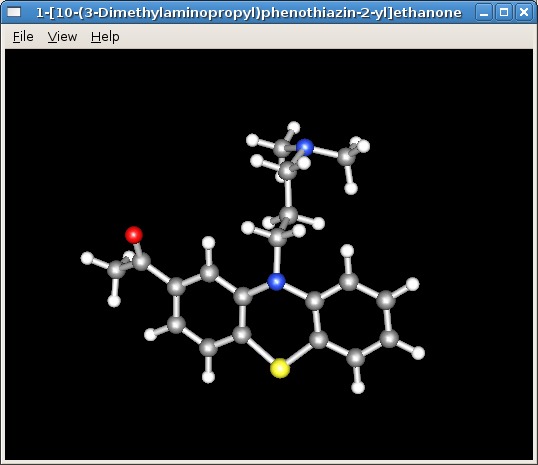
From the Web site, a great example of using the chemical viewer.
Installation
Available at the Web site are source tarballs for both the stable and development versions, and older versions are available in distro repositories. I ran into compiling problems with the development version, so I went with the stable version. Library requirements are quite extensive. According to the documentation, “to compile and use the GNOME Chemistry Utils, you need libglade-2, goffice, GtkGLExt, OpenBabel, BODR and their own dependencies. Everything except OpenBabel is available from the GNOME repository or one of its mirrors.”
I found a few more needed libraries, from both the configure and make stages. Although listed above, libgoffice, libopenbabel and libgtkglext1 all needed their development (-dev) packages installed to continue. Other needed packages were libgsf-1 and its -dev, libgcu0 and its -dbg, and chemical_mime_data.
Assuming you have the tarball, extract it and open a terminal in the new folder. From here, it's the standard fare of:
$ ./configure
$ make
If your distro uses sudo:
$ sudo make install
If your distro uses root:
$ su
# make install
Usage
As mentioned before, this is a suite of utilities rather than just one, so I take a brief look at each utility here. Below each utility's title, I provide the shell command to run the program. Unfortunately, partway through reviewing this suite, I managed to “break” several utilities, seemingly beyond repair. No matter which files I wiped, or how many re-installations I tried, I couldn't get the programs working again. Therefore, reviews will be brief (and possibly theoretical).
GChemCalc:
$ gchemcalc
“GChemCalc is a simple calculator for chemists”, according to the About page. Below the main menu is a field for entering formulae, and GChemCalc will try to interpret the symbols you enter, either by atom or nickname. Once the formula is entered, its raw formula form will be written below, as well as its molecular weight. In the main field, the composition will be displayed according to each element along with its percentage of mass.
Click on the Isotopic Pattern tab, and you can see the monoisotopic mass as a direct number and also displayed in a line graph, which can be exported as an image.
GChemPaint:
$ gchempaint
I got far enough to realize that structures you build in this program can be used by most of the other programs. I'd just attempted to re-create an LSD molecule from the Wikipedia diagram, but the program crashed when I saved it as an .mdl file.
To start designing molecules, pick an object from the tool window, such as Add a four membered cycle, and you now can “draw” in the white workspace. Click and hold the mouse, and if you move the mouse around, the still-colored object will rotate until you release the mouse button, then the object will go black and stay in place. Although its operation seems somewhat arbitrary, moving forward and backward with the mouse will make the object larger or smaller (although you might need some perseverance to get it working).
As far as symbols and their placement, something like C or N will update its appropriate symbols as you continue to expand on the molecule, balancing itself out (as far as I can tell anyway, I'm not a chemist).
Once you have a structure you're happy with, you can open it in GChem3D, allowing you to see it as an actual 3-D structure, instead of bland 2-D lines.
Something I'd have liked to explore more was a button marked: “Export for Wikipedia publication”. I'm guessing that gets used a lot.
GChem3D:
$ gchem3d
Unfortunately, I killed GChem3D when opening a bad file (the first of the casualties) and didn't get a chance to take it for a test run. The man file says: “gchem3d is a small chemical viewer application, which can show several chemical file formats”. From what I can tell from the other documentation, this takes place in an OpenGL 3-D window, letting you rotate and interact with each structure, as well as customize the visual atomic representation.
Gnome Crystal:
$ gcrystal
According to the man file, “gcrystal is a light model visualizer for crystal structures, based on the GNOME Chemistry Utils, that displays models of all sorts of crystal microscopic structures using OpenGL”. Although I didn't break this program, I couldn't make sense of it as a layman; however, the concept appears to be similar to that of GChem3D, but for viewing and editing crystalline forms rather than viewing molecular structures.
GChemTable:
$ gchemtable
This gives you a periodic table of elements that has a great database of information available for each element. Click on an element, and you'll be given four tabs. The first, Main, consists of the element's name (which is also translated into several other languages on the right), the atomic number, atomic weight and electronic configuration. The other tabs give you the electronic properties, radii and thermodynamics.
GSpectrum:
$ gspectrum
According to the man file, “gspectrum is a simple spectrum visualizer. It is only able to display files in the JCAMP-DX format”. This was another casualty of mine, but it appears to display JCAMP spectra on a basic X-Y scale.
This was the unluckiest month I've had at LJ. I think I went through a dozen programs that wouldn't work before I came across these two projects. Although half the programs in this suite died on me (in a way I've never encountered before), I'm sure distro-stable versions will be a lot more reliable. Bad luck aside, the GNOME Chemistry Utils suite seems to provide viewing, access and editing to some file types that are used in important scientific circles. That alone is worth this project's perseverance.
Brewing something fresh, innovative or mind-bending? Send e-mail to newprojects@linuxjournal.com.
John Knight is a 26-year-old, drumming- and climbing-obsessed maniac from the world's most isolated city—Perth, Western Australia. He can usually be found either buried in an Audacity screen or thrashing a kick-drum beyond recognition.
