
Build a Better Firewall-Linux HA Firewall Tutorial
Many enterprise networks require redundant HA (High Availability) infrastructure for key systems like network firewalls. This article demonstrates how you can use a combination of open-source packages to build and manage a Linux-based HA firewall pair that includes support for many of the advanced features commonly found in commercial firewalls.
The collection of open-source packages that I use to create the HA firewall in this article are iptables, conntrackd, keepalived and Firewall Builder. The network diagram in Figure 1 shows the example environment that will be configured.
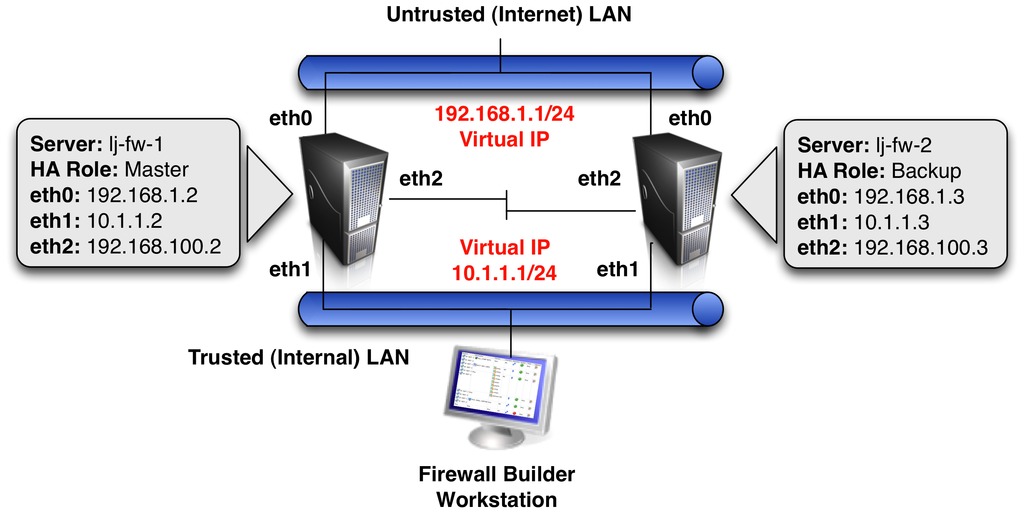
Figure 1. HA Diagram
The example uses a pair of servers running Ubuntu Server 10.10 that will be configured to run in an Active-Backup configuration. This means traffic will be going through only one firewall at any given time. More complex Active-Active solutions also are possible, but are beyond the scope of this article.
The conntrackd and keepalived packages are installed on both servers using apt-get. Since many commands require root privileges to run, the examples are shown using user root to help keep things concise.
Conntrackd is a dæmon developed by the netfilter.org project, the same organization that develops iptables. Conntrackd synchronizes the state of active connections between two or more firewalls running iptables.
In an Active-Backup configuration, like the example in this article, each time a connection is allowed through the active firewall, information about this connection is sent to the backup firewall. In the event of a failover, the backup firewall already will have information about the active allowed connections, so that existing connections do not have to be re-established after the failover occurs.
The example here is based on one of the example configuration files that comes with conntrackd. This configuration uses the FTFW reliable protocol to synchronize the connection data between the firewalls. There is also a script called primary-backup.sh that provides integration between keepalived and conntrackd. For Ubuntu, these example files are located in the /usr/share/doc/conntrackd/examples/sync/ directory.
Run the commands listed below to copy the sample config file and failover script to the default directory for conntrackd, /etc/conntrackd/conntrackd.conf:
root@lj-fw-1:/# cd /usr/share/doc/conntrackd/examples/sync
root@lj-fw-1:/# gunzip ftfw/conntrackd.conf.gz
root@lj-fw-1:/# cp ftfw/conntrackd.conf /etc/conntrackd/
root@lj-fw-1:/# cp primary-backup.sh /etc/conntrackd
Open the /etc/conntrackd/conntrackd.conf file for editing, and find the section in the file called Multicast. Edit the default values in this section to match the example network environment shown in Figure 1.
Multicast {
  IPv4_address 225.0.0.50
  IPv4_interface 192.168.100.2 # IP of eth2 interface,
                               # used for conntrackd synch
  Interface eth2
  Group 3780
Next, find the section at the bottom of the configuration file called IgnoreTrafficFor and edit the default values in this section to match the example network environment:
IgnoreTrafficFor {
  IPv4_address 127.0.0.1 # loopback
  IPv4_address 192.168.1.2 # eth0 interface IP
  IPv4_address 10.1.1.2 # eth1 interface IP
  IPv4_address 192.168.100.2 # eth2 interface IP
}
Repeat the same process for the lj-fw-2 server, making sure to use the correct interface IP addresses for the lj-fw-2 server.
Two Interface Firewalls
This example uses a dedicated interface for the conntrackd synchronization traffic, which is recommended for optimal security and performance. If your firewall has only two network interfaces, modify the “Multicast” section of conntrackd.conf to use the inside interface name and IP address.
When the package is installed, an /etc/init.d/conntrackd script is created. To test the configuration, start conntrackd and then run the status command to verify it is running properly (note: conntrackd needs to be started on both the lj-fw-1 and lj-fw-2 firewalls):
root@lj-fw-1:/# /etc/init.d/conntrackd start
root@lj-fw-1:/# conntrackd -s
cache internal:
current active connections:            1
(Additional output removed for brevity.)
For more information about configuring conntrackd, see the conntrackd configuration manual listed in the Resources for this article.
The keepalived dæmon allows two or more servers to share a virtual IP address. Only one server, called the master, will respond to packets sent to the virtual IP address. The other servers are in backup mode, ready to take over the virtual IP address if the master server fails.
By default, keepalived uses the configuration file /etc/keepalived/keepalived.conf. The following is a very basic keepalived.conf configuration:
lj-fw-1 /etc/keepalived/keepalived.conf file contents:
vrrp_sync_group {
 group {
  fw-cluster-eth0
  fw-cluster-eth1
 }
 notify_master "/etc/conntrackd/primary-backup.sh primary"
 notify_backup "/etc/conntrackd/primary-backup.sh backup"
 notify_fault "/etc/conntrackd/primary-backup.sh fault"
}
vrrp_instance fw-cluster-eth0 {
 state MASTER
 interface eth0
 virtual_router_id 20
 priority 100
 virtual_ipaddress {
  192.168.1.1/24 brd 192.168.1.255 dev eth0
 }
}
vrrp_instance fw-cluster-eth1 {
 state MASTER
 interface eth1
 virtual_router_id 30
 priority 100
 virtual_ipaddress {
  10.1.1.1/24 brd 10.1.1.255 dev eth1
 }
}
Additional options, like neighbor authentication, are available. More information about advanced configuration options is available at the keepalived Web site (see Resources).
The configuration for lj-fw-2 is very similar, with only a few values changed to identify that this system is acting as a backup:
vrrp_sync_group {
 group {
  fw-cluster-eth0
  fw-cluster-eth1
 }
 notify_master "/etc/conntrackd/primary-backup.sh primary"
 notify_backup "/etc/conntrackd/primary-backup.sh backup"
 notify_fault "/etc/conntrackd/primary-backup.sh fault"
}
vrrp_instance fw-cluster-eth0 {
 state BACKUP
 interface eth0
 virtual_router_id 20
 priority 50
 virtual_ipaddress {
  192.168.1.1/24 brd 192.168.1.255 dev eth0
 }
}
vrrp_instance fw-cluster-eth1 {
 state BACKUP
 interface eth1
 virtual_router_id 30
 priority 50
 virtual_ipaddress {
  10.1.1.1/24 brd 10.1.1.255 dev eth1
 }
}
One of the benefits of keepalived is that it provides sync_groups—a feature to ensure that if one of the interfaces in the sync_group transitions from the master to the backup, all the other interfaces in the sync_group also transition to the backup. This is important for Active-Backup HA firewall deployments where all the traffic must flow in and out of the same firewall.
The sync_group configuration includes information about the scripts to call in the event of a VRRP transition on the local server to the master, backup or fault states. The primary-backup.sh script, which was copied to the /etc/conntrackd directory earlier, informs conntrackd of VRRP state transitions so that conntrackd knows which firewall is currently acting as the master.
VRRP uses priority numbering to determine which firewall should be the master when both firewalls are on-line. The firewall with the highest priority number is chosen as the master. Because the lj-fw-1 server has the highest priority number, as long as the lj-fw-1 server is “alive”, it will respond to traffic sent to the virtual IP addresses. If the lj-fw-1 server fails, the lj-fw-2 server automatically will take over the virtual IP addresses and respond to traffic sent to it.
When using VRRP, devices on the network should be configured to route through the virtual IP address. In this example, devices on the internal LAN that are going out through the HA firewall pair should be configured with a default gateway of 10.1.1.1.
Now that there are two servers configured and ready to act as HA firewalls, it's time to add rules. In most HA pairs, the rules should be identical on both firewalls. Although this can be done by manually entering iptables commands, it can be difficult to maintain and is easy for errors to occur. Firewall Builder makes it simple to configure and maintain a synchronized set of rules on both of the HA firewall servers.
Firewall Builder is a GUI-based firewall configuration management application that supports a wide range of firewalls, including iptables. Information about downloading and installing Firewall Builder can be found on the Firewall Builder Web site, including a Quick Start Guide (see Resources) that provides a high-level overview of the GUI layout and key concepts.
Multiple firewalls can be managed from a single workstation using Firewall Builder. SSH and SCP are used to transfer the generated firewall scripts to the remote firewalls, so it is recommended that the Firewall Builder application be run on a different workstation and not on one of the firewall servers.
About Firewall Builder
Originally started in 2000, Firewall Builder is an open-source project with thousands of users around the world using it to manage production firewalls. In addition to iptables, Firewall Builder also includes support for configuring BSD pf, Cisco ASA, PIX and FWSM firewalls, Cisco router access, ipfw and ipfilter firewalls. Commercial licenses are available for prebuilt MS Windows and Mac OS X packages.
The focus of this article is using Firewall Builder's cluster feature to manage a single firewall policy for the HA firewall pair, but let's start with a quick overview of a few key Firewall Builder concepts.
Objects form the foundation of the Firewall Builder GUI. Objects are used to represent common firewall rule elements, such as IP networks, IP hosts and TCP and UDP protocols. Firewall Builder comes with hundreds of predefined objects for common elements, like well-known TCP services. The same object can be used in firewall rules on multiple firewalls, letting users define an object once and use it as many times as needed.
After a firewall object has been created and rules have been configured for that firewall, Firewall Builder generates a script that will be run on the target firewall server to implement the firewall rules that were defined in the GUI. The process of creating this script is called compiling the firewall rules. The generated firewall script also can be used to manage interface IP addresses, static routes and various system settings.
For more information about Firewall Builder basics, go to the NetCitadel Web site (see Resources), which includes a comprehensive Users Guide.
Now, let's dive in to configuring the firewall cluster with Firewall Builder. In order to create an HA firewall pair, called a cluster in Firewall Builder, you first need to configure the individual firewall objects that will be members of the cluster.
Click the Create new firewall button in the middle of the main window to launch the new firewall wizard that provides a series of dialog windows to walk you through the process of creating a new firewall object.
Set the firewall name (lj-fw-1) and platform type (iptables) in the first dialog and click the Next button. Leave the default setting of “Configure interfaces manually” on the next dialog window, and click the Next button. The final dialog window is where the interfaces for the firewall are defined. Follow the steps shown below to add the interfaces for the lj-fw-1 firewall.
Step 1: click the green + sign to create a new interface:
Set the interface name to “eth0”.
Set the interface label to “outside”.
Click the Add address button.
Enter 192.168.1.2 with Netmask of 255.255.255.0.
Step 2: click the green + sign to create a new interface, and repeat the steps from Step 1 to configure eth1 (“eth1”, “inside”, 10.1.1.2, 255.255.255.0).
Step 3: click the green + sign to create a new interface, and repeat the steps from Step 1 to configure eth2 (“eth2”, “synch”, 192.168.100.2, 255.255.255.0).
Step 4: click the green + sign to create a new interface, and repeat the steps from Step 1 to configure lo (“lo”, “loopback”, 127.0.0.1, 255.0.0.0).
Figure 2 shows an example of the interface dialog window after the first interface, eth0, has been defined. Once all interfaces are configured, click the Finish button to create the firewall object.
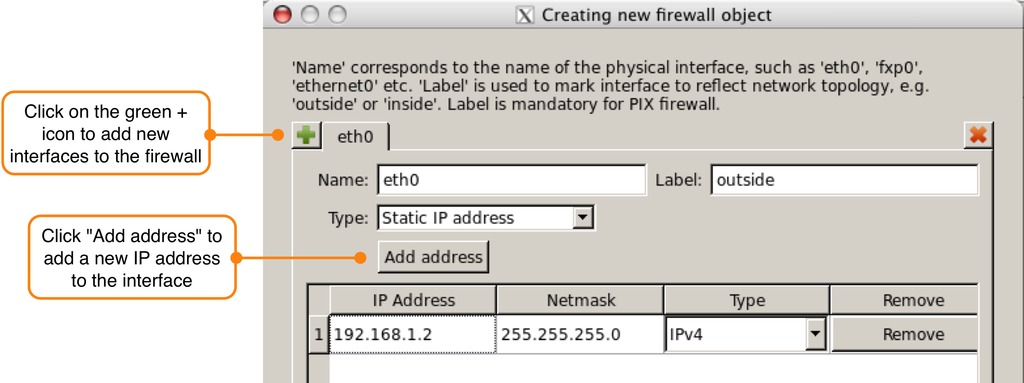
Figure 2. The Set Interface Dialog Window for New Firewall Wizard
The newly created firewall object will be displayed in the object tree in the left object tree panel. Right-click on the lj-fw-1 object and select Duplicate→Place in Library User from the menu. This creates an exact copy of lj-fw-1 in the object tree and opens it for editing in the editor panel at the bottom of the screen.
Rename the newly created firewall object to lj-fw-2. Click “Yes” on the warning message that is displayed about changing the name of all child objects. The lj-fw-2 firewall object will show in the object tree with all its child objects expanded.
When the firewall is duplicated, the interface IP addresses on the new firewall are the same as the interface IP addresses on the original firewall. Update the interface IP addresses to match the correct IP addresses for the eth0 interface on the lj-fw-2 firewall as shown in Figure 3. Repeat this process for IP addresses of interfaces eth1 and eth2.
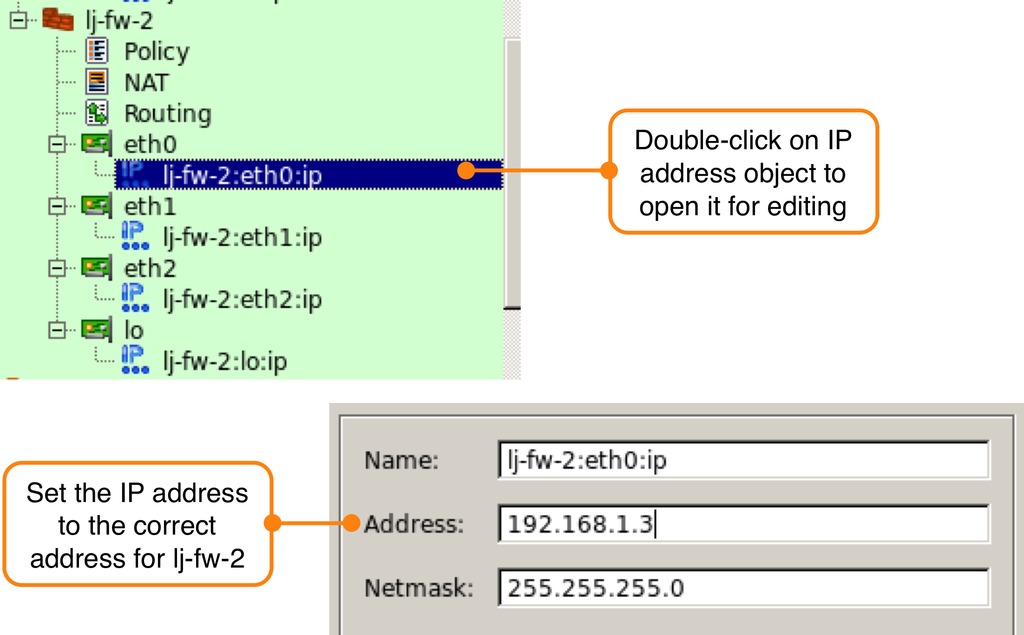
Figure 3. Changing Interface IP Addresses on the Copied Firewall
The final step is to identify the interface that will be used to manage each of the lj-fw-1 and lj-fw-2 firewalls. This will be used later by the installer to determine which IP address to use to connect to the firewall. Double-click on the interface object named “eth1” of the lj-fw-1 firewall to open it for editing and check the box labeled “Management interface” in the editor panel. Repeat the process for the lj-fw-2 firewall.
Now that the firewall objects have been created, the next step is to create a new cluster object with the lj-fw-1 and lj-fw-2 firewalls as members of the cluster. Right-click on the Cluster system folder in the object tree and select the New Cluster menu item. This launches the new cluster wizard, which walks you through the steps required to create a new firewall cluster.
On the first dialog window, enter the cluster name (lj-fw-cluster), and select lj-fw-1 and lj-fw-2 as cluster members (make sure lj-fw-1 is the master). Click the Next button.
Leave the default settings in the next dialog window and click the Next button.
The third dialog window (Figure 4) is where the failover protocol and virtual IP addresses are defined. For each interface tab at the top of the dialog window, enter the values according to the information in Table 1.
Table 1. Cluster Interface Configuration Parameters
| Interface | Label | Failover Protocol | Virtual IP | Netmask |
|---|---|---|---|---|
| eth0 | cluster-outside | VRRP | 192.168.1.1 | 255.255.255.0 |
| eth1 | cluster-inside | VRRP | 10.1.1.1 | 255.255.255.0 |
| eth2 | cluster-synch | None | n/a | n/a |
| lo | cluster-loopback | None | n/a | n/a |
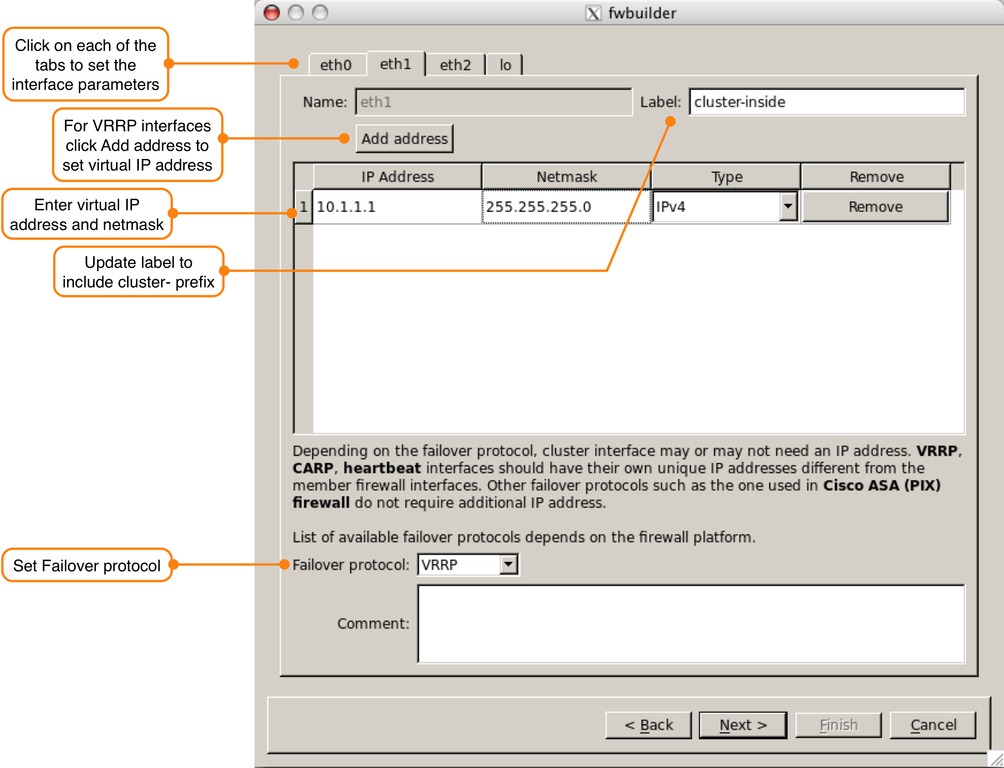
Figure 4. Setting Cluster Interface Values
After all interfaces have been configured, click Next. On the next dialog window, leave the default setting of “Do not use any, I will create new Policy and NAT rules”, and click Next. The final dialog window will show a summary of the cluster configuration. Review it, and if everything is correct, click Finish to create the cluster object.
After the cluster is created, it is displayed in the object tree. Double-click on the “State Synch Group” object located under the newly created lj-fw-cluster object. The State Synch Group defines the interfaces that are being used for the conntrackd FTFW synchronization traffic. Click on the Manage Members button at the bottom of the editor panel. In the dialog window that appears, click the eth2 interface below the lj-fw-1 firewall and click the right arrow to add the interface as a cluster member. Repeat the process for the eth2 interface of the lj-fw-2 firewall. Click OK to accept the changes.
Double-click the Policy object under the lj-fw-cluster object in the object tree. The Policy is where the firewall rules are configured. Click the green + sign at the top of the window to add a new rule. By default, new firewall rules are set to deny everything. Edit rules by dragging and dropping objects from the object tree into the fields of the rule.
For this example, let's create three simple firewall rules and a single NAT rule. The first firewall rule should be a rule that allows the firewall to communicate with itself using the loopback interface. This is needed because many applications rely on unfiltered access to the loopback for interprocess communication.
Drag and drop the interface object named “lo” from the lj-fw-cluster in the object tree to the Interface field of the rule on the right. Right-click in the Action field of the rule and select Accept. Finally, right-click in the Options field of the rule and select Logging Off. After this is done, the rule should look like Figure 5.

Figure 5. Rule to Allow Interprocess Communication Using the Loopback
Note that the lo interface object used in the rule was from the cluster object, not an individual firewall's loopback interface object. When Firewall Builder generates the firewall configuration script for each individual firewall, it automatically replaces the cluster interface object with the local interface values for that firewall.
The next two rules use a Network object called Internal LAN that has been created with a value of 10.1.1.0/24. To create a new Network object, double-click the Objects folder in the object tree, right-click on the Networks system folder and select New Network. Fill in the object name and network value in the editor panel at the bottom of the screen.
Right-click on the first rule, and select Add New Rule Below to add another rule to the firewall. The second firewall rule will allow traffic from the Internal LAN object to access the firewall on the internal eth1 interface using SSH. Drag and drop the Internal LAN object from the object tree to the Source field of the newly created rule. Drag and drop the eth1 interface from the lj-fw-cluster cluster to the Destination field.
Firewall Builder comes with hundreds of predefined objects, including most well-known protocols like SSH. Switch to the Standard object library to access the predefined objects. Figure 6 shows the location of the library selection menu at the top of the object tree.
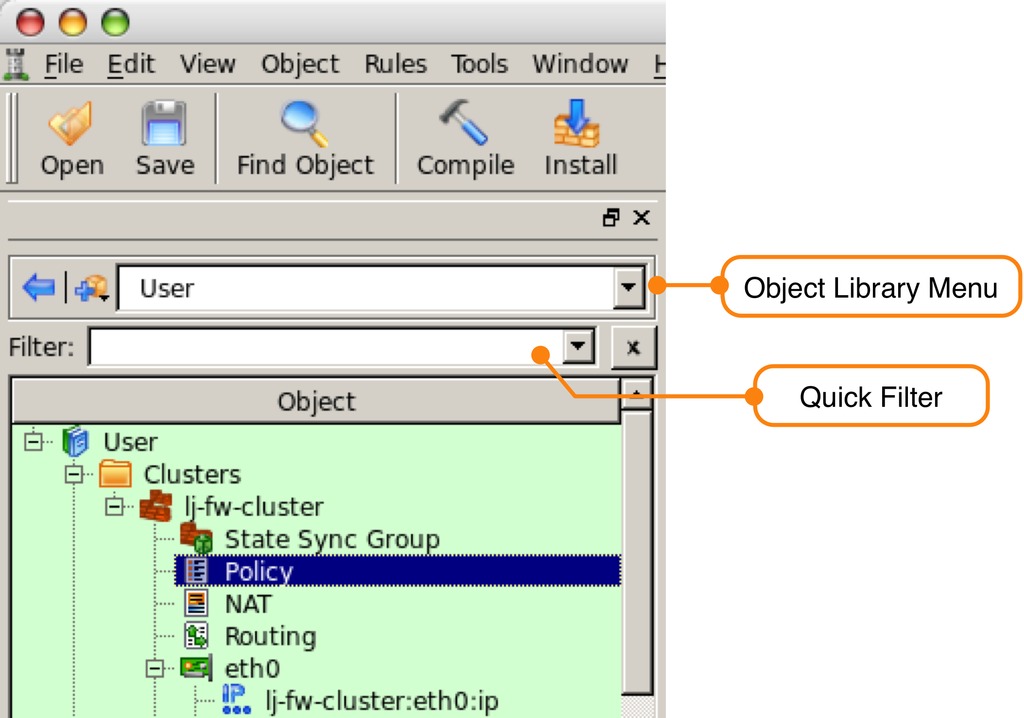
Figure 6. Library Selection Menu
To find the SSH object in the Standard library quickly, type ssh into the filter box at the top of the object tree. Drag and drop the ssh object to the Service field of the firewall rule. Remember to clear the filter by clicking the X next to the filter box.
Switch back to the User library, and drag and drop the eth1 object from the lj-fw-cluster object to the Interface field of the rule. Right-click on Direction field and select Inbound. Finally, right-click on the Action field and set it to Accept. If you want to log SSH connections to the firewall, leave the Options field set to Logging On; otherwise, set it to Logging Off.
Follow the same process to create the third rule, which should allow the Internal LAN to access Internet Web servers using HTTP and HTTPS going out the eth0 “outside” interface. Figure 7 shows the Policy configuration for all three firewall rules.

Figure 7. Cluster Firewall Configured with Three Firewall Rules
Notice that we didn't enter any rules to allow the VRRP or conntrackd traffic between the firewalls. Firewall Builder automatically generates these rules based on the configuration of the cluster.
The last step is to configure the NAT rule that will translate the source IP address of all traffic originating from the internal LAN going to the Internet to the outside virtual IP address of the firewall. Using the virtual IP address as the translated source ensures that traffic going through the firewall will continue to flow in the event of a failover from the master firewall to the backup firewall.
Double-click the NAT child object under the hq-fw-cluster object to open the NAT table for editing. Just like in the Policy rules, click the green + icon to add a new rule to the NAT configuration.
Drag and drop the Internal LAN object from the object tree to the Original Src field of the NAT rule, and then drag and drop the eth0 “cluster-outside” interface from the lj-fw-cluster object to the Translated Src field. The final NAT rule should look like Figure 8.

Figure 8. NAT Rule
The final step in the process is generating the firewall scripts and installing them on the firewall cluster members. To keep the article short, I'm using the root user to install the Firewall Builder-generated firewall scripts on the firewall servers, but Firewall Builder also supports using nonroot users with proper sudo rights. This is covered in the on-line Users Guide.
Before you can install the rules on the cluster member, firewalls create a directory called /etc/fw on both lj-fw-1 and lj-fw-2 servers. This is the default location where Firewall Builder will install the generated firewall script.
As previously mentioned, the process where Firewall Builder converts the rules into a firewall script that will be run on the firewall is called compiling the rules. To compile and use the built-in installer to deploy the rules, click on the Install button at the top of Firewall Builder to launch the install wizard.
Click the check box next to the cluster name, and make sure the Install check boxes are selected for both lj-fw-1 and lj-fw-2. If there are any errors in the configuration, the compiler will display these; otherwise, you will see a dialog window (Figure 9) showing that the cluster was compiled successfully. When the cluster is compiled, a firewall for each member of the cluster is created and saved locally on the machine where Firewall Builder is running.
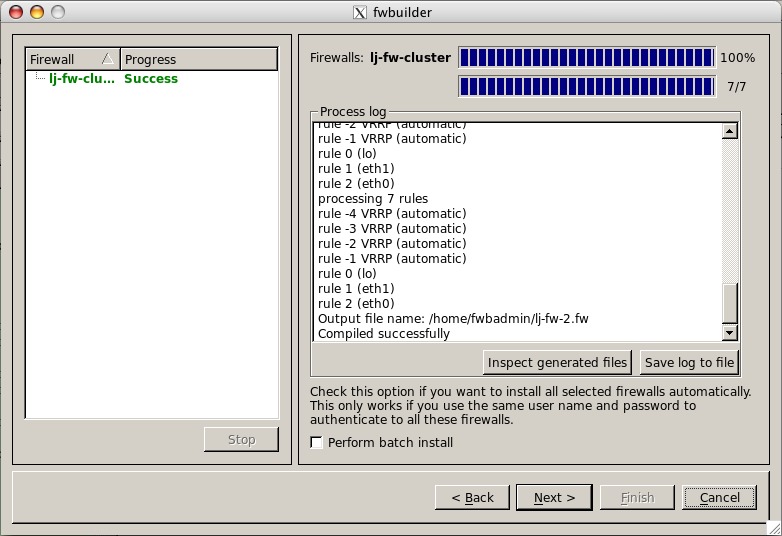
Figure 9. Cluster Compiler Status Window
Clicking Next on this window launches the installer dialog window (Figure 10). Each firewall in the cluster will have its own installer window. The installer uses SCP to transfer the firewall script that was generated for the cluster member to the firewall. After the firewall script is copied, Firewall Builder logs in using SSH to run the script. The installer includes an option to run in verbose mode, which displays each command as it is being run on the remote firewall. After the install completes, a new installer appears for lj-fw-2, and the same process is repeated.

Figure 10. Installer Window for Cluster Member lj-fw-1
This article just skims the surface of using Firewall Builder to configure firewall clusters. You can find much more information in the Firewall Builder Users Guide, including how to install custom policies on an individual cluster member, which is available on-line at the NetCitadel Web site.
Resources
Netfilter: www.netfilter.org
Conntrackd User Manual: conntrack-tools.netfilter.org/manual.html
Keepalived: www.keepalived.org
NetCitadel's Firewall Builder: www.fwbuilder.org
NetCitadel's Firewall Builder Quick Start Guide: www.fwbuilder.org/4.0/quick_start_guide.html
Mike Horn is the co-founder of NetCitadel LLC, the company that develops and supports Firewall Builder. He has worked on network and security technologies for more than 15 years at companies ranging from small startups to large global Internet Service Providers.

