
HTML Forms: Interacting with the Net
You have set up a World Wide Web server, and now have a number of HTML (hypertext markup language) documents for web-surfing visitors to enjoy. You're comfortable with HTML, and are ready to find new things for your server to do. In your network travels, you remember filling out some electronic forms to give feedback to the creator of one of your favorite home pages.
This article will help you acquire the basic knowledge needed to write HTML forms, and explains what needs to be done so that you and your server can interact with your Web visitors.
A working form really consists of three basic elements. The first is the form itself. The form is constructed using HTML text, as for your homepage, with a few different markup tags. The second element is the script or program. This program must be constructed in accordance with the common gateway interface (CGI) specification, if it is to communicate properly with your server and the user's Web client. The CGI script is the engine behind the interface; it will actually act on the data the user types into the form. The third element is the httpd (hypertext transfer protocol daemon) server, which calls the CGI program, passing it the data the user has entered.
Let's take a look at what elements a form can posses. Much like other HTML constructs, forms are built using markup tags and simple text. A form is encapsulated by <FORM>...</FORM>, where the ... is replaced by text and other form markups. Keep in mind that markup tags are case insensitive, though I will continue to capitalize them for clarity. Following is a list and descriptions of the major available form markup tags.
- <FORM>...</FORM>
Indicates the start and end of an HTML form.
- <INPUT>...</INPUT>
Indicates the start and end of form input.
- <SELECT>...</SELECT>
Indicates the start and end of a selection list.
- <TEXTAREA>...</TEXTAREA>
Indicates the start and end of a free-form text input area.
Form markup tags may use attributes to help control how a form will be displayed to the user. Let's take each markup tag in turn, and examine the valid attributes for each. First let's look at the FORM tag.
- ACTION
Typically a URL indicating a script or program to be executed.
- METHOD
Valid values are POST and GET.
The ACTION attribute specifies a URL (uniform resource locator) which will be used to carry out some action based on what is entered in the form. The URL usually specifies a program, which exists in a script directory on the server. For instance, http://some.server/cgi-bin/donothing.sh will result in the form data being returned to the program donothing.sh for processing. The program will then return an appropriate response to the client.
The METHOD attribute is used to specify how the data which is entered into the form is to be returned to the server. The data may be appended to the URL specified by the action attribute using the GET method. When the GET method is used, the http server will pass the information to the ACTION program encoded in an environment variable. When the POST method is used, the http server will pass the information to standard input.
<FORM ACTION="http://www.you.org/cgi-bin/donothing.sh" METHOD=POST>
begins the definition of a form which is processed by the donothing.sh script on the current host, which reads data from its standard input.
The INPUT tags are used to specify fields where data can be entered by the user. This tag, like all of the remaining form markup tags, must appear between a <FORM> tag and its associated </FORM> tag. Following is a list of valid attributes.
- NAME
Indicates a symbolic name for the input field. The ACTION program uses this to differentiate fields.
- TYPE
Specifies the type, such as checkbox or radio button, that is to be used.
- VALUE
This gives a default value for the input field.
- CHECKED
A boolean indication of status for elements such as checkboxes.
- SIZE
The physical display size of text entry fields.
- MAXLENGTH
The maximum allowable number of input characters for text entry fields.
The NAME of an INPUT field allows fields to be differentiated or grouped. The name of a field is used by the ACTION program to determine what a user entered in each field of the form. The NAME attribute is also used to establish logical groupings of some form element types, specifically radio buttons.
Valid settings for the TYPE attribute are checkbox, text, password, radio, hidden, reset and submit. A checkbox is an element which can take on one of two states, either checked or not checked. This provides a basic boolean true or false element for form entry. The text element provides a single-line text entry field in which the user can enter data. A password field is a text entry field in which the entered text is hidden from view in some fashion.
Radio buttons are groups of buttons which allow a single button to be toggled at a time. The other buttons in the group are untoggled when one button of the group is selected. A radio button group is established by setting the NAME attribute for each button in the group to the same value.
A hidden input is not displayed to the user at all, and the user cannot modify it. A hidden input encodes state information into the form. For instance, it might be possible to have one form which should be processed in different ways, depending on context. Each instance of the form could include hidden input indicating the context and directing the processing appropriately.
Of particular note are the submit and reset input types. Clicking on submit causes the form contents to be transmitted to the server, and then to the ACTION program for processing. The reset button causes the form elements to be set to their initial values, allowing the user to easily return the form to its initial state.
A default value for a form element can be specified using the VALUE attribute. For text entry elements, this indicates a default string of characters that are initially present when the form is retrieved. If the field is a radio button, this is the value the element takes on when it is checked (when the element isn't checked, it has no value). For the submit and reset elements, the VALUE attribute can be used to set the button label.
The CHECKED attribute is valid only for the checkbox and radio elements. If the CHECKED attribute is present, the radio button or checkbox is toggled by default. Setting the physical length of a text entry field can be done by using the SIZE attribute.
The MAXLENGTH attribute limits the number of characters that are accepted in a particular text entry field.
SELECT is the next major markup tag. The SELECT tag is used to encapsulate a selection list. Several <OPTION> tags may be included between a <SELECT> and a </SELECT>, to add elements to the list. A selection list may take on two physical forms. If it has a SIZE of one, it appears as a popup menu. If the SIZE attribute is greater than one, it appears as a scrollable list displaying SIZE options one at a time. Here are the possible attributes of the SELECT tag:
- NAME
Indicates a symbolic name for the selection menu.
- SIZE
The physical number of lines that are visible at any time.
- MULTIPLE
If this attribute is present, multiple items of the list may be selected at one time.
These attributes are straightforward, and I'll leave them for your exploration later. Before we move on, I should mention a little more about the <OPTION> tag. The option tag can have the attribute SELECTED. When present, this attribute indicates that a particular list item is selected by default. The <OPTION> tag is much like the <li> of normal HTML lists; it does not require a terminating </OPTION> tag. Instead, the appearance of an <OPTION> tag indicates the beginning of a new list item and the termination of any preceding items. Also, a selection list item can be only simple text. List items cannot be marked up, nor can they be anchored items.
A form element where a user can type in free-form text, much like entering text into an editor, is constructed using the TEXTAREA tag. A text entry area is has the basic form of:
<TEXTAREA>default text</TEXTAREA>
The default text is the initial text, if any, which is present in the text entry area. This form element has three easy-to-use attributes.
- NAME
Indicates a symbolic name for the selection menu.
- ROWS
The vertical size of the text entry area.
- COLS
The horizontal size of the text entry area.
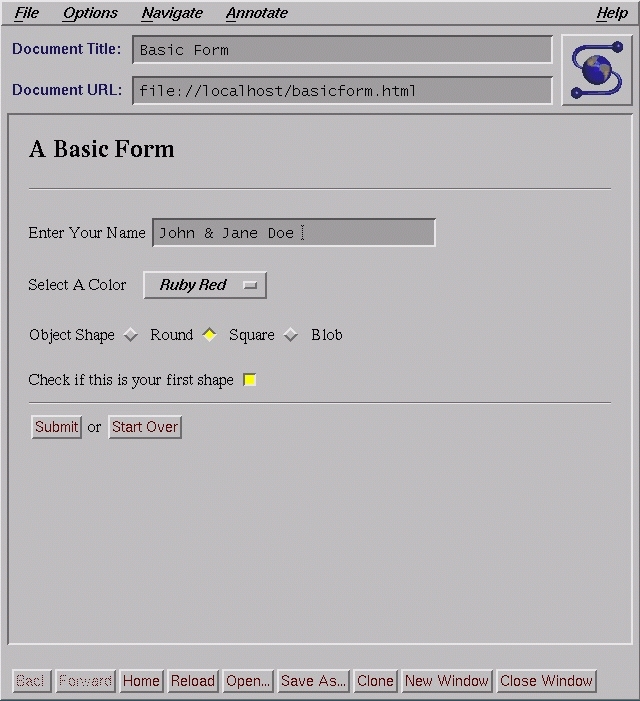
Now that we know what things we have available, let's create a basic form. Listing 1 shows a simple HTML form, while Figure 1(139K) displays how Mosaic might present this form.
Keep in mind that the ACTION attribute needs to specify your host and a valid script or program. In the example, the shell script echo.sh (shown later) will be executed on your.http.host when the form is submitted. The script or program needs to reside in a directory which your server recognizes as a valid location for executable programs. Be sure to check the documentation for your server to be sure it is configured properly to allow for this sort of execution. A typical location for these sorts of programs is in the cgi-bin directory under the server root, and that is how this example is configured.
The form is only one of the three parts necessary to interact with a user. The second is the http server, which we will not cover here (please refer to the documentation for your server). The third is a CGI program or script. As mentioned above, these programs must reside in a directory recognized by the http server as a valid location for executables. A CGI program needs to be able to understand the encoded form data as it is returned from a client, and must be able to respond appropriately. The encoded form data will appear either on the command line or in the environment variable QUERY_STRING, depending on whether a METHOD of GET or POST is used. Typically, a program needs only write the necessary response on stdout, and the response will then be transmitted back to the client by the http daemon.
A number of environment variables are also typically set by the server for the CGI program's use. Following is a partial list of environment variables that I find useful. Please refer to hoohoo.ncsa.uiuc.edu/cgi/env.html for further discussion of other environment variables.
- REQUEST_METHOD
Set to the METHOD used to make the request.
- QUERY_STRING
Set to the encoded form data when the GET METHOD is used.
- REMOTE_HOST
Set to the remote hostname if available.
- REMOTE_ADDR
Set to the IP address of the remote host.
- CONTENT_LENGTH
The length of the data returned in a client's query.
Usually, a CGI program need only respond to a request with an appropriate http header, possibly followed by a document. The response is simply written on stdout, where the data will be returned to the client. A header consists of an http header directive followed by a relevant text string. The header is terminated by a blank line. Two of the most used header directives are the Content-type and Location directives. The Content-type directive indicates the type of data which is to follow. For example, Content-type: text/html indicates that the document which follows the header on stdout is written in HTML. The Location directive is used to provide a means by which redirection can take place. For instance, Location: http://goto.another.host/web/doc.html would cause a client to retrieve the document specified in the URL.
Probably the easiest way to explore the construction of a CGI program is with an example. Listing 2 shows a shell script which will respond to a client's HTML form request.
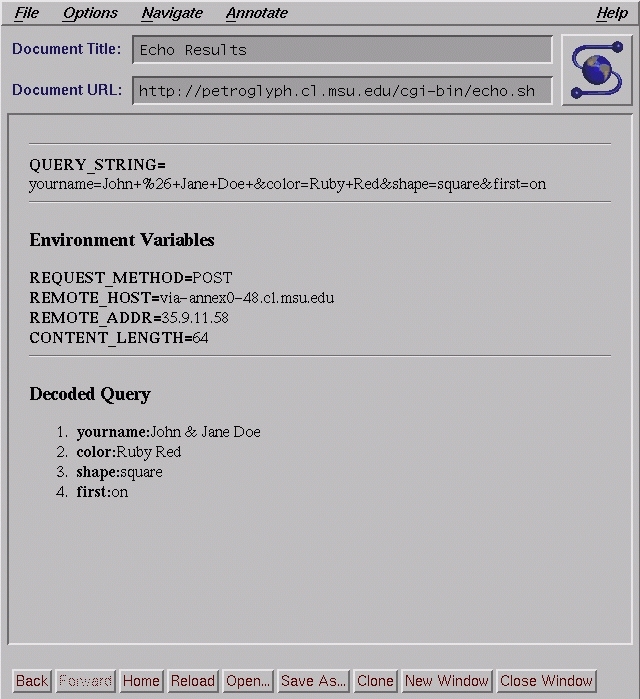
The response is to echo the encoded query, some of the environment variables, and the decoded content of the query. This program is useful as a test program when creating new forms, and as a base for building other CGI scripts. Figure 2(135K) displays the results of posting the form shown in Figure 1 to this script.
Examine the QUERY_STRING in Figure 2 Notice that spaces are encoded as addition signs, and that an ampersand in the input is encoded as a hex value preceded by a percent sign. Also notice that each name/value pair is separated by an ampersand. The shell script decodes this string back into the data as it was entered by the user. There are other programs, such as CERN's cgiparse, which will also help you decode CGI form data.
You now should have the basic building blocks of form construction and processing at hand. Many things which can be done with HTML forms and CGI programs, including providing man pages via http or constructing gateways for accessing other system information. Good luck, and have fun!
Eric Kasten has been a systems programmer since 1989. Presently he is pursuing his masters in computer science at Michigan State University, where his research focuses on networking and distributed systems. Well-thought-out comments and questions may be directed to him at tigger@petroglyph.cl.msu.edu. You may also visit his home page at petroglyph.cl.msu.edu/~tigger.

