
Chinavasion Pico Projector
It seems like Linux runs on just about everything these days from phones to televisions, and as my August 2010 column shows, it even can power a refrigerator. In fact, I bet many Linux users have become a bit jaded about it and almost expect electronics to have Linux under the hood—I know I have. Even so, I found myself surprised and intrigued when I heard about a pico projector sold by Chinavasion that runs Linux (www.chinavasion.com/product_info.php/pName/mini-projector-with-wifi-wireless-remote). Once I read the specs and discovered it had built-in wireless networking, an SD card slot and supported USB host mode, I started daydreaming about all the possibilities. Sure, you could use the projector for its intended purpose—playing media files—but imagine if you could access the Linux user space underneath. I knew I had to get one, and I had to try to hack into it. Read on for my review of the device and a chronicle of my adventures with it so far.
In a sense, this article is two reviews. First, I review the product as it's sold, then I discuss what I found when I looked under the hood. Chinavasion was kind enough to send me a review unit and was even open to my hacking on it, as long as I made it clear that taking it apart or messing around under the hood would void the warranty. At the time of this writing, the projector costs $235 and includes the projector itself, an IR remote control, a small IR keyboard, the power cable and adapter to US outlets, a tripod and an RCA cable. The projector itself has the following specs as listed from the product page:
Dimensions: 137mm x 77mm x 23mm
Projector: 10 lumen LED projector at 640x480
802.11b/g wireless support
SD card slot
USB port with USB host adapter support
Two-hour battery life
Two-thousand-hour lamp life
Video: VOB, MPEG1/2/4 AVI, XVID
Audio: MP3, WMA, AAC
Photo: JPEG, PNG, GIF, BMP
I have to say, I'm still new enough to pico projectors that I'm amazed they have been able to fit a projector into such a small space (Figure 1). I mean, I can fit this projector in my back pocket, and it's about the size of a pack of cards only longer. However, that small size comes at a price—brightness. Where your average full-size projector might sport more than 2,000 lumens, this projector sits at a fraction of that with 10 lumens. That means you will want to use this in a rather dark room, preferably at night. Also, although the Web site lists the projector as supporting up to a 70-inch projection size, you'll find better results the closer the projector is to the surface.

Figure 1. The Projector on Its Tripod with Both Remotes and a Decorative Shell Necklace
The first thing you notice when you power on the projector isn't the brightness—it's the sound. No, that's not a jet engine—it's the fan. It turns out that the LED lamp gets quite hot, and as any overclocker knows, when you want to cool a computer quietly, you want a large fan so the blades can spin at a lower RPM. When you have a small space and must use a small fan, you have to resort to very high RPMs to pull enough cool air through the system. It really sounds a lot like the fans you'll find in many 1U servers. Even with the fan, you'll notice after the projector has been on for a while, the metal surface gets quite hot. Apparently this is expected, but I still wouldn't put this projector on a bed or your lap. Luckily, the speaker is loud enough to drown out most of the fan noise. I personally find the sound of fans soothing (I spent many years sleeping near a full-size desktop with fans running 24x7), but I imagine the fan noise will bother some people.
The projector has a simple interface that you can navigate either with buttons on the device itself or through the included IR remote control or keyboard (Figure 2). Basically, you move left and right through the different operating modes and press Enter to select a particular mode. The device I received included modes to play videos and music, display photos, do limited video and music streaming, and had a calendar and a weather app. I have to say that the interface itself isn't impressive or flashy at all—it's just a few icons and simple menus to get you to the media you want to play.

Figure 2. Sample User Interface Screens
The projector supports quite a number of media formats, and I was able to play the movies I had ripped to AVI files. The only real problem I encountered was that some of the videos had somewhat low volume, so the fan did drown out the sound a bit, but that will vary depending on the video. The nice thing is that you can have it play media stored on either an SD card or a regular USB hard drive or even the ~400MB of free space it has on-board. Since it has support for USB hard drives, you essentially have unlimited storage choices, but it would have been nice if they had taken advantage of the wireless card to allow for network storage. The device does have a streaming app, but your choices are limited to YouTube and a few presumably Chinese streaming sites. YouTube streaming worked okay, although the interface is clunky and somewhat difficult to use. The other apps seemed to work as advertised but offered just basic functionality.
You might have noticed I didn't mention any sort of presentation app, and that's because there isn't one! This projector is strictly for media playback, so for now, you'll have to run your presentations from something else. The device has a port to connect an RCA cable, but that's for video out, not video in.
The wireless network can be configured from a settings page, and although the interface was simple, it did work fine and detect and connect to my wireless network. When you get to that menu, you'll get excited like I did when you notice that it lists not only wireless but also wired, GPRS/WCDMA and TD-SDCMA configuration; however, none of those are actual valid options, which makes me wonder why they were added to that menu.
I'll be honest. Although it's cool that they were able to fit all these features in a small device, if it weren't for the fact that there is a computer running Linux under the hood, I don't know how excited I would be about it. It does okay with media playback, but the interface just feels incomplete. At $235, it's a neat toy, but I don't know if I'd give it a recommendation to those of you who are reading this article if we stopped the review right here. Fortunately, this is only the beginning.
Before the projector arrived, one of the first things I asked Chinavasion was how I could access the Linux OS behind the interface. They checked with the manufacturer who said it wasn't possible to access the OS as it was “hard-wired into the unit”. Well, that sounded like a challenge to me, so my follow-up question was whether I could hack on the device. As I mentioned earlier but want to reiterate, if you do any of the things I mention below, you will void your warranty, and Chinavasion will not accept a return if you brick your projector. Now that I've said that, let's have some fun.
When the projector arrived, I poked at the regular interface for a second and then decided I couldn't wait—I had to get root on this device. The way the system boots, there didn't appear to be a way to change to a different virtual terminal (VT), so I figured my main route to a shell was through the network. After I connected the device to my wireless network, I ran a port scan, and wouldn't you know it, port 21 was open. “Hmmm”, I thought, “they couldn't possibly have telnet running on this.” Yet when I connected to the port, I got a nice ASCII art splash screen and a login prompt. I prepared myself for a day of brute-force attacks, but I was pleasantly surprised to find I could log in with root and no password. Jackpot.
Before I go into details on the user space for the projector, this a good place to list another way I discovered you could root this device, in case future versions no longer ship with telnet enabled. As I poked around on the filesystem, I noticed a script that is loaded at boot and easily could be exploited named /etc/init.d/S98z_auto_upgrade. This script is part of the init process and contains the following code:
#!/bin/sh

if [ -e /mnt/mmc/autorun.sh ]
then
        chmod 777 /mnt/mmc/autorun.sh
        sh /mnt/mmc/autorun.sh
        rm -rf /mnt/mmc/autorun.sh
        sync
        reboot
fi
It appears this script is set up so that the manufacturer easily can upgrade the software on the device. A previous init script will scan for and automatically mount any SD or USB drive under /mnt/mmc. This script automatically will execute any autorun.sh file it finds in the root of that device, so if telnet were disabled (or root were given a password), all you would have to do is create a shell script to run the commands you wanted.
So here's what I found in the user space. The system runs a 2.6.10 kernel and a unique ARM processor I hadn't seen before. Here are some selected lines from /proc/cpuinfo:
Processor       : ARM926EJ-Sid(wt) rev 5 (v5l)
BogoMIPS        : 124.51
Features        : swp half thumb fastmult edsp java
CPU implementer : 0x41
CPU architecture: 5TEJ
Hardware        : VIA-VT8430
The device itself has 256MB of RAM and 512MB of Flash split up into two partitions: a smaller one for / and a larger, mostly empty one for /mnt/mtd. You can navigate the file structure inside a standard BusyBox shell, and you'll see the standard root-level directories you might expect, although there is a very limited number of applications installed with the custom software found under /usr/dpf. I did notice it included a version of MPlayer that outputs to the framebuffer and uses hardware acceleration for video decoding, which I thought was interesting.
My simple goal was to find some way to display a shell on the projector. I figured at the very least, with a shell, I could ssh in to another machine and run other applications. This turned out to be far more challenging than I thought. The first challenge was the fact that there wasn't a virtual terminal set up for a console, and when I looked at /etc/inittab, I noticed that the only getty process that was running was for ttyS0, which I assumed was for some internal serial port I couldn't see from the outside:
ttyS0::respawn:/sbin/getty -L ttyS0 115200 vt100
Although you might think you could just run another instance of getty, it turns out that the version of getty included with this device doesn't support framebuffer output nor was another getty, such as fbgetty, included. Now at this point some of you might be thinking, “What about the kernel framebuffer?” Although it's certainly possible the kernel supported a hardware framebuffer, it wasn't enabled at boot. In fact, here's the complete kernel command line:
mem=244M root=/dev/mtdblock1 rootfstype=yaffs2 rw
 ↪noinitrd console=ttyS0,115200n8 init=/linuxrc
 ↪lcdbpp=16 lcdpath=GOV display=TV tvsys=NTSC loadtime=0
Because I found no evidence of a normal distribution bootloader, I'm assuming this system uses Uboot, so without serial access to the device possibly via a JTAG header, I wasn't going to be able to change the boot arguments. This meant I had to find a framebuffer getty compiled for ARM. At first, this seemed like an easy task. After all, Debian has been shipping ARM packages for quite some time, and all I had to do was find the right package and extract the binaries I needed. Simple, right?
As I extracted and tried to run various ARM-compiled Debian binaries on the projector, a common issue popped up—either my glibc was too new or too old. The glibc libraries are one of the core libraries for a Linux system that basically every C program needs to run, and the version this projector had seemed to fall somewhere between Debian Etch and Debian Lenny, with binaries from the former not executing and binaries from the latter complaining about a glibc that was a bit too old. It seemed like Lenny was the distribution closest to this one, but I honestly am not sure on what distribution or version this Linux install is based. The libc-2.3.3.so possibly seems to be from some ARM-compiled Fedora distribution. In any case, without glibc support, there was basically no way I could get most of my binaries to run, and I didn't want to risk bricking the device by overwriting the existing libraries, so I had to find a different approach.
My next plan was to track down a small Debian Lenny-based ARM distribution so I could copy the full root filesystem to the 400MB /mnt/mtd partition. Then, I could just chroot into that and run the commands I wanted. That way, all the commands would use that glibc, and I could add extra ARM-compiled Lenny packages. The problem I ran into fairly quickly was that, well, chroot segfaulted. Both the chroot binary that was included on the projector and the version in my Lenny install failed to work.
At this point, I started refreshing my memory on LD_LIBRARY_PATH, LD_PRELOAD and other variables I could use to tell a binary to use the version of the libraries under /mnt/mtd that I had installed. It turned out that got me a lot further. I could launch ls and a number of other console applications, including useful programs like strace and lsof; however, fbgetty was abandoned before Debian Lenny, so I had to try other framebuffer terminal applications in Lenny, such as jfbterm. The application would start, but it never seemed to be able to attach to the tty it wanted, and ultimately, it would error out. After trying a few things, including changing the permissions on /dev/console to be more permissive, I gave up for the moment and turned off the projector.
The next time I turned on the projector, the splash screen started with its scrolling progress bar, but after a minute or two, the progress bar seemed to freeze, and the system was unresponsive. Great, I bricked it. But how? After all, I had just added some files to a basically empty mountpoint and changed permissions on /dev/console. At least, that's all I could remember doing. At this point, I wasn't sure what to do. I didn't want to take apart the device (at least not yet), so I rebooted it a few times and tried to see if I could get any information. One thing I thought about was that the system might have needed all that space in /mnt/mtd that I had filled up or possibly all of my changing of VTs could somehow have been remembered (even though that seemed unlikely).
At this point, I remembered the init script that automatically upgraded the device, so I decided to make a USB key with a test script that would write a file back to the USB drive. If that worked, I could just continuously boot the device with the USB key and build up a script that could repair any damage I may have done. Unfortunately, when I tried this approach, I noticed that the device didn't seem to get very far into the boot process—the script never seemed to run.
Next, I decided to connect a USB keyboard and see if the system even loaded the kernel at all. It turned out that the keyboard did work, as the Caps-Lock key lit and Ctrl-Alt-Del at the right point did reboot the device. Unfortunately, when the system froze, so did the keyboard. At this point, I tried all sorts of keyboard combinations during boot to change the VT back and forth to attempt to Ctrl-C through some script that may have stalled, and through some sort of magic voodoo, whether it was something I hit on the keyboard, or as I've come to suspect, something on the hardware that started working again, finally the system fully booted.
After I breathed a sigh of relief, I realized I needed to make an immediate backup of the filesystem, so I had some record of what was there. I also decided to take off the cover to see if I could find a serial port on the hardware and access the boot prompt and boot messages. If you look at Figure 3, you can see the bottom of the motherboard on the device, and at the top of the picture is a small five-pin white connector labeled Program that I'm assuming is some sort of serial interface. Unfortunately, this connector is incredibly tiny, so I haven't been able to track down a compatible connector yet and test this theory. Figure 4 shows the top of the motherboard—what you would see if you simply unscrewed and lifted off the top of the projector. One thing I noticed when I looked on the board was extra soldering points for an extra USB port and VGA. More-seasoned hardware hackers might find even more interesting things on the board once they take a look.
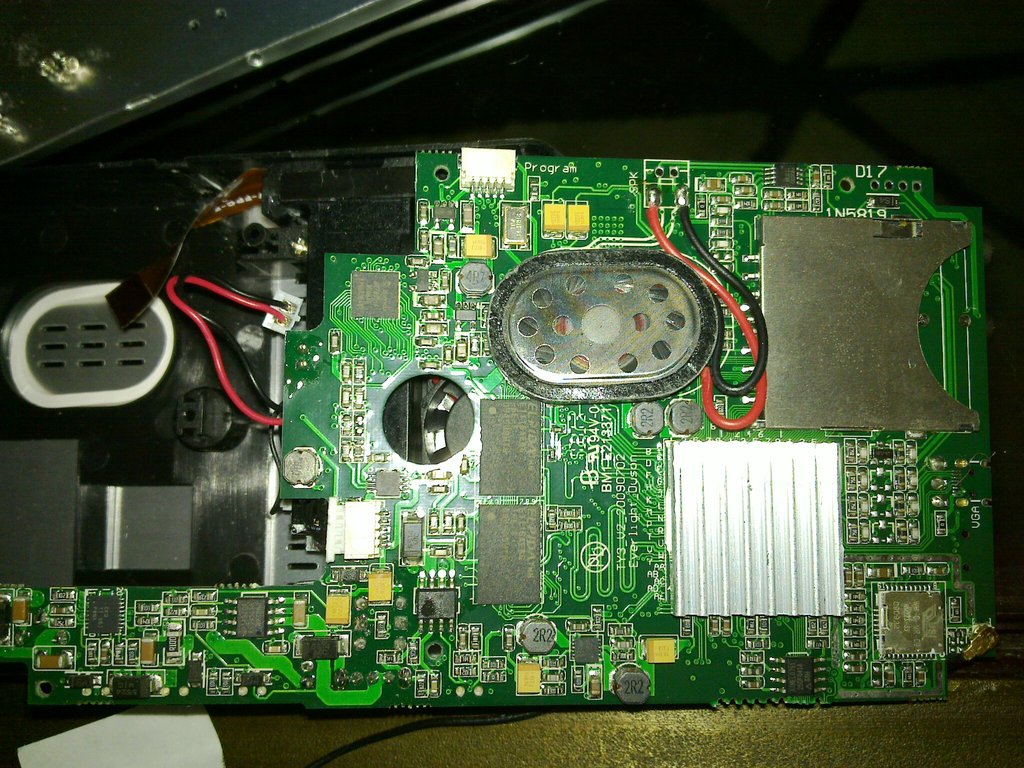
Figure 3. Bottom of the Motherboard
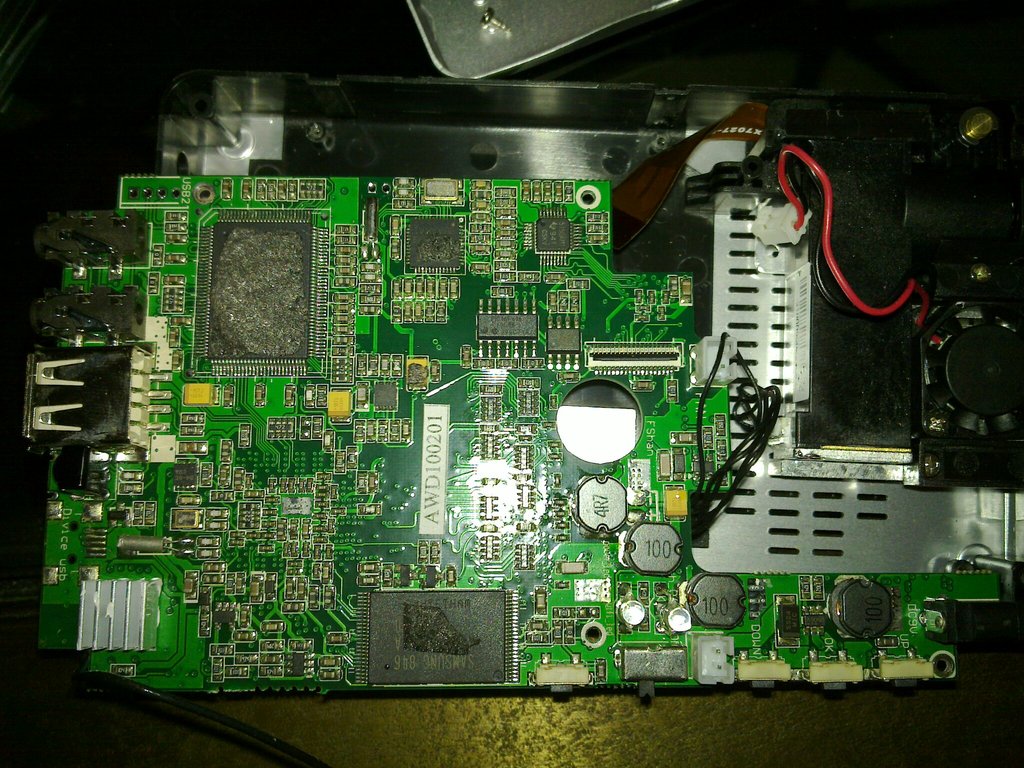
Figure 4. Top of the Motherboard
Unfortunately, after I took it apart, I had the same trouble with a frozen progress bar at boot. After a number of reboots, I finally was somehow able to get it to boot completely, but since then, I've experienced the same issue a few other times. Eventually, the system will boot, but as of yet, I've been unable to track down the source of the problem. At this point, I'm leaning toward some sort of short on the device.
So what's the final verdict? Although I think that the device without Linux console access may not be too interesting to Linux geeks and that the interface needs polish, the projector has so much potential once you get access to the shell. I think this would make the start to a great pico projector project for anyone with a few hardware-hacking or framebuffer-programming skills. I just wish that the manufacturers chose a distribution that was a bit easier to work with. For $235, I think this is a pretty good buy considering how hackable it is and considering the price compared to other Linux-powered pico projector kits like the one based on the BeagleBoard.
Kyle Rankin is a Systems Architect in the San Francisco Bay Area and the author of a number of books, including The Official Ubuntu Server Book, Knoppix Hacks and Ubuntu Hacks. He is currently the president of the North Bay Linux Users' Group.
