
A Look at the Ben NanoNote
The command line is something I always want in any computer or gadget I own. For me, it symbolizes ultimate access and control. When I heard about the Ben NanoNote from Qi Hardware and learned it primarily was a command-line device, I knew I had to get one and play with it. It also doesn't hurt that it costs only $99 ($124 after shipping).
Qi Hardware is a firm believer in not only open software, but also open hardware. According to its Web site, its mission is “to promote and encourage the development of copyleft hardware”. As part of this mission, full documentation on the Ben NanoNote is available on the Web site, including circuit-board layouts, schematics and other hardware documentation.
Granted, I probably never will have the tools or expertise to create my own NanoNote from parts, and even if I could, I probably wouldn't be able to do it for less than what it costs to purchase one. But, the documentation is available, and it is under a license that lets me do it if I had the inclination.
Incidentally, “Ben” refers to a Chinese character meaning “origin”, “root” or “beginning”. The idea is that this is the initial or first version of what eventually will be a complete line of NanoNote and other related products.
The Ben NanoNote is built around the JZ4720 366MHz MIPS-compatible processor from Ingenic Semiconductor with a three-inch, 320x240 pixel color TFT LCD (40x15 character in the text console). It has 32MB SDRAM, 2GB NAND Flash memory, one microSDHC slot (SDIO-capable), a 59-key keyboard, a headphone port, a mono speaker and a USB 2.0 Mini port. It is powered by a 3.7V 850mAh Li-ion battery, or it can run off USB power (5V 500mA DC) either by plugging it in to your computer or by using one of the increasingly common USB power adapters (my phone, camera and eBook reader all came with USB power adapters). The Ben NanoNote earns the “nano” part of its name, measuring only 99x75x17.5mm. Including the battery, the Ben NanoNote weighs in at only 126g, which is lighter than my cell phone.
Four days after ordering the Ben NanoNote, it arrived on my doorstep in North Carolina—not bad for coming all the way from Hong Kong. It comes in an attractive black box containing the Ben NanoNote itself, a manual (most of which is devoted to printing the full text of the Creative Commons BY-SA license), a microfiber cleaning cloth, a battery, a USB cable and a little rubber nub for shorting the “USB Boot” pins in the battery compartment.
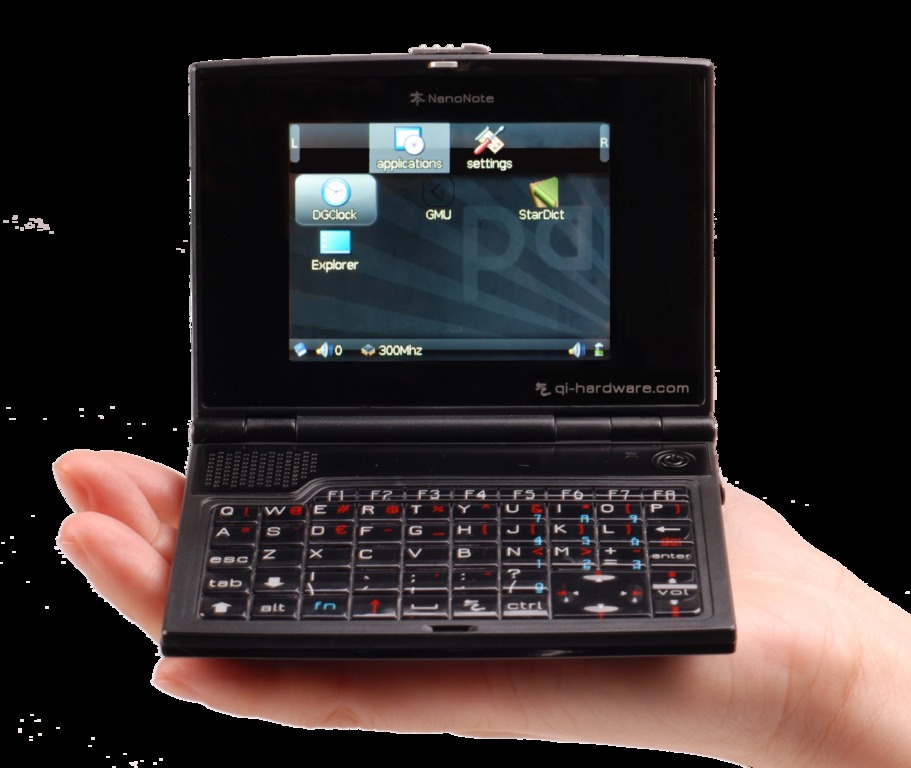
Figure 1. Ben NanoNote
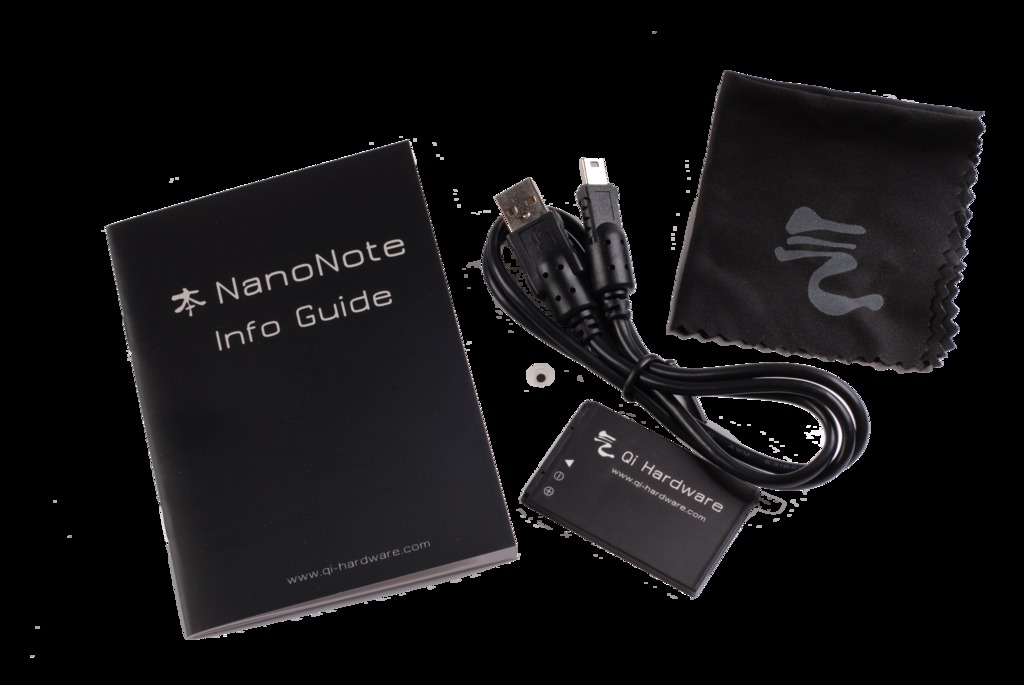
Figure 2. Included with the Ben NanoNote are a cleaning cloth, a manual, a USB cable, a battery and a little rubber nub.
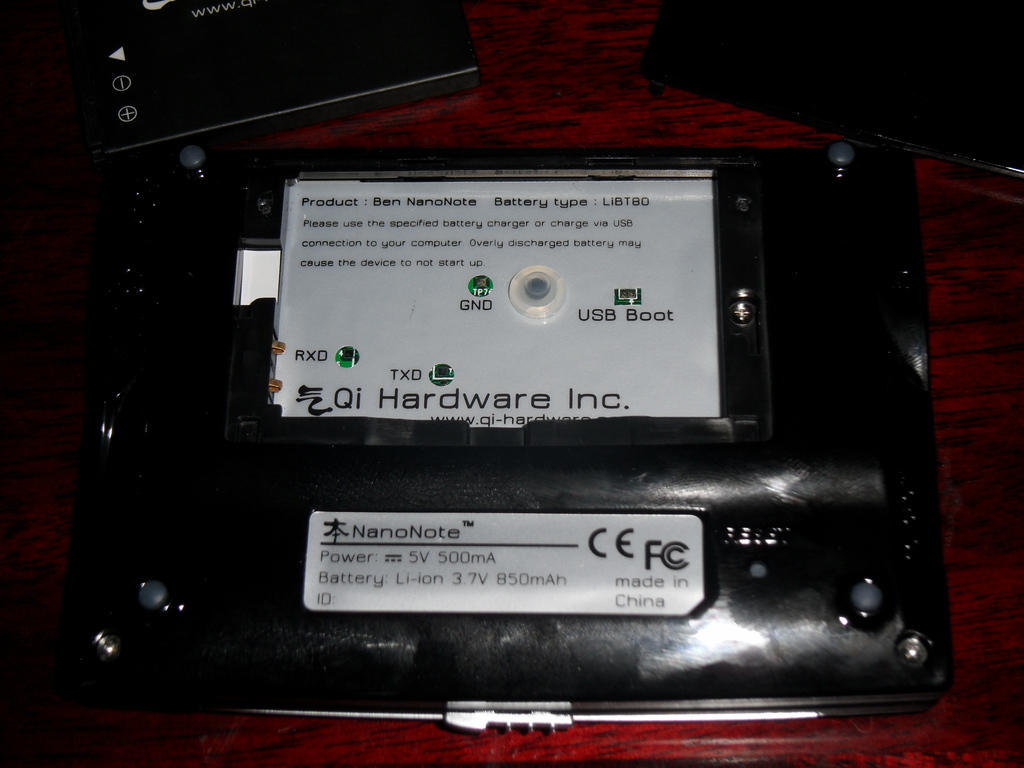
Figure 3. The Ben NanoNote's battery compartment—the round thing in between the GND and USB Boot pins is the nub used for shorting the two USB Boot pins together.
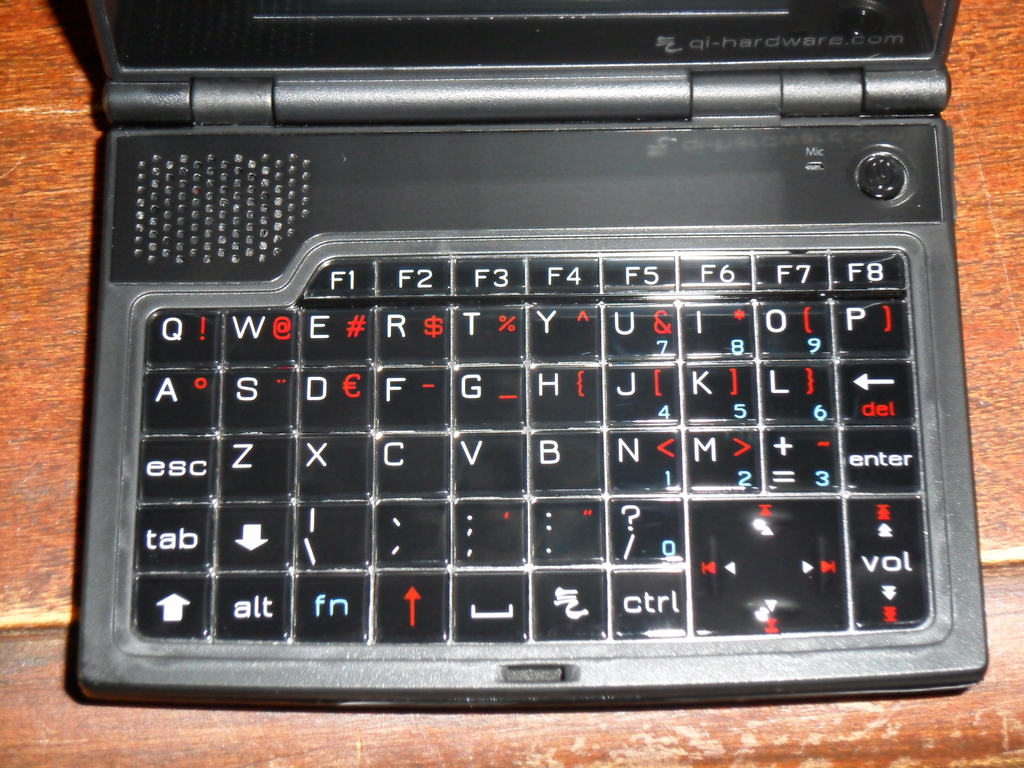
Figure 4. The Ben NanoNote's keyboard, featuring the world's smallest spacebar.
The build quality is decent with no gaps or loose bits. The keyboard has an okay feel to it, even though it is a bit stiffer than I prefer. And, despite it having the world's smallest spacebar, the layout actually works pretty well for command-line work—except that the dash (-) key is is annoyingly placed.
The sound quality out of the single speaker is tinny and prone to distortion, but it's what I expected. If you must listen to music on the Ben NanoNote, external speakers or headphones are the way to go.
Like many embedded devices, upgrades to the core software are done by flashing the device to the newest firmware. Unlike other handheld devices, which can flash themselves or be flashed by copying some files to the device via USB, the Ben NanoNote needs to start in a special “USB Boot mode” to be upgraded. Full instructions are on the Qi Hardware Wiki, but the basic steps are as follows:
Install the Xburst tools (used for booting the Ben NanoNote over USB).
Download the reflash_ben.sh script from the Qi Hardware Wiki.
Put the Ben NanoNote into USB Boot mode.
Run the reflash_ben.sh script.
Putting the NanoNote into USB Boot mode was harder than I thought it would be. To do this, you need to take out the battery and plug the Ben NanoNote in to your computer (if the screen comes on when you plug it in to your computer, unplug the USB cable briefly and plug it back in; the screen should stay dark). Next, use the little nub that came with the Ben NanoNote (or some other piece of conductive material) to short the two USB Boot pins found in the (now empty) battery compartment. While keeping the pins shorted, and without unplugging the USB cable, you have to press and hold the power button for two seconds. Because the power button is on top and the pins are on the bottom, this was not very easy for me to do. Even worse, the indication that you've succeeded is that nothing happens—when the screen stays dark after holding the power button for two seconds.
After going through the contortions it takes, I would prefer some sort of icon on the screen or even a little indicator light to confirm I am in the proper mode, but for now, that's the process. When in USB Boot mode, the Ben NanoNote is waiting for the usbboot utility (one of the Xburst tools) to give it an image from which to boot.
The final step, running the reflash_ben.sh script, is nicely hands-free. The script automatically fetches the latest firmware (unless you specify a specific version) and then boots and flashes the Ben NanoNote. The main root image is more than 140MB, so downloading may take some time, depending on your Internet connection. Flashing the rootfs also took several minutes. Patience, or a nice snack break, are required for this step.
After flashing my Ben NanoNote, unplugging it and re-inserting the battery, I knew all was well when it booted and I saw the OpenWrt logo, and then the graphical “Desktop” (Figure 5). Although the flash procedure is not overly difficult, it's not ideal, and I hope it improves over time.

Figure 5. The Ben NanoNote “Desktop”
The Ben NanoNote uses the OpenWrt Linux distribution, which is used for embedded Linux devices. Prior to using it on the Ben NanoNote, my only exposure to this distro had been on wireless routers.
Unlike my experience with OpenWrt on routers, the Ben NanoNote version comes with a desktop of sorts. The desktop is Gmenu2X, and by default, it has two sections: applications and settings. You can switch between sections using the q and p keys. Navigate within a section by using the direction pad, and to launch a selected application icon, use the x key. The Enter key is configured to launch the GMenu2X configuration program for some unknown reason.
The selection of desktop applications included in the default firmware is sparse in the extreme. There is a clock, the GMU music player, the StarDict dictionary and a file browser called Explorer.
The GMU music player, according to its home page, is capable of playing a wide variety of sound files, but only with the proper supporting libraries, several of which are not available in the Ben NanoNote default firmware. As it ships, GMU on the Ben NanoNote can play Ogg Vorbis, Muse, MikMod and WavPack files. Most of my music is encoded in FLAC or MP3 format, so any ideas I may have had to use the Ben NanoNote as a scriptable music player are on hold.
After playing around with GMU for a bit, just to confirm that it worked with my .ogg files (it did), and after trying out the other desktop apps, I decided the Ben NanoNote's graphical interface wasn't for me. It just isn't very useful. To be fair, the graphical interface is there more as an example than anything else. But, I was more interested in the command line anyway.
To switch to a console from the desktop, press Ctrl-Alt-F1, and then press Enter to activate the console. The Ben NanoNote actually gives you four virtual consoles, and you can substitute F2, F3 or F4 for F1 in the above command.
To get back to graphical mode from the command line, press Alt-F5. To switch between virtual consoles, press Alt and the console to which you want to switch (F1–F4). If the virtual console you switch to says “Please wait while graphical environment is loading...” or some other text, just press Enter to activate it.
As mentioned previously, the Ben NanoNote's console size is 40x15 (40 characters wide, 15 lines tall). For the next NanoNote, I hope this is increased at least to 80x24.
Like many embedded Linux environments, the OpenWrt command line is based on BusyBox. Instead of sticking just with BusyBox, the Ben NanoNote version of OpenWrt also includes several useful programs to supplement it. For example, Vim 7.1 is included. It's a stripped-down version (for example, no syntax highlighting is available), but it's still better than the vi clone built into BusyBox.
The Qi Hardware Wiki (see Resources) provides a list of some of the command-line applications included with the Ben NanoNote, such as Python, GPG, Vim and Mutt.
As I mentioned earlier when talking about the keyboard, the layout works fairly well when using the console. It's far from ideal, but it does work. After some practice, I could type at a slow but steady rate without a lot of hunting and pecking for the next key.
Many, if not most, portable devices come with some variant of 802.11 wireless networking these days. So, I was a little surprised when I learned the Ben NanoNote's only way of connecting to the Internet was through its USB port, which, when connected to a host computer, does not show up as a mass storage device but instead as a USB Ethernet device.
Unless you already have an Ethernet-over-USB adapter plugged in to your system, the NanoNote interface likely will show up as usb0. A list of all network interfaces your computer knows about can be viewed using the ifconfig command, like so:
ifconfig -a -s
To activate the Ethernet interface, an IP address needs to be assigned. I did this with the ifconfig command:
ifconfig usb0 192.168.254.100
I chose the above address because the NanoNote comes out of the box with the USB Ethernet configured with an IP address of 192.168.254.101. SSH starts automatically when the NanoNote boots, so as soon as the network was configured on my desktop, I was able to ssh to the NanoNote as root (change the root password on the NanoNote if you don't know it). You also can copy files to and from the NanoNote using scp.
While using the Ben NanoNote during the past couple weeks, the one question in the back of my mind has been: what exactly is the Ben NanoNote good for? The short answer I arrived at is: I don't know.
On the surface, the Ben NanoNote can do many things, but it is nowhere near the best or even particularly good at any single one of them. In particular, without a wireless Internet connection, it can't be used conveniently for e-mail, Web searching, posting blog updates or anything else that small, Internet-connected devices are good at. It can be used for those things, but only within 15 feet of a computer (the maximum length of a USB cable). So in my mind, I might as well use the computer.
I could use it as a portable electronic journal, but like my cell phone, typing on the Ben NanoNote is slow. If I really want to record my thoughts throughout the day, I would rather use a small paper notepad and pen.
So is the Ben NanoNote a useless gadget? Not at all. The thing that attracted me to the Ben NanoNote, and that still fascinates me, is that in a size I wouldn't have dreamed possible only a few years ago, I have a “real” computer complete with a screen and a keyboard.
Real, of course, depends on a particular definition of the term. For me, it means a computer with a usable command line, SSH and Vim, and the ability to install new software and to run shell scripts.
Although I still haven't decided what I ultimately want to do with my Ben NanoNote, I have thought of some tasks I might consider for it. One idea is to use it as a monitoring device for my home server with the internal speaker playing an alert if some preset condition is not met.
Another idea is to use it as an ultra-secure GPG encryption device. It's practically impossible to break into something over the network when the device you are trying to break into is not even connected to the network, so the Ben NanoNote satisfies my tinfoil-hat tendencies. I would have to be careful never to connect it to a computer, because anything connected directly to the Internet is, or potentially could be, compromised. But, with USB power adapters and the microSDHC slot (for getting files on and off the device), this shouldn't be too hard. I also would have to be careful to secure the device physically, but it's small enough that it should fit into almost any safe.
Those are just two uses, and others are rolling around in the back of my head. Some ideas have been discussed on the Qi Hardware Wiki or talked about on the mailing list, but I'm sure many uses have not been thought of yet.
The Ben NanoNote is not a device for passive consumers. It's for developers, hackers and tinkerers. Why? Because the biggest thing the Ben NanoNote provides is freedom—total freedom to do whatever you want. There aren't any EULAs, encrypted and/or signed firmware images, or other artificial locks standing in your way with the Ben NanoNote. Play with it, hack it, break it, fix it, discover new uses, rinse, repeat. The Ben NanoNote has a limited set of abilities, true, but like the rules for haiku, it's what you do within, or in spite of, the limitations that makes the difference.
Games on the NanoNote
No geeky device of the last ten years has been considered much of anything if you couldn't play id Software's first-person-shooter (FPS) DOOM on it. The Ben NanoNote is no different. I wouldn't call DOOM on the NanoNote “playable”, but you can walk around, shoot things and get through the various levels without dying too much, provided the difficulty is set to “I'm too young to die.”
Quake, another FPS game from id Software, also can be run on the NanoNote. Again, the usability is low (it's harder to play than DOOM), but it does work in a slow, jerky sort of way.
A more usable game available for the Ben NanoNote, from the same developer who provided the DOOM and Quake binaries I used, is Frotz. Frotz is an interpreter for Infocom-style text adventures (like Zork). There are some issues with text wrapping weirdly with strange line breaks, but the games I tried played fine.

Playing an old Infocom adventure on the Ben NanoNote.

Playing DOOM on the Ben NanoNote. Seems like everything plays this game.

You also can play Quake on the Ben NanoNote, but not very well.
Resources
Qi Hardware: qi-hardware.com
Ben NanoNote Wiki: en.qi-hardware.com/wiki/Ben_NanoNote
Applications Included (or Proposed for Inclusion) with the Default Firmware: en.qi-hardware.com/wiki/Applications
Xburst Tools: projects.qi-hardware.com/index.php/p/xburst-tools/downloads
Instructions for Installing Debian: pyneo.org/howto/debian/nano.html
Games for the NanoNote: downloads.qi-hardware.com/people/zear/games
OpenWrt: openwrt.org
Daniel Bartholomew works for Monty Program montyprogram.com as a technical writer and system administrator. He lives with his wife and children in North Carolina and often can be found hanging out on #maria and #linuxjournal on Freenode IRC.
