
Controlling Your Linux System with a Smartphone
Phone technology has come a long way recently. The gap between personal computers and handheld devices is becoming smaller. I keep hearing the phrase “death of the PC”, and there may be some truth to this statement. However, I believe many of us will continue to need access to larger and more powerful computers that are too big to fit in our pockets. To me, the best of both worlds is to have full control over a larger computer from my phone.
Many new smartphones have advanced Web browsers built in. With this technology, you can access an interface configured to run any command on almost any computer. It is fairly trivial to run a Web server on a Linux box. If you take the appropriate security measures, you quickly can build a Web interface designed specifically for handheld devices.
The approach shown in this article is to use a user account to run commands on the system. Of course, there are security concerns in doing this, but with the appropriate precautions, it can be made reasonably secure.
The system will rely on Wi-Fi. This makes sense when dealing with handheld devices, so configure your Wi-Fi router with a password. Users that want to connect to the local intranet will have to enter a password into their device before seeing anything. Most devices will remember the credentials and connect automatically once in range.
To minimize the risks in the event of a security breach, let's also create the user account with minimal permissions. This is a good safety measure, even though the interfaces will expose only “safe” commands.
Install the following from your distribution's repository if not already installed: Apache2, apache2-suexec and libapache2-mod-perl2.
The first package is the Web server. If it doesn't start automatically after the install, run the command:
/etc/init.d/apache2 start
The second package allows you to run the Web server with the credentials of a particular system user. When it is installed, you need to issue the following command as root to enable the apache module:
a2enmod suexec
Some of the examples presented here require Perl CGI interoperability. The last package is needed for that.
Now, you need to configure Apache to run as your little-trusted user. On our family Linux box, I created an account for all the kids. The user name is “saturn”. This account can do things like play music and watch videos. However, it doesn't belong to any groups that can delete or change things of importance. So let's use this account as an example.
Edit your apache config, and add the following line to the default VirtualHost (*:80) or to the VirtualHost you want to use:
SuexecUserGroup saturn saturn
Apache runs as root, so it has the ability to run scripts as any user. The line above tells Apache to run as the user saturn and group saturn.
Now, restart Apache, also as root, with this command:
/etc/init.d/apache2 restart
The Web service now is running as the user saturn.
Playing a sound file from the command line is fairly trivial, and it's a good way to exhibit the simplicity of this setup—one button for one action.
I'm using a traditional Web stack: HTML, CSS, JavaScript and CGI. The CGI part can be accomplished with a number of different languages. This first example uses a shell script, for the sake of simplicity.
Create an index.html file in the root Web directory. For many systems, this is located in /var/www/. Some systems use /var/www/html/. In this file, add a button that calls a JavaScript function called playQuack():
<button id="quack-button" onclick="playQuack()">Quack</button>
The JavaScript for the playQuack() function is in bonkers.js. The entire index.html file looks like this:
<html>
  <head>
    <title>Bonkers</title>
    <meta name="viewport"
          content="initial-scale=1.0; user-scalable=no"/>
    <link rel="stylesheet" type="text/css" href="default.css" />
    <script type="text/javascript" src="bonkers.js"></script>
  </head>

  <body>
    <button id="quack-button" onclick="playQuack()">Quack</button>
  </body>
</html>
Some additional content worth mentioning is in the metatag. This tells smartphones not to scale the content of the page. Without this, the button would be very tiny on the screen.
Here is my default.css file. It defines a background color and specifies how the button will look:
html, body {
  background-color: #1E1E26;
}

button#quack-button {
  position: absolute;
  top: 20%;
  width: 70%;
  left: 15%;
  padding: 5px;
  border-width: 3px;
  color: #BFBFBF;
  font-size: 34px;
  font-weight: 800;
  border-color: #9C9C9C;
  background-image: -webkit-gradient(linear, left top
      left bottom, from(#BF5A34), to(#463630));
      -webkit-border-radius: 10px;
}
Many mobile browsers are starting to support WebKit CSS. This is exciting, because a couple lines of WebKit code can do some really fancy things. The last two lines before the last curly bracket tell the button to have rounded corners and a color gradient background.
Now you have a nice-looking button. Point the browser on your phone to the IP address of the Linux computer. You should see something similar to Figure 1.

Figure 1. A Simple Button Displayed on an iPhone
Next, let's make the button actually do something. Create the bonkers.js file in the root Web directory, and enter the following:
var myDomain = document.domain;
var cgiURL   = "http://" + myDomain + "/cgi-bin/bonkers.cgi";
var xmlRequest;

function playQuack() {
  xmlRequest = new XMLHttpRequest();
  xmlRequest.open("GET", cgiURL, true);
  xmlRequest.send(null);
}
This is the JavaScript that forms the client-side process. It creates a URL that essentially runs the CGI script on your Linux box. In this example, you really don't care about the return value from the CGI script.
Believe it or not, the hard part is all done. CGI scripts are extremely simple and easy to understand—especially for someone who is used to the command line.
All CGI scripts must be located in the cgi-bin directory. This commonly is located in /var/www/cgi-bin or /usr/lib/cgi-bin and is also configurable within Apache.
Here is the CGI script, bonkers.cgi:
#!/bin/bash

mplayer ~/quack.wav &
That's all. This is a Bash shell script. A reference to the shell path is at the top. Below that is a command to run MPlayer, which plays an annoying quack sound. You essentially can place any shell command here.
There you have it. Anybody with a smartphone and the Wi-Fi password can make quack sounds come out of the computer. Now it's time to do something a little more useful.
My wife and I have four kids. All of which compete for time on our family Linux box. The computer, which is named Saturn, is constantly logged in with the account “saturn”. All kids use this account and are either watching TV, videos, YouTube, listening to music or playing Flash games on the Internet. I was getting sick of kicking the kids off the computer at supper time. This is why the interface “big-meanie” was created.
This next application scales up the previous example. I chose to use Perl as the CGI language, mostly because I am a longtime Perl user and fan. In the following example, I omit the HTML and CSS code because it's not significantly different from the code in the first example.
The main difference being that this example has three buttons: one is for starting a five-minute countdown until all fun is over. Another is to stop the countdown, just in case I have a change of heart. The last is when I really mean business and want to terminate all applicable programs immediately.
Figure 2 shows the layout of Big Meanie.
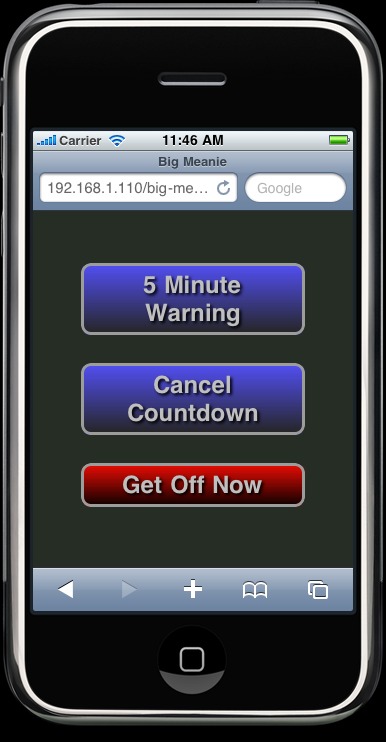
Figure 2. Big Meanie Displayed on an iPhone
The first button gives the kids a five-minute countdown to get off the computer. I thought it appropriate to have visual indicators popup over the current windows on the desktop. You need to set a few shell variables in order to output to the local display: XAUTHORITY, HOME and DISPLAY. The following Perl commands accomplish this:
$ENV{'XAUTHORITY'} = '/home/saturn/.Xauthority';
$ENV{'HOME'} = '/home/saturn';
$ENV{'DISPLAY'} = ':0';
This allows windows to open on the local display, even though the command was instigated remotely.
The next thing to note is that you have more than one function to perform, so you need to inform the script which action to perform (that is, which button was pressed). Since you're are dealing with Web URLs here, appending your parameter to the URL is the easiest way to accomplish this. Using a ? sign tells your script that the following text is a parameter. That parameter will be the action to perform.
Here is the full JavaScript file for Big Meanie:
var myDomain = document.domain; // Grab current domain.
var cgiURL  = "http://" + myDomain + "/cgi-bin/big-meanie.cgi";
var xmlRequest;

// This is the logic for the "5 Minute Warning" button
function warn5() {
  xmlRequest = new XMLHttpRequest();
  // Add the 5min variable to the URL
  xmlRequest.open("GET",cgiURL + "?5min", true);
  xmlRequest.send(null);
}

// This is the logic for the "Cancel Countdown" button
function cancel() {
  xmlRequest = new XMLHttpRequest();
  // Add the cancel variable to the URL
  xmlRequest.open("GET",cgiURL + "?cancel", true);
  xmlRequest.send(null);
}

// This is the logic for the "Get Off Now" button
function offnow() {
  xmlRequest = new XMLHttpRequest();
  // Add the off-now variable to the URL
  xmlRequest.open("GET",cgiURL + "?off-now", true);
  xmlRequest.send(null);
}
Each button has its own JavaScript function. The URL to the CGI script is appended with the appropriate variable within each function. The variable then is passed to the CGI script with the xmlRequest.send() function.
All action up until now has been happening on the phone browser. Now, let's dive into the script on the server, big-meanie.pl.
There is one last important thing to mention before going over the server-side script (Listing 1). Internet browsers expect a response from sites when making a URL request. The browser hangs if there is no response. You can get around this by creating a second thread that responds automatically with an empty message. The browser doesn't get stuck when the server is executing the command this way, which is important for what you're about to do.
Listing 1. Server-Side Script
#!/usr/bin/perl

# Grab the URL variable
$variable = $ARGV[0];

# Set some important environment variables.
$ENV{'XAUTHORITY'} = '/home/saturn/.Xauthority';
$ENV{'DISPLAY'}    = ':0';
$ENV{'HOME'}       = '/home/saturn';

# if the 5 minutes warning button is pushed
if ($variable =~ /^5min$/) {
    # Lets create a child process to deal with the notifications
    defined(my $childpid = fork);

    if ($childpid) { # If a child pid exists... this is the parent
        # Send response so the browser is happy
        print "Content-type: text/html\n\n";

        # Show a popup warning message
        # displaying 5 minutes remaining.
        `zenity --warning --text='5 minutes left to play'`;
    } else { # Otherwise it's the child
        # Print the amount of time left with a subtle gnome
        # notification message.
        sleep(60);
        `notify-send '4 minutes left to play'`;
        sleep(60);
        `notify-send '3 minutes left to play'`;
        sleep(60);
        `notify-send '2 minutes left to play'`;
        sleep(60);
        `notify-send '1 minutes left to play'`;
        sleep(60);

        # We are now out of time.
        # Let's close all the fun applications
        `/usr/bin/tvtime-command quit`; # Close the TV
        `pkill mplayer`;                # Close mplayer
        `pkill totem`;                  # Close Totem movie player
        `pkill rhythmbox`;              # Close the music player
        `pkill firefox`;                # Close the web browser
    }
}

# If the Cancel Countdown button has been pushed.
if ($variable =~ /^cancel$/) {
    defined(my $childpid = fork);

    if ($childpid) { # If parent
        print "Content-type: text/html\n\n";
    } else {
       `pkill big-meanie`;
    }
}

# If the Get Off Now button has been pushed.
if ($variable =~ /^off-now$/) {
    defined(my $childpid = fork);

    if ($childpid) { # If parent
        print "Content-type: text/html\n\n";
    } else {
        `/usr/bin/tvtime-command quit`; # Close the TV
        `pkill mplayer`;                # Close mplayer
        `pkill totem`;                  # Close Totem movie player
        `pkill rhythmbox`;              # Close the music player
        `pkill firefox`;                # Close the web browser

         # Just because we can... Send out a tweet that
         # someone has been kicked off the computer
         `curl -u <twitterUser>:<twitterPassword> -d
            status='Someone has been rudely kicked off the computer.'
            http://twitter.com/statuses/update.xml > /dev/null`;
    }
}
The action variable from the URL is grabbed through the $ARGV[0] array. The if statements that follow test which variable has been specified and, therefore, which action to execute. The first action, 5min, executes a five-minute warning by forking the CGI script (creating a copy of the process). The “parent” branch of the fork executes the if part of the if statement, and the “child” branch executes the else part. The parent sends an empty HTML response to the browser so the client doesn't hang and pops up a five-minute warning message box using Zenity. Zenity provides a simple GUI interface that can be accessed from scripts, and it should be installed by default on most GNOME desktops. There are alternatives for KDE users, such as kdialog or whiptail. The advantage of putting the pop-up dialog in a separate thread from the countdown notifications is the script doesn't stall if the current user doesn't click the OK button on the Zenity window.
The child portion of the fork does the actual five-minute countdown. I wanted to be a little humane here and provide subtle notifications of how much time is left before the user is kicked off. This allows the older kids to save their session or work. My younger kids just need to be eased into the idea of stopping.
The child part of the script sleeps for 60 seconds after the dialog appears. A simple notification then is sent to the desktop once the child wakes up. It appears as a standard GNOME notification in the upper right of the screen. Figure 3 shows how this appears to the user. This procedure repeats until the countdown is complete. Next, the meanie part of Big Meanie kicks in and sends a kill signal to any fun type of program the kids could be enjoying.

Figure 3. GNOME Notification on the Desktop Displaying the Time Remaining
I used the notify-send command commonly installed with GNOME. It is included in the libnotify-bin package, and it should be in most distribution repositories. KDE users can use kdialog with the --passivepopup flag instead of notify-send.
The second if statement is for the cancel countdown button. It sends a kill signal to all instances of big-meanie, essentially killing itself and all sleeping instances, which will kill any previously started five-minute wait child processes that are waiting to shut down things.
The last if statement doesn't need much explanation. It kicks the user off immediately and is almost identical to the first, excluding the countdown logic. You already may have noticed the juicy little addition at the very end of the code: big-meanie sends a status update to Twitter stating somebody has been kicked off the computer. It seemed appropriate for big-meanie to gloat to the whole world that someone's fun has been terminated. It also acts as a safety feature informing me if one of the kids has discovered the program and is possibly using it in any unfriendly fashion on fellow siblings.
The most-used application I have built is a television remote control. We use the fantastic tvtime program to watch all our TV. The tvtime package includes the tvtime-command command that allows you to control every conceivable function of the running tvtime instance. For example, tvtime-command chan-up changes the channel up one increment. Full documentation can be found in the tvtime man page.
I used all the same techniques described earlier and built a full functioning remote shown in Figure 4.
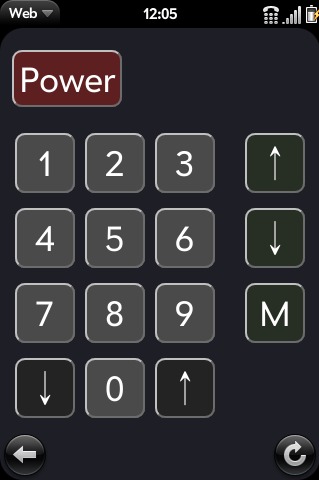
Figure 4. Remote Control Application Shown on a Palm Pre
Now friends and family can control the TV from the comfort of their very own smartphones. There are no more complaints about using our giant Bluetooth keyboard as a remote either. The kids simply can grab the closest iPod Touch, Palm Pre or whatever.
Smartphone technology is advancing extremely rapidly. Without modifying the phone, you can access almost any possible function on a remote computer through the built-in browser. Linux users are especially lucky. It doesn't take much effort to turn a Linux computer into a back end for a phone. Hopefully, this article inspires you to come up with your own unique and interesting uses.
Jamie Popkin lives in Lantzville, British Columbia, with his wife and four kids. He is a consultant specializing in geographic data portrayal on the Web. Recently, he has started developing for smartphones, utilizing modern Web/HTML5 technology. He can be reached via Twitter (@jamiepopkin) or e-mail (popkinj@littleearth.ca).
