
Managing KVM Deployments with Virt-Manager
KVM is the kernel-based virtual machine, a mainline kernel feature since versuib 2.6.20 for running virtualized guest systems on top of a host system. In less technical terms, this means you can run other operating systems as just another window on your desktop. But, before you can get to the desktop, you need to become familiar with creating and managing virtual machines using the Virtual Machine Manager suite of tools.
Each virtual machine instance, referred to as a VM, has its own virtualized hardware. This includes a chunk of memory and one or more of the available CPUs, network and graphics hardware, virtual disks and a mouse. The Virtual Machine Manager tools, often referred to collectively by the name of the primary GUI application virt-manager, make it possible to bring up the virtual hardware quickly with the virtual CD-ROM device “connected to” an ISO file in order to install an operating system. At work, we run a variety of Linux distributions and a couple Windows versions. Each operating system instance is installed with a base configuration that is common to all copies of that instance. This is known as a base image. From these, we make copies, known as clones, in which specific applications are installed. This result of cloning and custom application configuration is what the cloud computing world refers to as virtual appliances.
KVM is one of a number of options for running virtual machines. Xen, VirtualBox and VMware are alternatives with different requirements for setup and use. KVM was chosen for use at my office, because of the simplicity of setup on Fedora systems (the standard Linux development platform at work) and because of the ease of creating and using virtual machines across the internal network. The process discussed here is applicable specifically to using KVM-based virtual machines.
Since KVM is part of the kernel, most modern Linux distributions offer KVM kernels. However, the user-level tools that utilize KVM, such as virt-manager and libvirt, are what most users will be interested in. Check your distribution for availability of ready-to-install packages or grab the source packages from the URLs provided at the end of this article.
In virtualization parlance, the host system is the real hardware and its operating system that will be the platform on which you will run guest systems. Each guest system is the KVM-based virtual hardware and the OS installed on it. Before you can use a KVM-enabled kernel on your host system, you need to make sure your hardware supports virtualization. To check whether the processor supports virtualization, search for the following CPU flags:
egrep "vmx|svm" /proc/cpuinfo
Intel processors with VM support will have the vmx flag in the output of this command. AMD processors that support virtual machines use the svm flag. This command will print one line for each CPU core with VM support.
The next step is to configure the host operating system. The first thing to do is install the user-space tools associated with virt-manager:
sudo yum install kvm qemu libvirt \
                 libvirt-python python-virtinst \
                 bridge-utils virt-manager
This may install additional packages, but these are the ones critical to using KVM and virt-manager. These package names are specific to Fedora. Check your distribution for proper package names.
After installing the required software, a bridge network device needs to be added to the host system. Using a bridge device allows the VM to function like any other system on your network, using its own IP address. On the host system, the bridge will be assigned an IP address and the default “eth” device will be attached to that. Using a bridged network is a little easier if you disable NetworkManager:
# chkconfig NetworkManager off
# chkconfig network on
# service NetworkManager stop
# service network start
NetworkManager is ideal for mobile platforms, but as of Fedora 12, it's not suitable for use with shared networks, such as those used with a host and guest virtualized systems. Although you can run KVM on mobile systems, this article assumes the use of a desktop or server that is unlikely to need to change network configurations often.
Note that the above commands must be run as root. On Fedora, configuration scripts for each network device are located under /etc/sysconfig/network-scripts. Assuming there is at least one network card in your system, there will be a configuration file named ifcfg-eth0 in that directory. Open it and add the following line:
BRIDGE=br0
Then, comment out the following lines by prefixing each line with the # symbol:
#BOOTPROTO=none
#DNS1=...
#GATEWAY=...
#IPADDR=...
#NETMASK=...
To add the bridge device, create a file called ifcfg-br0 in that directory, and add the following lines to it:
DEVICE=br0
TYPE=Bridge
BOOTPROTO=static
DNS1=...
GATEWAY=...
IPADDR=...
NETMASK=...
ONBOOT=yes
The lines with ... can, in most cases, be the lines that you commented out of ifcfg-eth0. Note that the TYPE entry is case-sensitive.
Be sure to assign proper values for DNS, GATEWAY, IPADDR and NETMASK. This example assumes a static IP address, but if the device will use DHCP, change BOOTPROTO and leave these entries out:
DEVICE=br0
TYPE=Bridge
BOOTPROTO=dhcp
ONBOOT=yes
Note that the host also should have a large amount of disk space for the VM image files. The size of these can vary, but in this article, we'll create 12GB files to support complete Linux distributions on 8GB with 4GB for local user directories. Smaller installation partitions could be used for the operating system, and user directories can be NFS-mounted if desired. Also, it is possible to place the VM image files on NFS-mounted directories, although this can have serious performance impacts when running the virtual machine.
At this point, the host network can be restarted with the new networking configuration:
# service network start
The host now is ready for use with virtual machines.
Before diving into creating virtual machines, it's important to take a look at the related tools and files. Virtual Machine Manager is actually a suite of tools for working with virtual machines:
virt-install: command-line tool used to install software into a VM image.
virt-clone: command-line tool used to clone a VM image.
virt-manager: GUI for starting, stopping and using VM images.
virt-image: command-line tool used to create a VM-based on an XML description.
The first three of these will be used to create, clone and use virtual machines. The latter is useful for advanced users but is beyond the scope of this article.
The virt-manager tools are Python programs that depend on the libvirt library to manage virtual machines and QEMU to run the virtual machines. Both libvirt and QEMU offer sophisticated features for a wide variety of tasks. Fortunately, you don't need to know anything about QEMU to get started using a VM, and you need to know only very basic information about libvirt.
The virt-manager application uses VNC to connect to remote libvirt dæmons and view remote virtual machines on a local display. This means you can launch virt-manager on your system and connect to a VM running on another system across the network. Such connections will require password authentication in most cases, depending on how libvirt is configured. This article takes the simple (and highly insecure) path of using root SSH access to access remote hosts. This works for my company, because the virtual machines are on an insulated networks. This also works if you're behind a well-configured firewall at home, but to be safe, consider further research into the secure (TLS) transport options of libvirt.
Note that virt-manager provides a wizard for creating new virtual machines on the localhost using local or remote media installations (Figure 1). However, this article focuses on the underlying tools virt-install and virt-clone. These tools offer far more power and flexibility when creating virtual machines.
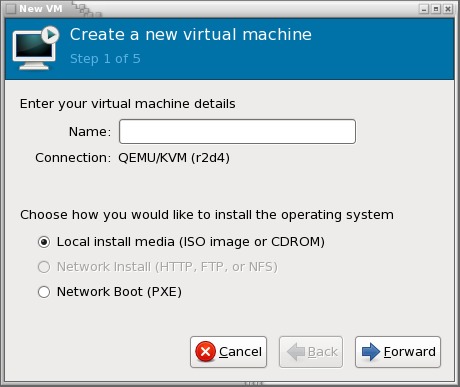
Figure 1. The virt-manager wizard can create images for the local host.
With the software installed and the host network configured, it's time to create a base image. The base image is an installation of an operating system into a VM image file. These files can take multiple formats, but the recommended format is qcow2:
sudo virt-install --connect qemu:///system \
                  -n <vm-name> \
                  -r 512 \
                  --vcpus=1 \
                  -f ~/<vm-name>.qcow2 \
                  -s 12 \
                  -c <distro-install-image>.iso \
                  --vnc \
                  --noautoconsole \
                  --accelerate \
                  --os-type linux \
                  --os-variant generic26 \
                  --network=bridge:br0
Replace <vm-name> with a symbolic name for the virtual machine. At work, we use the distribution name, version and CPU size, such as “fedora11-64”. The <distro-install-image> is the name of the ISO image file used to install a Linux distribution.
The man page for virt-install covers the available options in detail. This particular command attaches to the local hypervisor as root (--connect) and sets up a guest virtual machine with 512MB of memory and the maximum number of CPUs it can use (-r, --vcpus). It will create a virtual machine image in the file ~/<vm-name>.qcow2 that is 12GB (-f, -s) and boot the installation media <distro-install-image>.iso. virt-install will start a VNC console on the guest and make it available for use via the host (--vnc), but no connection to it is started by default (--noautoconsole). A connection to it will be made later using virt-manager. The guest machine will run using kernel acceleration if available (--accelerate).
The guest will be created using optimized ACPI, APIC, mouse and other hardware configurations (--os-type, --os-variant) and use the bridged network device (--network). Note that the os_type has specific valid values. Check the man page for details.
This command will exit immediately while it starts up the VM in the background. To interact with the operating system installation, start the virt-manager application. This program will recognize VNC servers on the local network and list them (Figure 2). Double-clicking on one will open a connection to that host and list the available guest systems. Double-clicking on a guest will open a window to the guest (Figure 3).
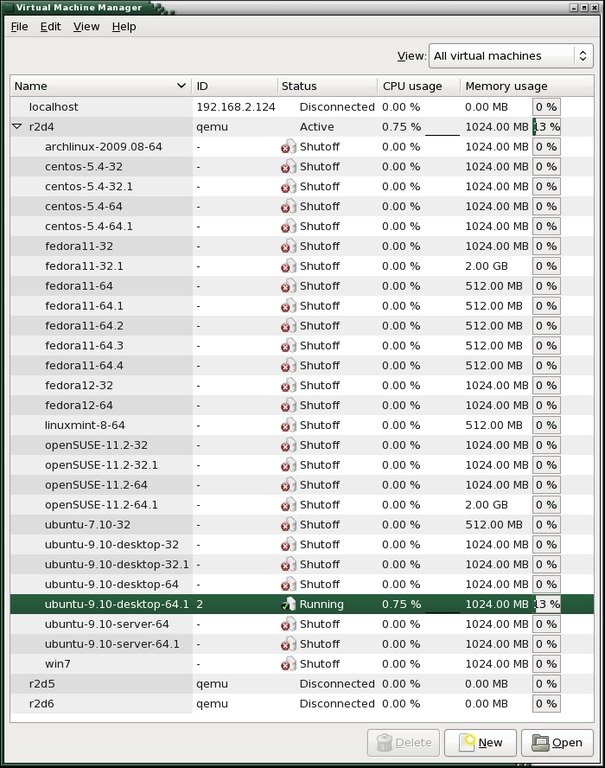
Figure 2. The virt-manager window shows hosts with VNC servers. Connecting to the localhost is automatic.

Figure 3. Each OS will set the default size of the console. The console window can be scaled up, but not down, using the View→Scale Display menu.
With the VNC window open, the installation proceeds just as it would when installing on bare metal. Click inside the VM window to activate the guest VM mouse, then hold down Ctrl-Alt at the same time to return the mouse to the host desktop. In many cases, you won't need to capture the mouse pointer this way. Instead, just type with the host mouse pointer over the VM console window and keystrokes are passed to the guest VM.
Once the installation completes, a reboot typically is required. A reboot of the VM, that is—a reboot in this VM instance shuts down only the virtual machine, not the host. You must use the Run button in the menu bar of the VNC window to start the VM again manually. After rebooting, be sure to install any updates for the Linux distribution.
Using virt-install to create a VM image does two things. It creates an image file, and it creates a configuration (Listing 1) to launch it for libvirt. The configuration file is an XML file found under /etc/libvirtd/qemu, which should be accessible only by the root user.
Listing 1. Sample XML Configuration File for a VM
<domain type='kvm'>
  <name>ubuntu-9.04-64</name>
  <uuid>19a049b8-83a4-2ed1-116d-33db85a5da17</uuid>
  <memory>1048576</memory>
  <currentMemory>1048576</currentMemory>
  <vcpu>2</vcpu>
  <os>
    <type arch='x86_64' machine='pc'>hvm</type>
    <boot dev='hd'/>
  </os>
  <features>
    <acpi/>
    <apic/>
    <pae/>
  </features>
  <clock offset='utc'/>
  <on_poweroff>destroy</on_poweroff>
  <on_reboot>restart</on_reboot>
  <on_crash>restart</on_crash>
  <devices>
    <emulator>/usr/bin/qemu-kvm</emulator>
    <disk type='file' device='disk'>
      <source
       file='/home/baseimage/ubuntu-9.04-64.qcow2'/>
      <target dev='hda' bus='ide'/>
    </disk>
    <disk type='file' device='cdrom'>
      <target dev='hdc' bus='ide'/>
      <readonly/>
    </disk>
    <interface type='bridge'>
      <mac address='54:52:00:42:df:25'/>
      <source bridge='br0'/>
    </interface>
    <serial type='pty'>
      <target port='0'/>
    </serial>
    <console type='pty'>
      <target port='0'/>
    </console>
    <input type='mouse' bus='ps2'/>
    <graphics type='vnc' port='-1' autoport='yes'/>
  </devices>
</domain>
If edits are done manually to this file, libvirt should be restarted:
sudo service libvirtd restart
However, it probably is better not to edit the file and to use the virsh command for libvirt to make updates to a VM configuration. If the amount of memory or number of CPUs to use for a VM needs to be lowered, the virt-manager Details tab needs to be used rather than using virsh. Be sure to exit any instances of virt-manager before restarting libvirt.
The base image can be copied to an NFS directory along with the XML configuration file, so that other hosts can make use of it. For another host to use it, copy the XML file to the new host's /etc/libvirtd/qemu directory, and edit it to point to the NFS mountpoint. Then, restart the libvirt on the new host.
The base image is just the core image for creating your VM appliances. Each appliance is a clone of the base image with additional applications installed. Base images are also known as “backing stores”, because the base image is used for reads, and the clone image is used when writes occur. In this way, the clone gets updated while the base image remains pristine.
Creating a clone requires that the host libvirt knows about the base image, which means the XML configuration for the base image is in the libvirt configuration directories and libvirt has been restarted. Cloning is performed by the virt-clone command:
sudo virt-clone -o <base-image-name> \
                -n <clone-image-name> \
                -f <path-to-base-image>
As with virt-install, virt-clone options are described in detail in the man page. Using the previous virt-install example and the naming scheme described earlier, a clone of a Fedora base image would look more like this:
sudo virt-clone -o fedora11-64 \
                -n fedora11-64.1 \
                -f /home/cloneimages/fedora11-64.1
In this example, the clone image name is the same as the base image with an identifying suffix, and the clone image file has the same name as the image and will be created in /home/cloneimages. The image name is used to identify the guest VM to libvirt and is saved as the “name” element in the XML configuration file for the VM. The image filename is the name of the file where the image is located. This is stored in the “source file” element of the XML configuration file.
Cloning an image can be a system-intensive operation. Although a quad-core CPU with 8GB of memory might handle this just fine, a single-core system may get bogged down if other operations are in progress. Cloning at home may be something to leave for overnight processing.
Clones are not required for working with a VM. You can just as easily work directly with the base image. Clones, however, are useful if you plan on having multiple, independent configurations using the same base OS installation. In other words, clones are not typically necessary at home, but they may be required when used with clusters of servers.
libvirt provides many features to do more complex things with virtual machines, such as storage, networking and USB/PCI options. All of those features should be accessed using the virsh command-line tool. virt-manager provides GUI-based wizards for creating new virtual machines and allows dynamic reconfiguration of the boot device while displaying interactive performance graphs (Figure 4). For home users, the best feature of virt-manager is its ability to show multiple VM consoles at the same time.
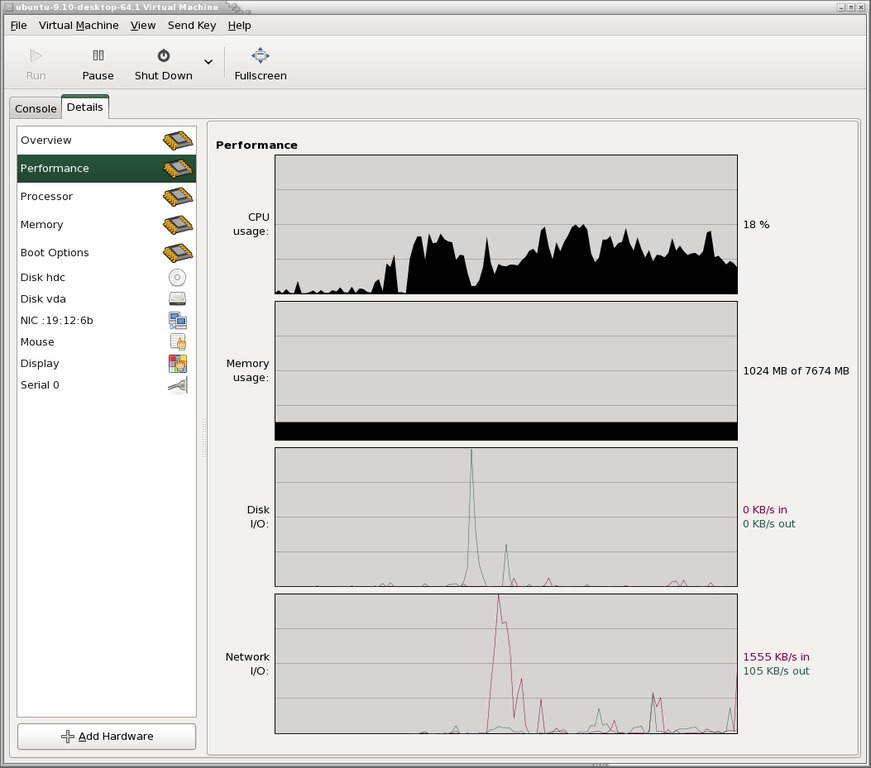
Figure 4. Processor and memory usage can be adjusted dynamically up to the configured maximum for the guest.
Other distributions will work with KVM, although the creation of the host bridged network is likely to be different. Advanced users may want to investigate the use of Logical Volume Managers (LVMs) instead of flat-file images to improve performance.
Resources
Virtual Machine Manager: virt-manager.et.redhat.com
libvirt: libvirt.org
QEMU: wiki.qemu.org
KVM: www.linux-kvm.org
KVM on Fedora 11: www.howtoforge.com/virtualization-with-kvm-on-a-fedora-11-server
Shared Networks on Fedora: fedoraproject.org/wiki/Features/Shared_Network_Interface
libvirt Networking: wiki.libvirt.org/page/Networking#Fedora.2FRHEL_Bridging
Michael J. Hammel is a Principal Software Engineer for Colorado Engineering, Inc. (CEI), in Colorado Springs, Colorado, with more than 20 years of software development and management experience. He has written more than 100 articles for numerous on-line and print magazines and is the author of three books on The GIMP, the premier open-source graphics editing package.

