
Getting Started with Quickly
At the heart of what makes Linux thrive as an operating system are applications. Within it is a vibrant, diverse range of applications, satisfying even the most particular needs, all just a few clicks away. With such an imaginative range of applications available, a similarly vibrant developer community has formed, complete with a vast array of tools, languages and functionality. Unfortunately, although powerful, many of these tools are awkwardly complex, and many developers have let their ideas and creativity become buried under an avalanche of confusion around how those tools fit together.
Part of the cause of this problem is that many developer tools cater only to systematic developers—the kind of code-writing workaholics who hack for a living, with a fervent attention to detail backed up by unit tests and other hallmarks of the professional programmer. There are, however, developers of a different sort who are driven by writing practical code, scratching their itches and having fun writing programs and sharing them with others. These are opportunistic developers.
As part of our work in Ubuntu, we have been keen to harness opportunistic developers and enable them to do great work using Ubuntu as a platform. As part of this goal, we have developed a series of tools to make it simple for you to break down the barrier between idea and implementation, and help you to scratch your itches more quickly and easily. One such tool is Quickly (wiki.ubuntu.com/Quickly).
Quickly gets you up and running (quickly, of course) writing an application from scratch. Traditionally, writing desktop applications has involved a not-insignificant amount of faffing required, with build systems, source control, packaging frameworks, graphical interface tools and other things that get in the way of writing code. Quickly is a tool that simplifies how those different things fit together.
Quickly provides a framework with a series of templates for creating different types of applications. With each template, a series of opinionated decisions are made about the tools involved in creating that application. By far, the most popular template and the one that Quickly itself was created to satisfy is the Ubuntu template. This template uses a set of tools that has become hugely popular in modern desktop software development, and tools we have harnessed in Ubuntu. They are:
Python: a simple, easy-to-learn, flexible and efficient, high-level language.
GTK: a comprehensive and powerful graphical toolkit for creating applications and the foundation of the GNOME desktop environment.
GNOME: the desktop environment that ships with Ubuntu, offering many integration facilities.
Glade: an application for creating user interfaces quickly and easily, which then can be loaded right into your Python programs.
GStreamer: a powerful but deliciously simple framework for playing back and creating audio, video and other multimedia content.
DesktopCouch: a framework for saving content in a database that is fast and efficient, hooks neatly into Ubuntu One and is awesome for replication.
gedit: for editing code—Quickly assumes you are going to use the text editor that ships with Ubuntu, which provides a simple and surprisingly flexible interface for writing your programs.
With this core set of tools, you can write any application you can imagine and know that it will run effortlessly on Ubuntu and other distributions. Let's make the magic happen.
Today, Quickly primarily is used on Ubuntu and is not currently packaged for other distributions, although we hope this changes in the future and that other distributions use Quickly too. If you are running Ubuntu, getting Quickly is as simple as installing from the Ubuntu Software Center or firing up a terminal and running:
sudo apt-get install quickly
After a few minutes, you should be up and running.
With Quickly installed and ready to roll, let's start creating a simple application. Fire up a terminal with Applications→Accessories→Terminal, and enter the following command:
quickly create ubuntu-project myapp
This command uses Quickly to create a new Ubuntu Project called myapp. You will see a flurry of lines fly past your eyes as Quickly generates the new project and saves its various files inside a new directory called myapp. When Quickly finishes generating the project, it runs it automatically, and you should see a window that looks remarkably similar to Figure 1.
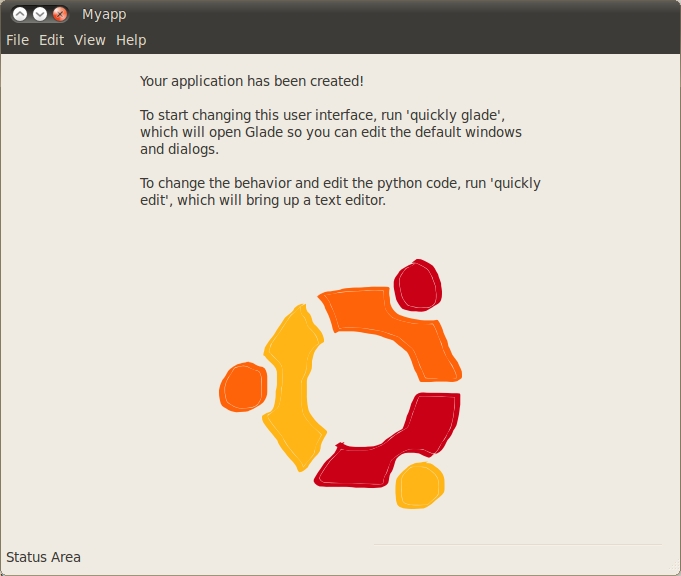
Figure 1. Myapp Main Window
The generated application has a number of important elements common to many applications, such as a menu bar, menu items and status bar, and it also includes a label with some text and a rather nice Ubuntu circle of friends image. Feel free to click through the menus and play with your new program. It won't do much yet, but from this pre-existing base, you now can turn it into any program you want. Let's start working on it. First, go into the project directory:
cd myapp/
Quickly has a series of commands that each begin with the quickly command. The first command you need to know is how to run your program. Simply use the run command:
quickly run
This runs your program and displays it on the screen. When you're finished with the program, you can close it down either by clicking the window close button or pressing Ctrl-C inside the terminal.
Now, let's create a really simple program that demonstrates how basic development works with Quickly and its key components: Python and the GTK widget set. To do this, the program will have a text entry box and when you type in a word, it will search for that word on Google. Although delightfully simple, it demonstrates the basics well and is a good place to start.
In every program, you can use buttons, scrollbars and other interactive things to click on to construct your program interfaces. These building blocks for creating interfaces are called widgets, and they are part of the GTK toolkit.
First, let's make some changes to the user interface to remove some unneeded widgets. You also will want to add a text box widget. To edit your user interface, use a program called Glade, which lets you visually construct your interface by pointing and clicking. Later, you can hook different widgets up to code that do interesting things. First, load Glade with:
quickly glade
When Glade pops up, it should look eerily similar to Figure 2. (Note: in Quickly 0.4, the command is quickly design.)
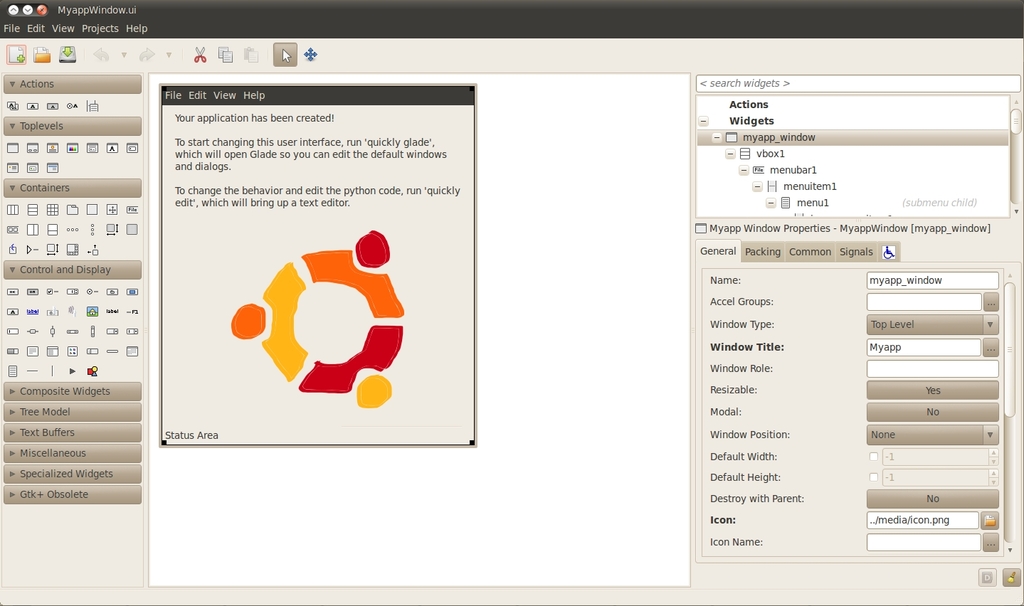
Figure 2. Glade
Glade has a few components to its interface. In the middle, you can see the current interface on which you are working. There, you can click on widgets to highlight them, move them around, delete them and more. The collection of icons on the left of the main Glade interface is called the Tool Palette, and it provides a wide range of widgets you can use in your application. Simply click on a widget, and then click in your application window to add it.
To the right of the Glade interface are two main areas. At the top, you can see the widget hierarchy. This shows that widgets are part of other widgets. Many widgets act as containers for others. As an example, a button typically has a label on it with some text and the label (a gtk.Label) sits inside the button (a gtk.Button).
Below the widget hierarchy is a collection of tabs that all reflect settings for the currently selected widget. As an example, if you click on the image of the circle of friends (the Ubuntu logo) in your application interface in Glade, you can see the contents of the widget settings area adjust to show the available settings for a GTK image widget. If you click on the text above the image (which is called a GTK Label), you will see the settings reflect that widget too.
Now, let's adjust the interface to reflect this simple application. Having clicked on the label, change the text that is displayed by looking at the widget settings on the right of the main Glade window, and look for the label option. In there, delete the existing text, and enter the following text: “Type in a search term below:”. You should see the label in your user interface change.
With the label complete, you don't really need the circle of friends image, so click it and press the delete key. When the image is deleted, you will see a gray space open up behind it. This is an empty part of your interface where you can put another widget. It's also rather convenient, because you will want to fill this space with a text entry widget where your users can type in their search terms.
To add a widget, use the tool palette area on the left side of the main Glade interface window. In the Control and Display section, hover over the icons until you find the Text Entry item (typically, it's the third icon down on the left). Click it, and then click in the gray space that opened up when you deleted the image. You now should see the text entry appear, and your user interface should look like Figure 3.

Figure 3. Text Entry
With the widget there, you should name it. All widgets in your interface can be referenced throughout your code, and you often will use this name to reference them. To do this, go to the widget settings area on the right of the Glade interface, and in the Name option, enter “search_box” as the name. You can call the widget whatever you like, but I usually refer to what it does (for example, search) and then use an underscore and add the description of the widget (for example, “box” for a text box). This makes it easy to determine what the widgets do when reading your code.
Before continuing, let's take a brief break from the tools to discuss a key aspect of how graphical programs work—a technique known as Event Driven Programming. It's a fairly simple idea. When users interact with one of the widgets in your program, it will trigger behavior that you want. For instance, in this example program, you want users to enter a search term into the text box, and when they press the Enter key, the program will search for the term in a Web browser.
When you interact with a widget in a certain way, it generates a signal to indicate what you did to the widget. In this case, you are interacting with a text box widget, and there are a range of signals for different ways of interacting with it, such as copying text to the clipboard, pasting text in there, moving the cursor with the arrow keys, typing in a letter and more. This example application is specifically intended to search Google when users press the Enter key (pressing Enter typically indicates they have finished typing), so it's a good time to trigger the desired behavior.
The way this works is you will use Glade to specify which handler in your program code you want to call when a particular signal is generated. In this case, the signal that is generated when you press the Enter key is called activated, and soon you are going to create a handler called search_for_term in your code to respond to the signal.
To make this connection, ensure that the text box currently is highlighted in Glade, and in the widget settings, click the Signals tab. There you will see a list of signals in the Signal column. Now, click in the space to the right of the activated signal, and in the Handler column, enter “search_for_term” as your handler. Now, click File→Save to save your work in Glade.
With the user interface complete, now let's write the search_for_term handler that performs the search. To edit your program's code, simply use the edit command in the terminal:
quickly edit
This will fire up each of your source files in your project into the default Ubuntu text editor, gedit. A number of different source files will load, but most of the action happens in the myapp file. This is the main Python program that is executed when you run quickly run.
The code you need to write to take the term entered into the search box and search Google with it is pretty simple, and you can use the webbrowser Python module to help. In the myapp file, after the import gtk line add: import webbrowser.
This imports the webbrowser Python module, which loads URLs into the system's default Web browser.
Now, scroll down, and after the on_destroy handler, add the following after the gtk.main_quit() line:
def search_for_term(self, widget, data=None):
    """Search for the term entered"""

    searchurl  = "http://www.google.com/#hl=en&source=hp&q="
    searchterm = searchurl + widget.get_text()
    webbrowser.open_new_tab(searchterm)
Here, you add the search_for_term handler, and it has three arguments that are passed to it:
self: all class methods are passed self, this is normal Python.
widget: this is a reference to the widget that called the handler. You can use this to get information from the text entry widget.
data=None: when you call a handler, you can pass it additional data if you like, but you can ignore this for this example.
When this handler runs, first construct the final search term by concatenating “http://www.google.com/#hl=en&source=hp&q=” and the content that was typed into the search box. To get this content, use the widget that was passed to the handler automatically. This is a reference to the text entry widget and can be used to run any of the methods that are part of the gtk.Entry text entry widget. One such method available is get_text(), which simply returns the text that was entered. As such, concatenate this with the Google URL, and you now have a complete URL you can pass to the Web browser. For example, if you typed in “chickens”, the full URL would be “http://www.google.com/#hl=en&source=hp&q=chickens”.
To pass the URL to the browser, use the webbrowser module and its open_new_tab() method that opens a new tab with the URL that you pass it.
With the code complete, let's run it to double-check that everything works:
quickly run
You now should see something similar to Figure 4 in which you can type some text, press Enter and see the results in your browser. If you see some errors in your terminal, be sure to double-check that you typed in everything correctly.
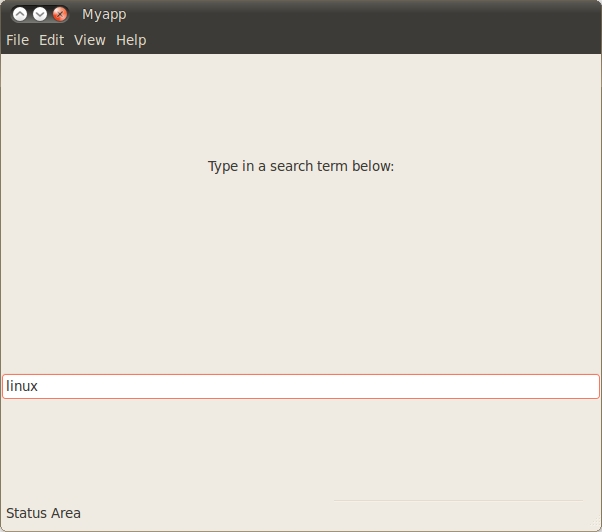
Figure 4. Myapp Main Run
Quickly is an incredibly simple and powerful tool for generating applications, and I barely have scratched the surface of what is possible with it. You can find out more about using Quickly by visiting wiki.ubuntu.com/Quickly.
Jono Bacon is the Ubuntu Community Manager at Canonical, author of The Art Of Community published by O'Reilly, founder of the Community Leadership Summit and co-presenter on Shot Of Jaq and FLOSSWeekly.


