
Doing IT the App Engine Way
Google first announced its App Engine technology in 2008. The Internet's search superstar will host your Web application (webapp) on its infrastructure, initially at no charge. Only when your webapp gets “busy” will Google start charging you. By “busy”, Google means something in the range of five million “page views” per month. Hit that threshold, and Google will come looking for your credit-card details.
Apps for Google's App Engine are written in Python (with Java recently added to the mix). As most of you know, Python's creator (Guido van Rossum) works for Google and spends a reported 50% of his time working on Python's ongoing improvement and the developer ecosystem that surrounds this increasingly popular general-purpose programming and scripting technology.
Unlike most other webapp development technologies and frameworks that require you to host your webapp yourself (or find a friendly cost-effective ISP to host your webapp and its dependent technologies for you), Google's App Engine abstracts away the hosting part. Simply build your webapp to the App Engine standard, upload it to Google, and it's then deployed in the Google “cloud”. Google handles backups, load balancing, spikes in access, deployment, caches and the like. All you have to worry about is your code, as there's no more deployment distractions. And, when it comes to App Engine, it's all about the code, which is just how we programmers like things, isn't it?
In this article, I explain how to build a very simple App Engine project using the Python API. By the time you've worked through to the end, you should know enough to be in a better position to decide if Google's App Engine is something you want to spend more time learning.
Most modern webapp technologies are organized around the Model-View-Controller pattern (MVC). In essence, an MVC-compliant webapp is divided into three parts: the model handles interactions with your webapp's data, the view looks after the user interface, and the controller provides the application or business logic that glues everything together. In theory, changes to how your webapp looks (the view) should not significantly affect how your webapp stores its data (the model), or at least any effects should be minimal and localized. Of course, the MVC pattern can be applied to any application domain, but it is particularly appropriate within the Web context, as each component is (typically) physically separate from the others. For instance, your view code runs within a browser on your client PC. Your controller code runs on your Web server, and your model may be deployed on some sort of datastore, which may or may not run on its own hardware.
App Engine conforms to the MVC pattern, and what's nice about App Engine is that each of the MVC components is realized in code files that are easy to keep separate from one another. You can put your code into one big source code file if you like, but to be honest, all but the most trivial webapps benefit from splitting out each MVC component into its own source file.
Of course, App Engine doesn't really care how you structure your code (only that it's correct), nor does App Engine care how your webapp operates. If you want to write a basic CGI webapp, you can. You can use Python's WSGI standard too, which is the standard we'll use here. So, let's learn what's involved by building a simple MVC-patterned webapp with Google App Engine.
To build an App Engine webapp, you need two things: Google's App Engine SDK and release 2.5 of Python.
Although you'll deploy your App Engine webapp to Google's cloud, during development, it is possible to test your webapp on your local machine. All you need is a copy of the App Engine SDK, which is easy to get. Go to the App Engine download page (see Resources) and click on the link for the Python SDK. From the page displayed, select the Linux download (which is a ZIP file at the time of this writing). The current App Engine documentation as well as a Google Plugin for Eclipse also are available for download (should such things interest you).
With the download complete, installation is a breeze. Simply unzip the downloaded file into a directory of your choosing. I unzipped into my HOME directory, and a new directory called google_appengine was created.
Since the end of 2008, Python comes in three distinct flavors: the standard 2.5 release (which maintains backward-compatibility with the installed base), the 2.6 release (which is designed to bridge the move from the 2.5 release to future releases) and release 3 (which is the new, backward-incompatible Python). App Engine targets a customized and optimized version of the 2.5 release of Python that runs in Google's cloud. You can try to run your webapp under 2.6, but my experience has been less than satisfactory, although it can sometimes work. The 3.1 release of Python currently is not supported, so don't waste your time trying to use it with App Engine.
For this article, I'm using Fedora 12. I used to eat, sleep and breathe Red Hat Linux (then Fedora), but like a lot of other Linux users, I was tempted away by the promise and then delivery of a friendlier desktop experience with Ubuntu. As luck would have it, I recently received the latest edition of Mark G. Sobell's book (see Resources), which includes Fedora 12 on DVD. Installation, as expected, was straightforward. However, Fedora 12 comes with Python 2.6 pre-installed, and I needed the 2.5 release.
A feature of Python that I love is that multiple versions of the interpreter can happily co-exist on your system. On my systems (desktops and laptops), I have releases 2.5, 2.6 and 3.1 installed. Only one of these releases is symbolically linked to the /usr/bin/python (usually the 2.6 release), but I can invoke the other releases using one of these command lines:
python3
python2.5
Deploying release 2.5 of Python on Fedora wasn't an issue. It's the usual tar -zxvf, configure, make and make-install four-step. As expected, the Fedora DVD pre-installed all the development tools required to let me build Python 2.5 from source without any issues.
Unlike technologies, such as Ruby on Rails or Django, which provide a collection of helper scripts to get you up and running quickly, App Engine forces you to do all the work yourself. Thankfully, this is not a huge effort. To demonstrate, let's create a new project with the rather imaginative name, myapp. Create the initial directories and files required in your HOME directory with these commands:
mkdir myapp && cd myapp
mkdir templates && touch app.yaml
The above commands create some required directories (more on these later) as well as the main App Engine configuration file: app.yaml. You edit this file to tell App Engine all about your webapp. Add the following configuration directives to your YAML file:
application: myapp
version: 1
runtime: python
api-version: 1

handlers:
- url: /.*
  script: myapp.py
The application line identifies your webapp, and the value needs to match the name of the directory you just created to house your project. Use the version value to indicate the release of your webapp to which this YAML file refers (this value also is used by Google's cloud to refer to different versions of your webapp, should they exist). The runtime line tells the App Engine for which platform you are coding, and the api-version value indicates what version of the API you are using.
The remaining three lines tell App Engine what to do with any Web requests destined for your webapp. It is useful to think of these handlers in the YAML file as high-level, application “routing directives”. The bit after url is a regular expression that (as all regex gurus will tell you) matches anything that starts with a /, followed by any string (or nothing at all). What's happening here is that any URL received by App Engine on behalf of your webapp is going to be redirected to the script identified on the script> line, which in this case is called myapp.py. At the moment, no such script exists, so let's fix that.
To demonstrate how an App Engine webapp is put together, let's build a simple Web page that lets users submit their e-mail addresses with a message. These two pieces of data are stored in the Google cloud. A second page displays the e-mail addresses and messages on-demand. Granted, this isn't a hugely exciting webapp, but it's enough to demonstrate the basics of the technology and for you to get started with something “real”. Of course, it is possible to build this using App Engine's CGI mechanism (which works exactly as you would expect), but as this application is destined for greatness, let's code to Python's WSGI standard instead. Let's also build the webapp to conform to the MVC pattern.
As you plan to store some data in this webapp, you need somewhere to put it, which means you need a model. App Engine provides an API to Google's “cloud” datastore. All you need to do is define a Python class that inherits from db.Model, then create the required data fields. For the webapp, you need a field for the e-mail address and the associated message. To keep things manageable, let's put your model code in its own file, called myappDB.py:
from google.appengine.ext import db

class UserComment(db.Model):
    cust_email   = db.StringProperty()
    cust_message = db.TextProperty()
There's not much to this model code. It simply imports the db module from App Engine, creates a new class called UserComment and creates class instance variables for each data field. As App Engine's StringProperty type is limited to 500 bytes, you need to specify TextProperty for the user message, just in case someone has a lot to say.
With the model defined, you can create the rest of your code. Create a file called myapp.py and pop the following code into it. Note that the code in this section is all contained in one file, but it's split up here so I can describe its function to you. Start with your imports:
import wsgiref.handlers

from google.appengine.ext import webapp
from google.appengine.ext import db
from google.appengine.ext.webapp import template

import myappDB
After importing the Python-standard WSGI reference implementation, three libraries are imported from App Engine: webapp provides a simple Web framework, db provides access to the App Engine datastore, and template provides access to App Engine's standard templating system (which is based on and built from Django's). Note that you've also imported the just-created myappDB module, which brings your model definitions into this program.
Every webapp needs to be told what to do when a user sends a default request from a browser to a server. Typically, this is requesting the index or home page. The first request handler provides that functionality:
class IndexHandler(webapp.RequestHandler):
    def get(self):
        html = template.render(
            'templates/index.html', {}
        )
        self.response.out.write(html)
You've created a new class called IndexHandler that's inherited from webapp's RequestHandler. Within the class, a Python method called get is invoked whenever a request for the default page is processed. The method renders a template called index.html within the templates directory and assigns the rendered page to the html variable, which then is sent to standard output as the HTTP response, which eventually makes its way to the browser. The second parameter to the render() method is an empty hash (or “dictionary” to use the correct Python terminology). It's possible to send data (template variables) to the template engine, but you don't have to in this instance. The convention is to send an empty hash when there's no data for the template engine to process. I explain how to create templates later in this article. For now, note that any HTML used by your webapp is stored in the templates directory, which helps segregate view code from controller code.
The functionality required to leave a message has two parts. The first presents a small form that allows users to enter their e-mail addresses and messages. The second takes the submitted form data and stores it in the Google cloud. Here's a request handler class that implements both parts:
class LeaveCommentHandler(webapp.RequestHandler):
    def get(self):
        html = template.render(
            'templates/comment.html', {}
        )
        self.response.out.write(html)

    def post(self):
        comment = myappDB.UserComment(
            cust_email = self.request.get("c_email"),
            cust_message = self.request.get("c_message")
        )
        comment.put()
        self.redirect("/comments")
The get method in this class is essentially identical to the get method in the previous class, except in this method, you are rendering a different template called comment.html. The post method (which you didn't have in the last class) responds to a POST request sent from a browser. In other words, when users fill in the form rendered by the get method and then click the submit button, the data on the form is delivered to this request handler's post method. The code in your post method first creates a new instance of the model data by extracting two named form fields from the posted data (referred to as c_email and c_message in the HTML form). The submitted data is assigned to the data fields defined in the model and then stored in Google's cloud with a call to comment.put(). With that done, your code immediately redirects to a different URL (/comments), which causes another request handler's code to activate. That is, of course, assuming you have the “/comments” handler code written. And, here it is:
class DisplayCommentsHandler(webapp.RequestHandler):
    def get(self):
        comments_query = myappDB.UserComment.all()
        comments = comments_query.fetch(1000)
        html = template.render(
            'templates/comments.html',
            {'comments': comments}
        )
        self.response.out.write(html)
Your DisplayCommentsHandler code provides only GET functionality, as that's all that's required. Using App Engine's functional interface to the datastore, your get method first creates a query that asks for all the UserComment data, before fetching the first 1,000 comment-pairs from the query results. Your code then renders the comments.html template, passing in the (up to 1,000) comment-pairs to the templating engine. The rendered HTML returned from the template system then is sent to standard output as the HTTP response.
The limit of 1,000 is imposed by App Engine on all running webapps and is designed to limit the potential harm a “rogue” webapp could do to the App Engine infrastructure if left unchecked. By limiting the number of rows of data that can be fetched at once, App Engine can attempt to ensure that no one webapp hogs all of its resources. It's not really much of restriction. How many Web pages attempt to display more than a few hundred database records at a time? Obviously, if you have more than 1,000 rows in your datastore, you need to write some extra code to cycle through your data, 1,000 rows at a time, until you've exhausted it all.
Unlike the previous two request handlers, this latest one sends data to the templating system. The comment query results (a collection of e-mail addresses and messages) are passed to the template for further processing.
You may have noticed that there's no SQL used in the get method within the DisplayCommentsHandler request handler. Instead, you've used App Engine's API to request all the data from the datastore, from which you've then fetched 1,000 rows of data. Google's datastore technology, an integral component of App Engine, doesn't support SQL. It turns out that the datastore is not a relational database. Instead, it's based on Google's BigTable technology, which is a different beast altogether. Google does provide a query language of sorts in the guise of GQL, which looks a lot like SQL but doesn't do everything you are used to being able to do with SQL. For instance, there are no joins in GQL. Check out the App Engine datastore documentation for all the details to see if no SQL will be a deal-breaker for your app.
With the request handlers defined, all that's left to do is connect your application's URLs to the request handlers. Recall that the app.yaml file already has arranged for every URL request directed to your App Engine webapp to be handled by your myapp.py program. So, the question is, when the request gets to your program, what happens next? The answer is that your myapp.py program handles it, of course! When you imported webapp, you inherited functionality that allows you to link your URLs with your request handlers. Here's the code you need:
def main():
    app = webapp.WSGIApplication(
        [ ('/comment', LeaveCommentHandler),
          ('/comments', DisplayCommentsHandler),
          ('/.*', IndexHandler)],
          debug = True
    )
    wsgiref.handlers.CGIHandler().run(app)
The WSGIApplication constructor takes a list of tuples detailing which URL invokes which request handler. Each of the URLs in the tuple list are regex patterns that are checked for a match to the URL that has been delivered to your program. If a match is found, the request handler is invoked. Note that in this code, you need a “catchall” regex to do something sensible when a delivered URL does not match one of the URL patterns. Here, you arrange to invoke the IndexHandler when no match is found. You've also switched debugging information on, which is useful during development, but it should be switched off when you deploy. With the URL routes ready, a call to the run method provided by wsgiref.handlers.CGIHandler starts your webapp.
The URL-routing and application-starting code is contained within the main function. This is deliberate, as App Engine looks for this function when initially loading and reloading your webapp. Its existence allows App Engine to optimize and cache your webapp. It also allows App Engine to avoid having to load your application every time a new request occurs, a criticism that continues to haunt CGI to this day. Of course, to test your webapp locally, you need to tell Python how to start it, which is accomplished with the classic Python idiom:
if __name__ == '__main__':
    main()
And, that's it for your controller code. You've created code that does what you require when a URL request is sent to your webapp. All that's left is to create your view code, which, in this simple app, is a small set of HTML templates.
The first template is rendered when no URL or the default URL is matched during the routing process. It's rendered by IndexHandler, is stored in your templates directory, is called index.html and looks like this:
<html>
<head><title>Welcome!</title></head>

<body>
Either <a href="/comment">leave a comment</a>
or check out what
<a href="/comments">other people are saying</a>
about this webapp.
</body>
</html>
As you may notice, the index.html template is plain HTML. It displays a welcome page that offers your site's users the option to leave a new message or see all the messages already submitted (Figure 1). Granted, this HTML is trivial, but critically, it is stored separately from your code, which maintains the goal of the MVC pattern.
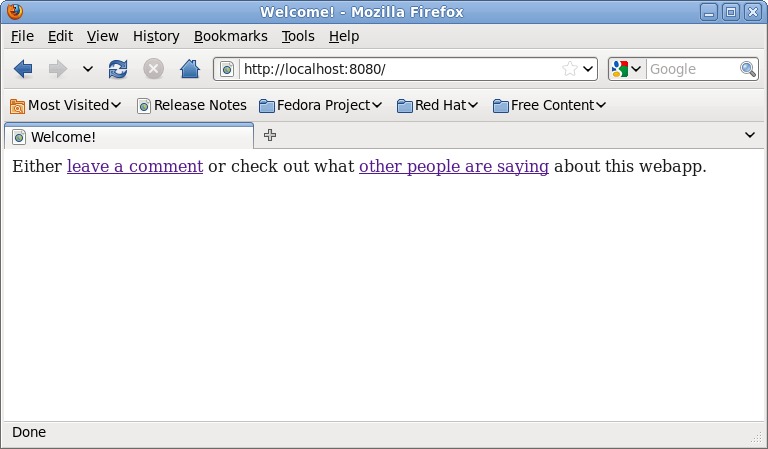
Figure 1. The Index Request Handler Page
When users click the leave a comment link, a request routes to LeaveCommentHandler's get method, which renders another template called comment.html, which, again, resides in the templates directory. Here's this template's HTML:
<html>
<head><title>Leave a Comment</title></head>

<body>
<form action="/comment" method="POST">
<p>Enter your e-mail address:
<input type="text" name="c_email"></p>

<p>Enter your message (be nice):
<textarea name="c_message" rows="5" cols="50"></textarea></p>

<p><input type="Submit" value="Submit your comment"></p>
</body>
</html>
Again, this is standard HTML. A form is rendered to the screen (Figure 2), and the form solicits an e-mail address and message from the user. Note the names assigned to each interface element in the HTML. Also, note that the form's action tag is directed back to the /comment URL. When users submit the form, the data is posted to App Engine, which results in the post method executing within your LeaveCommentHandler request handler. This code creates a new row of data from the submitted data (note how the names match) and saves it to the datastore. The code then redirects to the /comments URL.
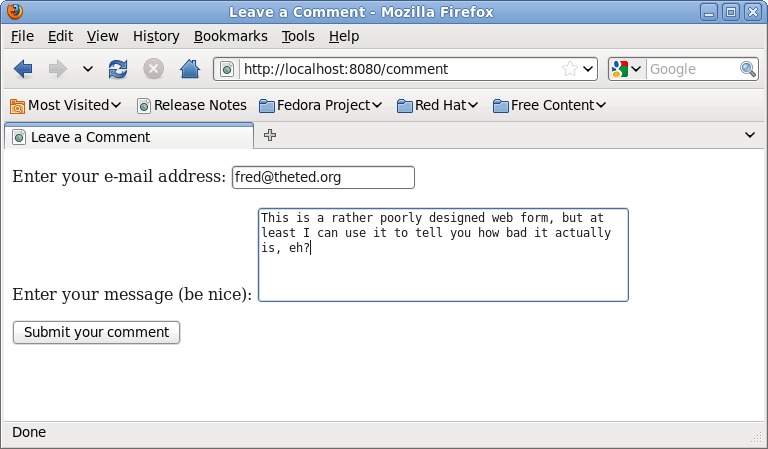
Figure 2. The Leave a Comment Form
When App Engine sees the /comments request URL, it invokes the DisplayCommentsHandler request handler's get method, which fetches 1,000 rows of data from the datastore and then sends the data to the comments.html template for rendering. This final template looks a bit more like a “real” template:
<html>
<head><title>Here are the User Comments</title></head>

<body>
<p>Here are the comments.</p>

{% for c in comments %}
    <p><b>{{ c.cust_email }}</b> said:
    <i>"{{ c.cust_message }}"</i></p>
{% endfor %}

</body>
</html>
This is the final template that contains templating instructions, which are included to process the data that the request handler sent to the template engine when the template was invoked in your controller code. Anything enclosed within {% and %} and within {{ and }} is template code; everything else is standard HTML. App Engine's templating technology is based on Django's, which is a popular Python-based Web application framework. Code found within {% and %} is executed, whereas code found within {{ and }} is a value substitution. This template takes the comment query results passed to the template and displays each row within some custom HTML. The rendered results are shown in Figure 3.
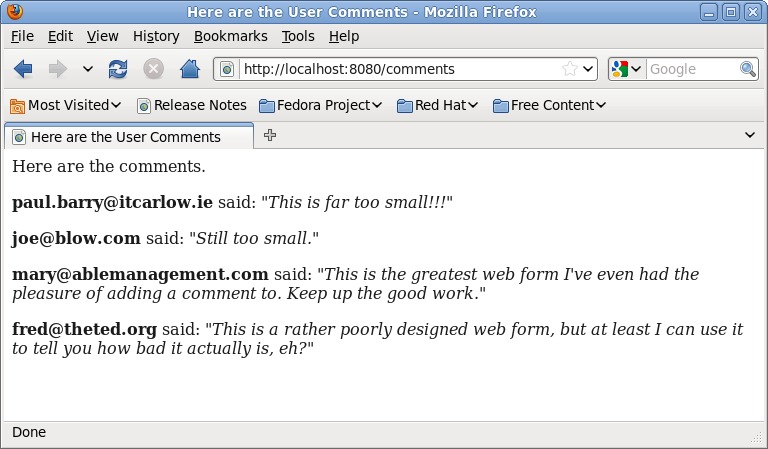
Figure 3. The Displayed List of Comments
Testing your application locally is complicated (only slightly) by having to ensure that you use the correct version of Python, namely the 2.5 release. If you have been following along, you should have App Engine installed in its own directory in your HOME directory, as well as your webapp code in a directory called myapp. To start your webapp from your HOME directory, open a shell and use this command:
python2.5 google_appengine/dev_appserver.py myapp/
A bunch of status messages will appear in the shell, and if all is well, the development server will inform you that your webapp is up and running on http://localhost:8080. Fire up your favorite browser, surf to your webapp and give it a spin. You should see behaviors similar to those shown in Figures 1, 2 and 3.
App Engine includes an administrator interface to your webapp that can be accessed via the Web. To see it, point your browser at http://localhost:8080/_ah/admin. Figure 4 shows the interface to the datastore entries I created. The interface lets you inspect and edit each of your entries in the datastore (as well as create new ones). Each entry has been assigned a unique Key and ID value by the datastore automatically. These values are often used to retrieve a specific entry from the datastore.
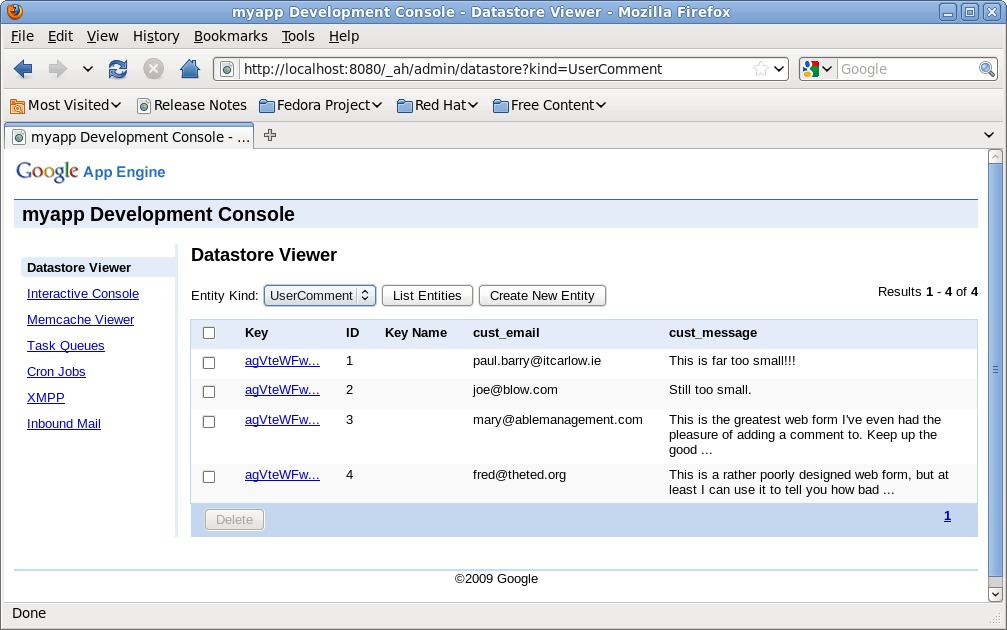
Figure 4. The App Engine Admin Interface
With your testing complete, you're ready for deployment. To do this, follow the deployment instructions on the App Engine Web site. This involves signing up for a Google ID (you already have one if you use Gmail or Wave), selecting a unique name for your webapp and requesting a seven-digit Google App Engine Code (which you need to activate your webapp and which is sent by SMS to your cell phone). With all of that in place, upload your code to Google's cloud from your HOME directory using this command:
google_appengin/appcfg.py update myapp/
Of course, it doesn't end there. App Engine has so much more, including integration with Google's user management and login system, security enhancements, memcached integration and validation technologies, among other things. I recommend reading Using Google App Engine and Programming Google App Engine, both from O'Reilly Media (see Resources). The former is an extended tutorial introduction to App Engine using Python, and the latter is a reference that targets both the Python and Java APIs. At the time of this writing, the other technical publishers have App Engine books at an advanced stage of development (most notably Manning). Apress also has a series of Google books. Another project worth keeping an eye out for is the upcoming Google App Engine video tutorials (again) from O'Reilly Media.
As I mentioned earlier, Google lets you get started with App Engine for free. When your site becomes popular, Google asks you to pay for the hosting services it provides. The busier your site, the more you pay, and costs are pretty much in line with what you'd expect from a reasonable-size ISP. If your site traffic remains modest, you may never have to pay for App Engine's hosting service. But, do you pay in other ways? Consider the following: once your code is uploaded to App Engine, you can't retrieve it. You can update it, but you had better keep a local copy as your own backup should you wish to transfer the business logic you've embedded in your webapp to another platform. Then, there's your data. It lives in the Google cloud, and what that means really depends on whom you ask. App Engine keeps your data away from others, but you are trusting Google to mind it for you.
App Engine is built on top of open-source Linux, with Python and Java APIs, which also are both open technologies. But, these facts alone do not make App Engine open. Far from it, this is as vertically closed a system as Apple's iPad. Be aware of what you are giving up when you decide to develop for this particular “free” Google platform. If you're okay with vendor lock-in, and if you trust Google with your data and your application, Google App Engine may be for you.
Resources
The Google App Engine Download Page: code.google.com/appengine/downloads.html
A Practical Guide to Fedora and Red Hat Enterprise Linux, 5th ed., by Mark G. Sobell, Prentice-Hall, PTR, 2010: www.pearsonhighered.com/educator/product/Practical-Guide-to-Fedora-and-Red-Hat-Enterprise-Linux-A/9780137060887.page
Using Google App Engine, by Charles Severance, O'Reilly Media, 2009: oreilly.com/catalog/9780596801601
Programming Google App Engine, by Dan Sanderson, O'Reilly Media, 2009: oreilly.com/catalog/9780596522735
Paul Barry (paul.barry@itcarlow.ie) lectures at The Institute of Technology, Carlow in Ireland. He recently completed Head First Programming, which he cowrote with David Griffiths. As he's a sucker for punishment, he's now working on Head First Python, to be published by O'Reilly Media in late 2010.


