
Introduction to LINCKS
LINCKS is a multi-user, client-server, object-centered database system built on top of a storage server called NODE. The storage server provides LINCKS with an append-only, object-centered database and object development history (“from which object was this object created?”), temporal history (relationship between objects), and optional command history (which is not enabled by default). An object consists of an image section, where anything can be stored (text, images, sounds, etc.); a set of attributes which, in a sense, types the object; and a set of links to other objects.
The current main user interface, xlincks, is an X11 application that allows you to edit and browse a LINCKS database in a hypertext fashion, using Emacs-like commands. xlincks provides a basic environment for document editing in a work-group setting, but provides only limited mark-up facilities at this time. The hypertext nature of LINCKS, together with the advanced view support, allows easy sharing of information and re-use of parts of documents (section, subsection, or paragraph) simply by creating links to the parts to be used.
A view is a definition of how to present the data to the user. You can define your own views, which are stored and edited like any other objects in the database. You define the logical structure (parts and their order), the location in the database from which to retrieve the different parts and the formatting attributes for the objects. By applying different views to the same objects, you are able to look at a document, for example, as a “full document”, as a “document overview”, or as only the highest level, the table of contents. Any editing of an object performed in one view is automatically propagated to all views built from (containing) the same object.
Also, when several users edit the same documents in a database, LINCKS issues warnings when parallel editing of the same object (a section, subsection, paragraph, etc.) occurs. Thus, you can coordinate your work with other people working with you using a secondary channel (email, talk, telephone, etc.) for synchronization.
LINCKS has its origin as a research database system, developed at the Intelligent Information System Laboratory at the University of Linköping, Sweden. We released LINCKS under the GNU GPL in the Autumn 1993, to gain feedback from outside researchers and users. Since then, we have ported LINCKS to SunOS 4.1.x, SunOS 5.x, Ultrix, AIX, Dynix, Linux, HP-UX, IRIX, SCO, 4.3BSD Reno, and DEC OSF/1 Alpha. It is running under X11R5, X11R6, and OpenWindows (and even X11R4, but not with full functionality). We ported LINCKS to Linux to enable us to run demonstrations on a portable unix box.
To run LINCKS, you must be running the RPC port-mapper (normally started from /etc/rc.d/rc.inet2), a kernel with TCP/IP, and X11 for xlincks. Also, you will need at least 8MB of RAM to run the database servers and the X11 application interface xlincks on the same machine.
To install the LINCKS binary distribution (lincks2x.ybin.tgz), you first should create a new user who will own the database, perhaps called “lincks” (It is not a good idea to install LINCKS as “root”).
As root, cd / and un-tar the zipped tar archive.
If you created a special LINCKS user, change the owner of all the files in /usr/local/lincks/ directory by typing chown -R lincks /usr/local/lincks.
Then make /usr/local/bin/dbpasswd set-user-id “lincks” by typing chown lincks /usr/local/bin/dbpasswd and chmod +s /usr/local/bin/dbpasswd to enable users to modify their own passwords, even though the files are owned by “lincks”
Finally, running as user “lincks” start the database server by typing lincks -s /usr/local/lincks/DB
The next step is either to continue reading this article or run the interactive tutorial. To start the on-line tutorial, you invoke xlincks with xlincks/usr/local/lincks/DB. You will be prompted for your LINCKS login and password; give the user name “demo” and the password “demo”.
The following is the LINCKS directory hierarchy:
usr/local/man/{manl,catl} for formatted and preformatted manual pages
usr/local/bin/ for the LINCKS programs
usr/local/lincks/ is the main LINCKS directory with a “ready-to-run” database in the DB subdirectory, postscript documentation, FAQ, README, etc. The bitmaps subdirectory contains X11 bitmaps which might be missing on few systems.
LINCKS consists of eleven different programs which can divided into three different classes: the database server (monitor, netserv, and dbs); general utility programs (dbpasswd, dbdump, dbroot, t2lincks and cutoff which are normal clients), and the main application program (xlincks).
Both the application program and the utility programs take the last argument to be a path to a directory with the LINCKS database files. If you are only running one database server, or if you get tired of typing the path to the database directory, simply set the environment variable LINCKSDBDIR to point to this directory and omit the path. A typical database directory might look like:
-r--r--r--   1 lincks   iislab      33554 Aug 23 01:27 .fonttrans
 -rw-r--r--   1 lincks   iislab         18 Sep 18 19:30 .indexfile.lock
 -rw-r--r--   1 lincks   iislab        158 Aug 23 01:28 .lincksrc
 -rw-r--r--   1 lincks   iislab     592883 Aug 23 02:07 1.dat
 -rw-r--r--   1 lincks   iislab      82368 Aug 23 02:07 1.mol
 -rw-r--r--   1 lincks   iislab          6 Aug 23 01:56 data.names
 -rw-------   1 lincks   iislab        494 Aug 23 01:27 groups
 -rw-r--r--   1 lincks   iislab      61944 Aug 23 02:07 index
 -rw-r--r--   1 lincks   iislab          6 Aug 23 01:56 molecule.names
 -rw-r--r--   1 lincks   iislab        305 Jun 28 17:08 passwd
The .lincksrc is the configuration file which tells the LINCKS software where to find the database directory, log file directory, executable, TCP/IP port, etc. The passwd file contains a user name, a user id, and an encrypted password for each user. Access protection is defined by the groups file and by an optional wrgroups file. The dbs processes, stores, and retrieves objects and their contents in the 1.dat and 1.mol files. The monitor process uses the index file for storing the object identifications for each object. The *.names files contain the names of all the *.dat and *.mol files, which hold the actual data.
Whenever a LINCKS program accesses the index file, it must create a .indexfile.lock file, which contains the program name, its process id, and current host name. For more information, please see the LINCKS System Administration Manual.
The monitor process serializes object creation, imposes access control, and provides for parallel editing notifications. The monitor allows you to define which objects a particular user has read and write access via the group file and the optional wrgroups file.
The netserv process handles connections from all clients. After validating the user name and password against the passwd file (which is changed using dbpasswd), netserv forks and creates the dbs process for each connected client.
Each dbs process interacts with one client. It retrieves and stores objects in the *.dat and *.mol files using the monitor to ensure unique object identifiers and to synchronize access to the common database files. The dbs process dies when the client process closes the connection.
The lincks program is used to start a LINCKS database server. If the database server is interrupted by a system crash, an .indexfile.lock file exists, but no LINCKS software is running. You will receive a warning message. Just remove the lock file (first check for a running process, please!) and re-execute the lincks command.
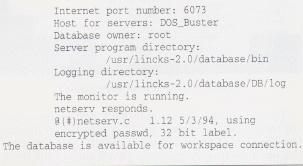
The dbstat utility is used to check for a running database server (monitor and netserv). dbstat connects to the netserv and monitor processes and returns some status information, as shown in Figure 1, dbstat
You use dbpasswd to add or to change a user's password. It is installed suid to enable every user to modify his or her own password, which is encrypted by default. When you add a new user, you must edit the passwd, groups and, if you use it, wrgroups files by hand. When you are finished editing, restart the database server to enable the monitor to re-read the protection files.
To export or dump a LINCKS database, use the dbdump program, which exports a whole LINCKS database in text format. If you have stored any binary object in the database (images, sounds, object code, etc) dbdump will create a file for each of the binary objects. You use t2lincks to import an exported database. Of course, t2lincks can also be used to import an object or any information into a database—registers or articles, for example—as long as it is in the proper format (see the t2lincks manual pages).
The two last utilities are not used very often—dbroot creates a completely empty database (it destroys any existing objects in the database if any already exist). You only run dbroot when setting up a new database. To garbage collect a LINCKS database run cutoff, which removes all objects which are not referenced by any other objects.
To edit and browse a LINCKS database, you have to use the X11 interface application program, xlincks. If you are using a small screen, you would probably like to change the .Xdefaults as described in LINCKS.FAQ. Also, you might install lincks2x.ydb.tgz, which contains a database using smaller fonts. If you are installing LINCKS from the source distributions, see the script DB/scalefonts.
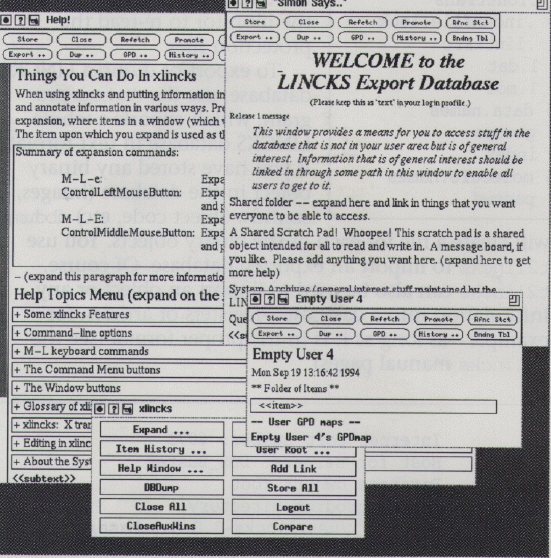
When started up, xlincks will create a series of windows. For each one, use the mouse to place it where you want it, then click the left button. (In these directions, if the mouse button is not otherwise specified, use the left button.) One of the windows should be the xlincks command menu (see Figure 2, “Logged in as emptyuser4”).
Much of the information in a database is organized hierarchically. When you start up xlincks, you should get one or more windows which are your entry points into the database. In Figure 2, we have logged in as user emptyuser4. To see more of the database, “expand” (see “expanding” below) some item in a window, thereby using it as the root of a new window.
Figure 2. Logged in as emptyuser4
The following convention is often used: <<xxx>> usually means “xxx” is a placeholder. A placeholder indicates that the view calls for something of type “xxx” to be in this place. Editing the placeholder will then create something of type “xxx” in the database. A box (frame) around an item often means that it's something that can be expanded. This is, however, simply a convention used by some views.
There are two kinds of on-line help: the help text associated with a particular button in the command menu and on-line documentation. You get the button help text by clicking on the button, about which you wish to know more, using the right mouse button.
When you log in, you should get a window called “Help!” All of the on-line documentation is organized under this window. You can “expand” the appropriate items to see the documentation. This is not true for the tutorial account, but there is a button in the command menu called “Help Window ...” which will bring up the “Help!” window if you click on it.
To expand something, click with the left mouse button on the thing you want to expand, while at the same time holding down the “Control” button. This will open a new window. The key command meta-l meta-e has the same effect. Or you click with the middle mouse button on the thing you want to expand while at the same time holding down the Control button; this will expand the item and reuse the window. The key command meta-l meta-E (note the capital E) has the same effect.
The previous paragraph described how to expand something using the default view, or GPD (General Presentation Descriptor) in LINCKS parlance. To expand something using a view other than the default, click on the “Expand ...” command menu button, which will bring up a menu of GPDs. Next, click on the item you wish to expand and then click (in the menu) on the GPD you wish to use. For example, if you wish to see something in “node view” (the entire database object), click on the item you want to see, bring up the menu, and click on the menu item “node”.
Using xlincks, log in using user name emptyuser4 and password emptyuser4. You should get the windows, as in Figure 2.
First, we'll add a link in the “Empty User 4” window to the “Help!” window:
Click on the item to which you wish to have a link (the source), in this case, the line “Things You Can Do In xlincks in the ”Help!“ window”, then
Click on the item after which we wish to put the link (the destination), that is the <<item>> in the “Empty User 4”.
Finally, click on the command menu “Add Link” button in the command menu.
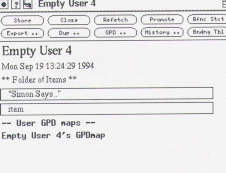
Now the “Empty User 4” windows should look as in Figure 3, “After adding a link”. For fun, try to expand the “Simon Says” and see if you really get the “Help!” window.
Figure 4. After inserting a plural item
Now we'll start writing our upcoming article for Linux Journal about “Linux on the Road”. We prefer to store the article in our home directory (the “Empty User 4” window). First, move the cursor to the “Simon Says.” line in “Empty User 4” window. Then, insert a new item in folder view by giving the command meta-l meta-i (insert closest plural), which will create a sibling of the current item. (See “The xlincks User” manual or the next part of this series for more information.)
Now, replace the “item” as displayed in Figure 4, “After inserting a plural item”, with ”Linux on the Road“.
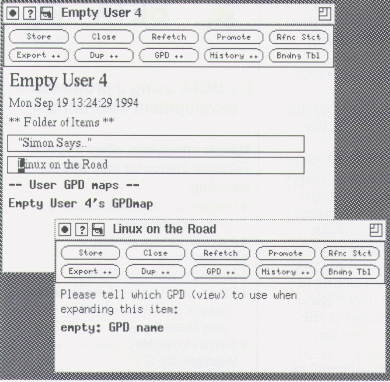
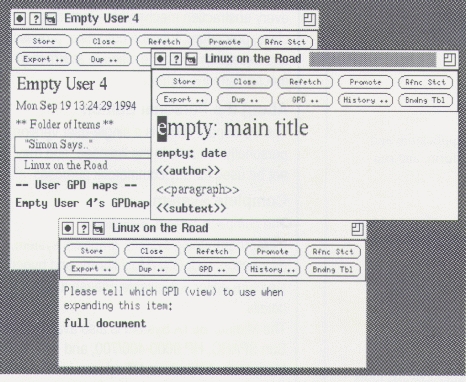
Then, move to “Linux on the Road” and expand it using meta-l meta-e (or control-left-button if you like), yielding the result in Figure 5.
Figure 5. Specify the expansion view
Now, replace the “empty: GPD name” with “full document” which is the name of the view (GPD) we'll use. Expand on the “full document” line, which gives us a full view of the document as shown in Figure 6. (You might need to move out of the line to make the change take effect, before you expand it.)
Now we can start writing using the regular Emacs-like command for editing and the meta-l prefix commands for inserting and deleting structure items.
When the document is getting long, we tend to lose the overview of the different parts—we are no long able to see the forest for all trees. To get a top-level table of contents of our document, “Linux on the Road”, simply:
Select the title of the “Linux on the Road” document.
Press the “Expand ...” button on the command menu.
Select/press the “document contents” in expand menu.
and we should get something like Figure 7.
Now, change the title or author field in one of the windows. Then move out of the field and watch what happens. The change propagates to all other views built from the same content object.
Lastly, we remove the “Help!” item from our home directory. Move to the “Help!” item in “Empty User 4” type meta-l meta-r (for remove closest plural) to remove it.
We must save to the database server to make our changes permanent, since all our editing so far has been done in the client. To save the contents of a window, we only have to press the “Store” button or type control-x, control-s.
In the next article, we will cover in more detail how to define your own views (GPDs) and their different parts (structure, access, expand, format, and auto-links) by building a very small application.
For more information, please send e-mail either to lincks@ida.liu.se or to the author. Bug reports are welcome to lincks-bugs@ida.liu.se. To subscribe to the LINCKS User mailing list, lincks-users@ida.liu.se, send e-mail to lincks-users-request@ida.liu.se, which is handled by a human.
Martin Sjolin is currently pursuing a PhD in the Department of Computer and Information Science, University of Linköping, Sweden, in the field of Artificial Intelligence. He is responsible for support and development of LINCKS, when he is not browsing the net. He enjoys cooking, backpacking, skiing, wind surfing, canoeing and reading, whenever he is not hacking on LINCKS or Linux/Mac!

